Read the full article at AskVG.com
via AskVG https://ift.tt/2RC4Oha
It’s not uncommon to have a cluttered Android home screen as Android automatically adds shortcuts of new apps on the home screen by default. If you are tired of this cluttered home screen and looking to do some spring cleaning, then it might be a good idea to just get rid of all the shortcuts in one go. Removing shortcuts one by one is a tedious task, and even if you need to keep a few shortcuts; you can add them later again.
Today, I will show a simple trick to get rid of all the shortcuts on your Android home screen and start over.
Your phone’s launcher controls the shortcuts on your Android home screen, and as the launcher itself is an app you can reset its data to delete all the shortcuts with a single tap. However, before we reset the launcher app you need to know the exact name of your phone’s launcher as it’s different from phone to phone. Here’s how:
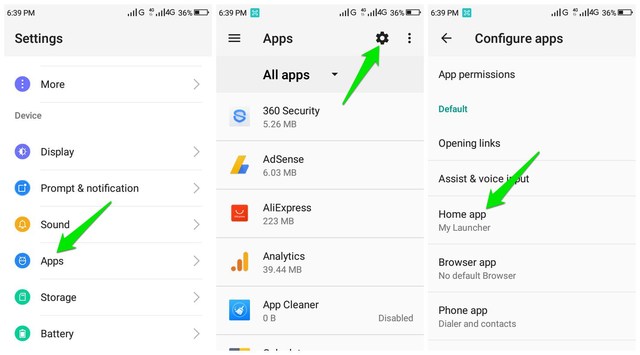
Go to your phone’s “Settings” and tap on “Apps”.
Here tap on the “gear” icon at the top-right corner.
You will find the name of your phone’s launcher under the “Home app” option. In my case, it’s “My Launcher”.
Now that you know the name of your phone’s launcher app, let’s see how to find it and reset it.
Go to the “Apps” section again and from the top-right menu click on “Show system”.
Now scroll through the list of apps to find your phone’s launcher app and open it. The list is alphabetically ordered so you can directly move to the right starting letter.

Here tap on the “Storage” option and then tap on “Clear data”.
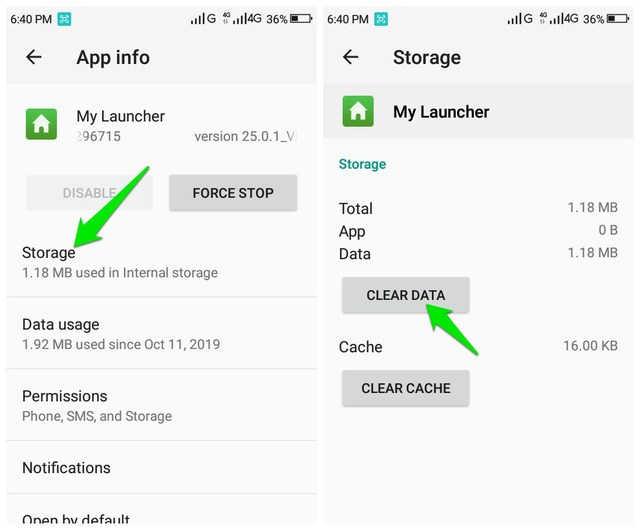
This will delete all the data stored for your phone’s launcher, including home screen shortcuts. However, this will also delete your other launcher related preferences, such as your wallpaper or custom folders, etc.
When you want to start over with a clean home screen, reset the phone launcher is definitely an easy way to clean things up. However, you should avoid using this option if you have lots of custom folders or need to keep many shortcuts on the home screen. Let us know in the comments if you find this little trick useful.
The post Quickly Remove All the Shortcuts on Your Android Home Screen appeared first on Gtricks.


By default, Google Sheets automatically omits any zeros at the start of a number as it only considers numbers with a value. However, not always you would want to enter numbers with a value in the spreadsheet. For example, zip codes, phone numbers and security numbers, etc. can start with zero.
If you are looking to create a Google spreadsheet with numbers starting with zero, then I can help. In this post, I’ll show you two ways to add a zero before a number in Google spreadsheets.
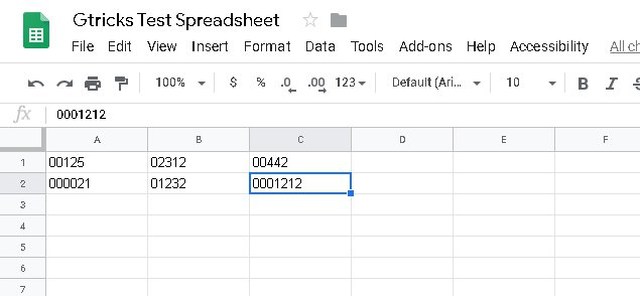
If you don’t need to add a ton of data starting with zero, then this simple trick should solve your problem without needing to change document formatting. All you need to do is add an apostrophe sign (‘) at the start of the number. On most keyboards, the apostrophe (‘) key is found near the “Enter” key.

Once added, move to the next cell and you’ll see that the spreadsheet will not show the apostrophe sign and show the number in full along with zeros. However, when you will edit that cell again, the apostrophe will become visible.

The apostrophe basically tells the cell that data next to it is plain text, so it doesn’t automatically omit zeros from it. When you need to present data, then this trick should work fine. Although for editing a spreadsheet and collaborating with other people, it can create confusion.
If the amount of data is very large that starts with a zero or you simply don’t want an apostrophe in the cell, then you can also change text formatting to plain to achieve the same results. Here’s how:
Click and hold on a cell and then drag to highlight all the cells in which you would be entering the data.

Afterward, click on the “Format” menu and select “Plain text” from the “Number” option.

Now all the data entered in the selected cells will be in plain text and the zeros in the start will not be automatically omitted.
I know it’s quite irritating when the spreadsheet automatically starts removing zeros from the start. However, it’s not spreadsheet’s fault as it has been designed to enter data which usually has some value. I am sure the above two solutions will be sufficient to make sure the zeros are not omitted automatically from the start of a number. If you have any further questions, let us know in the comments below.
The post 2 Easy Ways To Add Zero Before a Number in Google Sheets appeared first on Gtricks.

Citing sources is one of the most important parts of academic writing. And if you are using Google Docs for your academic writing, then you must know how to cite a source in Google Docs. Google Docs actually makes it very easy to cite a source as a footnote in a document. You can search for the source right inside the document and then cite it using MLA, APA or Chicago formats with not more than a few clicks.
In this post, I am going to show you how to add citations in Google Docs in MLA, APA, and Chicago formatting.
The source to cite can be searched inside the Google Docs document, so you just need to click where you want to cite and follow the below instructions:
Click on the “Tools” menu at the top and select “Explore” from it. Alternatively, you can also press Ctrl+Alt+Shift+i keys to directly open it.

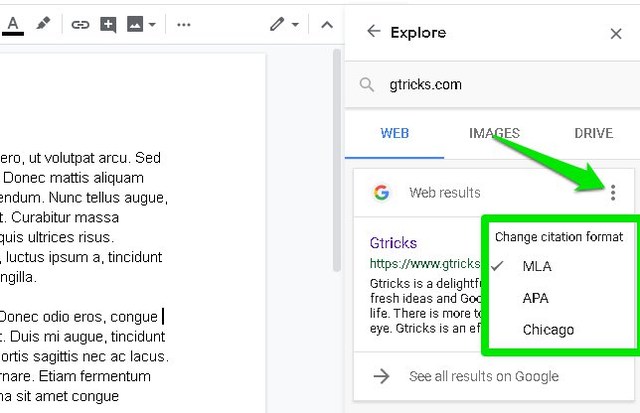
This will open a side panel where you can see topics and images related to the content of the document. You’ll also see a search bar at the top where you can add related keywords to the source or directly enter the URL of the source to find it in Google search.

Once the source page has been found you can click on the three vertical dots menu at the top-right corner to select citation format, including MLA, APA, and Chicago.
Afterward, hover your mouse cursor over the source result and “Cite as footnote” button will appear, click on it.

This will cite that source at the bottom of the page in the footnotes section and add a number in the area where you cited. Do keep in mind that this will add the source in the footnote of the current page, it will not be at the very end of the document.
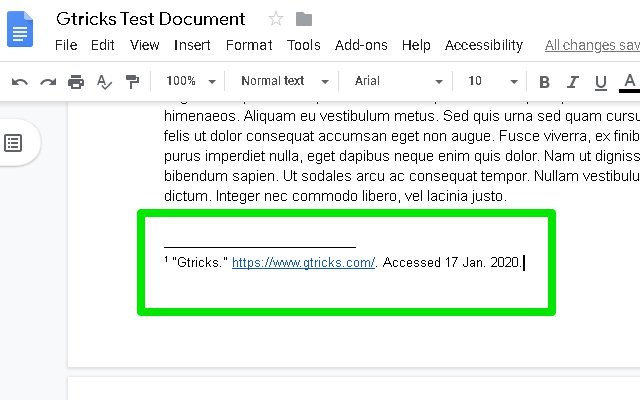
Honestly, Google Docs makes it extremely easy to cite sources in three of the most popular formats. This feature becomes more apparent when you need to cite dozen of sources and all you have to do is search and click to cite with Google Docs. Let us know in the comments if you find this feature useful.
The post How To Easily Add Citations in Google Docs (MLA, APA, and Chicago) appeared first on Gtricks.

Unlike most other document creation tools, Google Docs doesn’t come with a built-in option to apply a border to a page. There is also no third-party Google Docs add-on that provides this functionality. If you are looking to add a border in Google Docs, then you are at the mercy of clunky workarounds.
I know 2 ways to add a border in Google Docs, but of course, these workarounds are limited in functionality and a bit unintuitive as well. Although until Google adds this feature officially, these workarounds should get the job done.
To replicate a border you can use a 1×1 table and make it large enough to look like a border. Afterward, fill it with content and it will look like there is a border around the content. Here’s how to make it work:
1. From the top menu, click on “Insert” and go to “Table” and select a 1×1 table.

2. Now click and hold on the lines of the borders to drag and make it as big you need.
3. To customize, right-click inside the table and click on “Table Properties”.
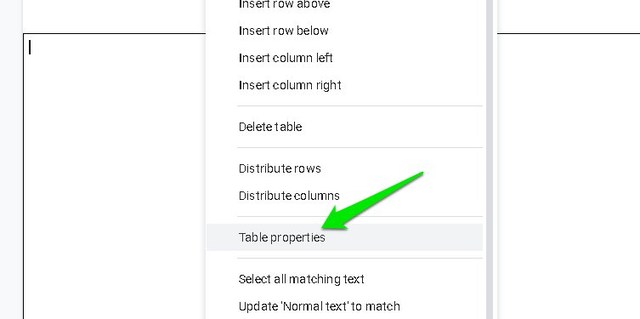
4. Here you can customize border color, line width, and background color, etc.

You can fill the table with content including text and pictures and keep increasing the size of the border as needed.

Google may not have the option to add a full-page border, but it still lets you add a border to a paragraph. You can use this same option to add a border around all of the content in your document. Here’s how:
1. Highlight the content around which you need the border (press Ctrl+A to select all).
2. Now click on the “Format” menu and then click on “Borders and shading” in the “Paragraph styles” option.

3. Here select the first four border lines next to the “Position” option and customize the rest of the options as you need and then click “Apply”.

This will add the customized border around all the selected content. To customize the border, you will need to go to the same “Borders and shading” option again while the content is highlighted.

The first method is definitely more intuitive and it also closes the border when you move to the next page; which makes it look clean. There are some other ways as well, but they are very limited. Such as the drawing tool table, but it is very hard to edit and adding more content is a headache as well. Let us know in the comments if you know any other easier ways to add a border in Google Docs.
The post 2 Simple Ways To Add a Border in Google Docs appeared first on Gtricks.

