Read the full article at AskVG.com
via AskVG https://ift.tt/2QB7c6D
Gmail comes with hundreds of background themes to beautify your interface. Although there are sufficient wallpapers, but if you want to add a little personal touch, then you can add your own custom backgrounds as well. Whether you want to add a wallpaper that isn’t available in the Gmail collection or you want to add your own picture as a background, all can be done.
In today’s post, I am going to show you how to add a custom background in Gmail.
Gmail uses your albums saved in Google photos as background, and interestingly, it doesn’t give you the option to separately upload pictures. Therefore, you must upload your background pictures to Google photos and also create an album, because Gmail only accepts pictures in albums for some reason. So make sure the background Pictures are saved as an album in your Google photos account. if you don’t know how to do it; here is a support page by Google explaining it.
To set the custom background in Gmail, click on the “Gear” icon at the top-right corner and then click on “View all” in the “Theme” section.
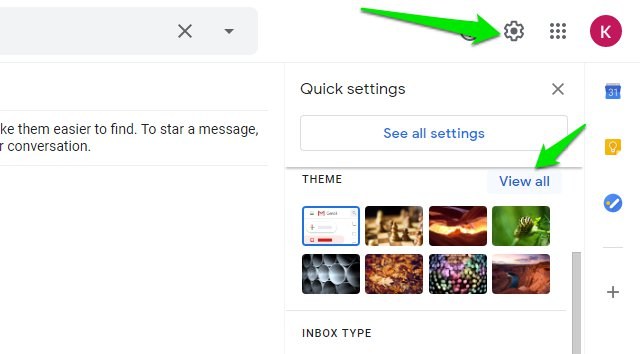
Afterward, click on the “My photos” button at the bottom-left corner.

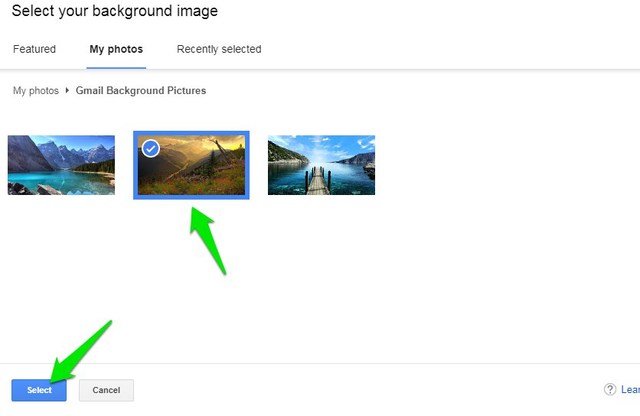
You will see all your albums here, just open the album and choose the background photo and then click on “Select”.
That’s it, the background will be applied and your selected picture will show up in your list of themes.

For the best results, you should use a 2560 x 1920p or higher resolution picture. If the picture will be smaller than this, then Gmail will zoom in and apply the background as it finds fitting.
And just like regular themes, you can also customize your custom background picture from the “Pick your theme” section, such as add vignette or blur the background.
Adding a custom background in Gmail is definitely a great way to personalize your interface. Although, it would have been easier if Gmail would just let us upload a picture and apply it. Creating an album in Google photos is just an extra chore we have to go through.
The post How To Add a Custom Background in Gmail appeared first on Gtricks.


If you forward an email in Gmail, it will show all the connected information like sender email, time, and subject, etc. However, what if you don’t want the recipient to know that you are forwarding the email? Or maybe you don’t want the recipient to know where the email came from.
If it’s only a text email, you can just copy it and compose a new email. Although it will be tough to copy it if it contains graphical content like images, themes and buttons, etc. That is when you can just forward it, but remove all the connected information about the sender. Let’s see how you can forward emails without showing original sender information.
There are basically two types of information that you must remove to make the email look like it’s coming directly from you. First you need to remove the “Forwarded message” section that contains information directly connected to the original sender, such as name and time, etc. And then you should remove the “Subject” of the email as it may give away that the email has been forwarded (not necessarily though). Here’s how:
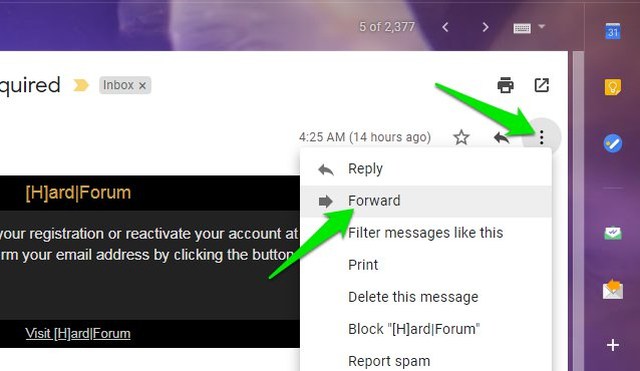
After opening the email, click on the three vertical dots menu on the right side and select “Forward” from it.
A compose window will open below with a “Forwarded message” section at the top. Use the backspace key to remove all information in this section, including the “Forwarded message” heading. You should also remove any empty space created there to make sure the original email starts from the top.

Afterward, click on the “Type of response” button next to “Recipients” and select “Edit subject”.

The email will open in a new compose window and here you can change the subject and add the recipient’s email address to send the email.

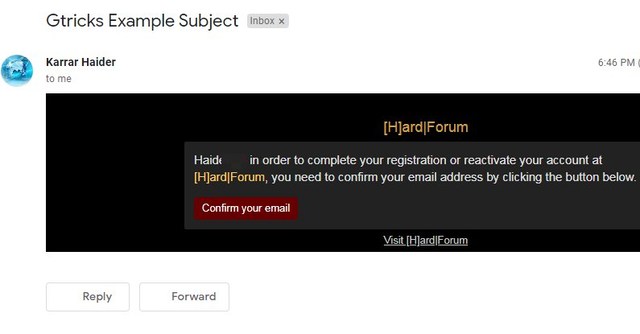
In the below screenshot, you can see that it looks like that email has been sent directly by me. There is no forwarding information anywhere.
I will recommend you to stick with copying text if the email only contains plain text. There is no need to go through 2-3 extra steps just to forward an email without sender information. Although for emails with even slight graphical content, it’s better to forward it like I have instructed above.
The post How To Forward an Email in Gmail Without Showing Original Sender appeared first on Gtricks.

Gmail does an amazing job of keeping spam emails out of your main inbox. Honestly, I don’t remember the last time I received an email in my inbox saying my uncle has left me a million dollars and I just need to click a link to get it. Although, Gmail spam filter is good at dealing with obvious scam emails, but it’s still far from perfect. Occasionally, you will still get a well-written unknown marketing email dropped in your inbox, or an important email going into spam just because it triggered the Gmail spam filter in some way.
Fortunately, Gmail spam filter learns from your behavior, so depending on how you interact with emails, it can manage spam better for you. In this post, I am going to list simple tips that will help you minimize spam in Gmail and also make Gmail spam filter better at catching the spam emails.
Starting with something simple, when Gmail makes the mistake of marking or unmarking a wrong email as spam, you can manually fix the mistake. This is important as Gmail will use this preference to manage your future spam and make the filter better. So if you see a spam email in the inbox, you should mark it as spam to send it to the spam folder and future emails as well. Similarly, if an important email ends up in the spam folder, then you should let Gmail know it’s not spam. Here’s how.
To mark an email as spam in your inbox, click on the select box next to the email to select it and then click on “Report spam” at the top to mark it as spam.

To unmark an email as spam, go to the spam folder and select the email by clicking on the select box next to it. Afterward, click on the “Not spam” button at the top.

The best way to avoiding spam is to stop it from reaching it to your email address in the first place. If you sign up to online websites and services often and/or give your email address on online public pages, then you are bound to receive spam emails. Spammers use multiple techniques to get access to emails and send spam emails. Many shady websites sell your email to these spammers, and spammers can also use software to analyze random pages (especially forums) and look for potential emails.
What you need to do is protect your email address from being publicly available. Only sign up to websites that are trustworthy. If you are in doubt, use a disposable email service to get a fake email and keep your real email address clean. You should also avoid typing your email anywhere the public can see, such as forum posts or comments. If you really need to give your email to someone, then directly message the person. Same goes for social profiles, you should hide your email on social media websites too (if possible).
If you are continuously receiving spam emails from different email addresses, then you can use a third-party tool to bulk unsubscribe from them. There are a bunch of apps for this purpose, but I personally prefer the Unsub Chrome extension. The extension basically creates a filter to move all the emails from a sender to a dedicated label, both current and future emails.
It keeps your inbox clean all the time, and if you ever need to see emails from a specific sender; you can just go to the specific label and see them. If you are interested in using this extension, check out my post on how to use Unsub to bulk unsubscribe emails.
I will also recommend you to go through your spam folder at least once a week as an important email can end up there. Quite often I receive marketing emails in spam folder from companies that I care about, usually because they didn’t get my exclusive consent to receive a newsletter. So keeping an eye on the spam folder is always worth it.
The post Simple Tips To Manage Spam Emails in Gmail appeared first on Gtricks.

Google doesn’t offer a Windows version of the Google authenticator app. However, if you don’t want to rely on your phone for logging in, then there is a workaround to use Google Authenticator on Windows. With the help of a third-party authentication app, you can set up Google Authenticator on your Windows PC.
In today’s post, I will show you how to set up Google authenticator on Windows and validate logins right from your PC.
To use Google Authenticator on Windows, you need to get a secret Google Authenticator code that allows other authentication apps to use Google Authenticator service. You can then enter that code in your preferred authentication app for Windows and use Google Authenticator through it. Follow the below instructions to set it up:
You can get this code right from the security settings of your Google account, here’s how:
Click on this link to the Google account security page and then click on the “2-Step Verification” option in the “Signing in to Google” section.

Provide Google account password and then scroll down and click on “Set Up” under the “Authenticator app” section. This setup is here to verify Google Authenticator on phone, but we will be using it just to get the secret code.

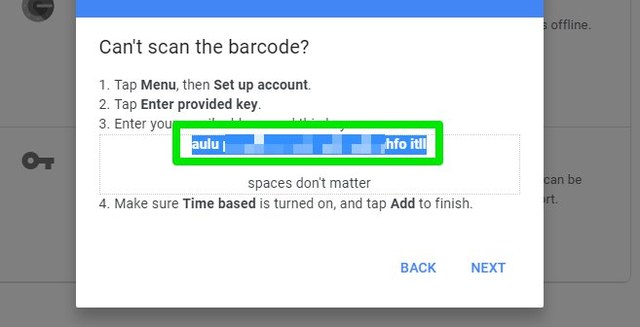
Afterward, click on the “CAN’T SCAN IT” link under the barcode.

Copy the code on the next screen and then you may cancel this setup process.
Keep this code safe, as anyone with this code can access your Google Authenticator.
Now you must use an authentication app compatible with Windows to access your Google Authenticator account through it. There are many apps for this purpose, but I will recommend you to use WinAuth. Apart from being really easy to use, WinAuth is also an open-source app (source). As the app will be managing your extremely sensitive information, you need to make sure it’s trustworthy. And as the app’s code is available to the public, you can trust that no shady business is happening in the background.
After downloading WinAuth, launch it and click on the “Add” button and select “Google” from the list.

Here provide the secret code and click on “Verify Authenticator” and then click on “OK”.

A page will open up with multiple options to tighten up the security of the WinAuth app. You can use a password, restrict device access, or use a Yubikey. I will recommend you to at least use a password to make sure no one can access the app.

That’s it, WinAuth will now show a refreshable Google Authenticator code that you can use to validate your logins.

If you would ever like to remove your Google Authenticator account from the WinAuth app, then right-click on the Google option in the WinAuth app and select “Delete” from the context menu.

Using Google Authenticator on your Windows PC is definitely a convenient way to validate logins without having to access your phone. Although, make sure you add strong protection to the WinAuth app as now a hacker doesn’t need to have access to 2 different devices to access your account. If the hacker gets your account password and access to the unprotected WinAuth app, then he can easily access your account.
The post Guide To Set Up and Use Google Authenticator on Windows appeared first on Gtricks.

