Read the full article at AskVG.com
via AskVG https://ift.tt/2QzUVyE
Spring Boot Webflux DynamoDB Tutorial – Let us integrate AWS DynamoDB with Spring Boot Webflux. In this tutorial will be try to integrate DynamoDB with Webflux in Spring Boot. Instead of using the default AWS Sync Client which blocks the thread, we will use Async client with Webflux.
We are going to create a REST API with basic CRUD operations on a Customer entity. The customer record will be stored in AWS DynamoDB. Also we will use Webflux to connect with DynamoDB.
Let’s start by bootstrapping a new Spring Boot project using start.spring.io. Following project settings were selected in start.spring.io.
Once generated, import the project in your favorite IDE.
Update the build.gradle file as following. We have added awssdk dynamodb 2.10.40 through dependencyManagement. Also not that spring-boot-starter-weblux is on classpath.
build.gradle
plugins {
    id 'org.springframework.boot' version '2.2.2.RELEASE'
    id 'io.spring.dependency-management' version '1.0.8.RELEASE'
    id 'java'
}

group = 'net.viralpatel'
version = '0.0.1-SNAPSHOT'
sourceCompatibility = '11'

repositories {
    mavenCentral()
    maven {
        url 'https://s3-us-west-2.amazonaws.com/dynamodb-local/release'
    }
}

dependencies {
    implementation 'org.springframework.boot:spring-boot-starter-webflux'
    implementation 'software.amazon.awssdk:dynamodb'
    testImplementation('org.springframework.boot:spring-boot-starter-test') {
        exclude group: 'org.junit.vintage', module: 'junit-vintage-engine'
    }
    testImplementation 'io.projectreactor:reactor-test'
}

dependencyManagement {
    imports {
        mavenBom 'software.amazon.awssdk:bom:2.10.40'
    }
}

test {
    useJUnitPlatform()
}
Add following configuration in application.yaml file. We have defined a couple of properties for dynamodb endpoint and table name. Note the endpoint is pointing to our local DynamoDB. In production you might want to change this to point to your AWS region. We can also use Spring profiles to switch the value for this properties in different environment.
application.yaml
application:
dynamodb:
endpoint: http://localhost:8000
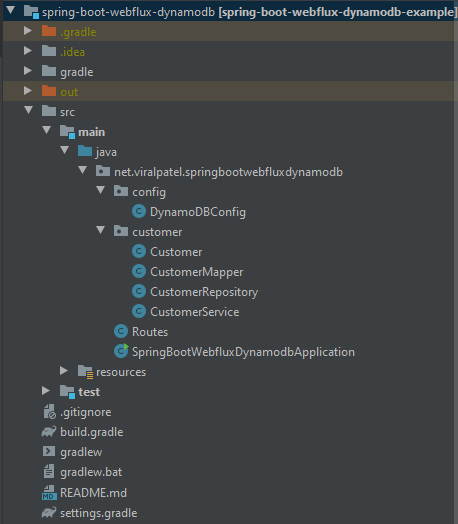
customer_table: customersFollowing is the directory structure for our REST API project. Note that the customer related classes are segregated in a customer package.
Before we proceed with the rest of tutorial, we will setup a local dynamodb instance where we can test our changes. Instead of relying on AWS environment for DynamoDB this would speed up the development process.
We will create customers table in local DynamoDB. Follow the steps at https://ift.tt/375nb2N
java -Djava.library.path=./DynamoDBLocal_lib/
-jar DynamoDBLocal.jaraws dynamodb create-table
--table-name customers
--attribute-definitions AttributeName=customerId,AttributeType=S
--key-schema AttributeName=customerId,KeyType=HASH
--provisioned-throughput ReadCapacityUnits=5,WriteCapacityUnits=5
--endpoint-url http://localhost:8000aws dynamodb list-tables
--endpoint-url http://localhost:8000{
"TableNames": [
"customers"
]
}Let us start by defining the Repository and DynamoDB configuration to access the data from DynamoDB. As noted earlier we will use DynamoDbAsyncClient to access DynamoDB.
The repository class contains basic CRUD methods to maintain Customer entity. Note how we use dynamoDbAsyncClient to access DynamoDB using different GetItemRequest, DeleteItemRequest, ScanRequest APIs. Also we map the return type from DynamoDbAsyncClient which is CompletableFuture to Reactor’s Mono class using Mono.fromCompletionStage.
CustomerRepository.java
package net.viralpatel.springbootwebfluxdynamodb.customer;

import org.springframework.beans.factory.annotation.Value;
import org.springframework.stereotype.Repository;
import reactor.core.publisher.Flux;
import reactor.core.publisher.Mono;
import software.amazon.awssdk.services.dynamodb.DynamoDbAsyncClient;
import software.amazon.awssdk.services.dynamodb.model.*;

import java.util.Map;
import java.util.UUID;

@Repository
public class CustomerRepository {

    private DynamoDbAsyncClient dynamoDbAsyncClient;
    private String customerTable;

    public CustomerRepository(DynamoDbAsyncClient dynamoDbAsyncClient,
                              @Value("${application.dynamodb.customer_table}") String customerTable) {
        this.dynamoDbAsyncClient = dynamoDbAsyncClient;
        this.customerTable = customerTable;
    }

    public Flux<Customer> listCustomers() {

        ScanRequest scanRequest = ScanRequest.builder()
                .tableName(customerTable)
                .build();

        return Mono.fromCompletionStage(dynamoDbAsyncClient.scan(scanRequest))
                .map(scanResponse -> scanResponse.items())
                .map(CustomerMapper::fromList)
                .flatMapMany(Flux::fromIterable);
    }

    public Mono<Customer> createCustomer(Customer customer) {

        customer.setId(UUID.randomUUID().toString());

        PutItemRequest putItemRequest = PutItemRequest.builder()
                .tableName(customerTable)
                .item(CustomerMapper.toMap(customer))
                .build();

        return Mono.fromCompletionStage(dynamoDbAsyncClient.putItem(putItemRequest))
                .map(putItemResponse -> putItemResponse.attributes())
                .map(attributeValueMap -> customer);
    }

    public Mono<String> deleteCustomer(String customerId) {
        DeleteItemRequest deleteItemRequest = DeleteItemRequest.builder()
                .tableName(customerTable)
                .key(Map.of("customerId", AttributeValue.builder().s(customerId).build()))
                .build();

        return Mono.fromCompletionStage(dynamoDbAsyncClient.deleteItem(deleteItemRequest))
                .map(deleteItemResponse -> deleteItemResponse.attributes())
                .map(attributeValueMap -> customerId);
    }

    public Mono<Customer> getCustomer(String customerId) {
        GetItemRequest getItemRequest = GetItemRequest.builder()
                .tableName(customerTable)
                .key(Map.of("customerId", AttributeValue.builder().s(customerId).build()))
                .build();

        return Mono.fromCompletionStage(dynamoDbAsyncClient.getItem(getItemRequest))
                .map(getItemResponse -> getItemResponse.item())
                .map(CustomerMapper::fromMap);
    }

    public Mono<String> updateCustomer(String customerId, Customer customer) {

        customer.setId(customerId);
        PutItemRequest putItemRequest = PutItemRequest.builder()
                .tableName(customerTable)
                .item(CustomerMapper.toMap(customer))
                .build();

        return Mono.fromCompletionStage(dynamoDbAsyncClient.putItem(putItemRequest))
                .map(updateItemResponse -> customerId);
    }
}
In following configuration class we create an instance of DynamoDbAsyncClient. Note how we mapped the endpoint from the application.yaml using Spring @Value annotation.
DynamoDBConfig.java
package net.viralpatel.springbootwebfluxdynamodb.config;

import org.springframework.beans.factory.annotation.Value;
import org.springframework.context.annotation.Bean;
import org.springframework.context.annotation.Configuration;
import software.amazon.awssdk.auth.credentials.DefaultCredentialsProvider;
import software.amazon.awssdk.services.dynamodb.DynamoDbAsyncClient;

import java.net.URI;

@Configuration
public class DynamoDBConfig {

    @Bean
    public DynamoDbAsyncClient dynamoDbAsyncClient(
            @Value("${application.dynamodb.endpoint}") String dynamoDBEndpoint) {
        return DynamoDbAsyncClient.builder()
                .endpointOverride(URI.create(dynamoDBEndpoint))
                .credentialsProvider(DefaultCredentialsProvider.builder().build())
                .build();
    }
}
Below is a utility class to map response from DynamoDB into our Customer entity class and vice versa. It’s just a boilerplate code.
CustomerMapper.java
package net.viralpatel.springbootwebfluxdynamodb.customer;

import software.amazon.awssdk.services.dynamodb.model.AttributeValue;

import java.util.List;
import java.util.Map;
import java.util.stream.Collectors;

public class CustomerMapper {

    public static List<Customer> fromList(List<Map<String, AttributeValue>> items) {
        return items.stream()
                .map(CustomerMapper::fromMap)
                .collect(Collectors.toList());
    }

    public static Customer fromMap(Map<String, AttributeValue> attributeValueMap) {
        Customer customer = new Customer();
        customer.setId(attributeValueMap.get("customerId").s());
        customer.setName(attributeValueMap.get("name").s());
        customer.setEmail(attributeValueMap.get("email").s());
        customer.setCity(attributeValueMap.get("city").s());
        return customer;
    }

    public static Map<String, AttributeValue> toMap(Customer customer) {
        return Map.of(
                "customerId", AttributeValue.builder().s(customer.getId()).build(),
                "name", AttributeValue.builder().s(customer.getName()).build(),
                "email", AttributeValue.builder().s(customer.getEmail()).build(),
                "city", AttributeValue.builder().s(customer.getCity()).build()
        );
    }
}Next we are defining Spring’s Service class to abstract the repository from our routes (controller in old world) layer. Note that we are calling CustomerRepository from the service class and mapping the response into ServerResponse with appropriate Http Status.
CustomerService.java
package net.viralpatel.springbootwebfluxdynamodb.customer;

import org.springframework.stereotype.Service;
import org.springframework.web.reactive.function.BodyInserters;
import org.springframework.web.reactive.function.server.ServerRequest;
import org.springframework.web.reactive.function.server.ServerResponse;
import reactor.core.publisher.Mono;

import java.net.URI;
import java.util.stream.Collectors;

@Service
public class CustomerService {

    private CustomerRepository customerRepository;

    public CustomerService(CustomerRepository customerRepository) {
        this.customerRepository = customerRepository;
    }

    public Mono<ServerResponse> listCustomers(ServerRequest serverRequest) {
        return customerRepository.listCustomers()
                .collect(Collectors.toList())
                .flatMap(customers -> ServerResponse.ok().body(BodyInserters.fromValue(customers)));
    }

    public Mono<ServerResponse> createCustomer(ServerRequest serverRequest) {

        return serverRequest.bodyToMono(Customer.class)
                .flatMap(customer -> customerRepository.createCustomer(customer))
                .flatMap(customer -> ServerResponse.created(URI.create("/customers/" + customer.getId())).build());
    }

    public Mono<ServerResponse> deleteCustomer(ServerRequest serverRequest) {
        String customerId = serverRequest.pathVariable("customerId");

        return customerRepository.deleteCustomer(customerId)
                .flatMap(customer -> ServerResponse.ok().build());
    }

    public Mono<ServerResponse> getCustomer(ServerRequest serverRequest) {
        String customerId = serverRequest.pathVariable("customerId");

        return customerRepository.getCustomer(customerId)
                .flatMap(customer -> ServerResponse.ok().body(BodyInserters.fromValue(customer)));
    }

    public Mono<ServerResponse> updateCustomer(ServerRequest serverRequest) {
        String customerId = serverRequest.pathVariable("customerId");

        return serverRequest.bodyToMono(Customer.class)
                .flatMap(customer -> customerRepository.updateCustomer(customerId, customer))
                .flatMap(customer -> ServerResponse.ok().build());
    }
}Finally we glue everything up using Routes.java. In this class we utilize Spring Webflux RouterFunctions to define the route endpoints for Customer REST API.
We defined a bunch of methods using GET, PUT, POST, DELETE methods in Spring Webflux RouterFunctions and invoked appropriate CustomerService methods.
Routes.java
package net.viralpatel.springbootwebfluxdynamodb;

import net.viralpatel.springbootwebfluxdynamodb.customer.CustomerService;
import org.springframework.context.annotation.Bean;
import org.springframework.context.annotation.Configuration;
import org.springframework.web.reactive.function.server.RouterFunction;
import org.springframework.web.reactive.function.server.ServerResponse;

import static org.springframework.web.reactive.function.server.RequestPredicates.*;
import static org.springframework.web.reactive.function.server.RouterFunctions.route;

@Configuration
public class Routes {

    private CustomerService customerService;

    public Routes(CustomerService customerService) {
        this.customerService = customerService;
    }

    @Bean
    RouterFunction<ServerResponse> customers() {
        return route(GET("/customers"), customerService::listCustomers)
                .andRoute(POST("/customers"), customerService::createCustomer)
                .andRoute(GET("/customers/{customerId}"), customerService::getCustomer)
                .andRoute(PUT("/customers/{customerId}"), customerService::updateCustomer)
                .andRoute(DELETE("/customers/{customerId}"), customerService::deleteCustomer);
    }
}Build and execute the project using Gradle.
./graldew bootRunMake sure your local instance of DynamoDB is up and running and customers table is created before starting the project. If everything is setup correctly, the customer API should be able to communicate with DynamoDB.
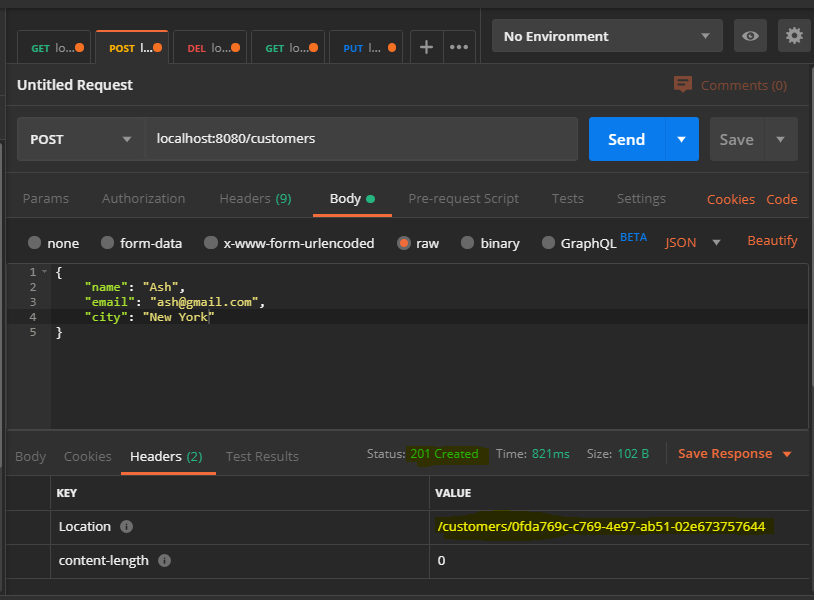
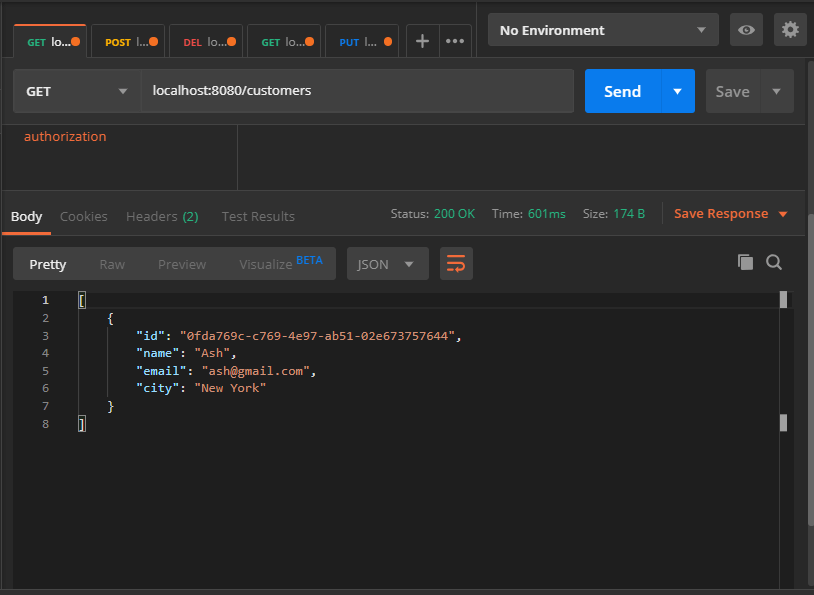
Open Postman and fire up the APIs.
Create new customer
List all customers
Source code of this project is available on Github.
Github – spring-boot-webflux-dynamodb


Although YouTube video creators do have the option to add subtitles to videos, but not every creator uploads one. If you as a viewer would like to see the subtitles of a video or simply need subtitles in a different language, then that’s possible. All you need is the .srt file of the subtitles and a Chrome extension to make it work.
In today’s post, I’ll show you how to add subtitles or closed captions to any YouTube video using Substital Chrome extension.
First, you need to have the .srt subtitle file of the video on which you want to see the subtitles. It’s the standard file format for subtitles and if the video is popular enough then you should be able to find one for it. Just search for your video name and add the word “subtitles” or “srt” in the search to find it.
YouTube natively doesn’t allow viewers to add subtitles (only creators can), but you can get this option with the Substital Chrome extension. The extension allows you to add subtitles to any video online, including YouTube videos.
After installing the Chrome extension, go to the YouTube video on which you want to add subtitles and click on the Substital extension button. The extension will recognize the YouTube video and show you in its interface. Click on it and the Substital extension will apply some new options to the video.

You can either use the search bar above to find the subtitles for your video (searches popular subtitles websites) or upload one if you already have it on your PC. As you already have the .srt file, you just need to grab and drop it in the video interface to apply it. This will immediately apply the subtitles and they will start appearing without any need to restart the video.

You will also see a new Substital button at the bottom of the YouTube player that gives you the option to control the subtitles. Here you can adjust subtitle color, size, transparency, and even synchronize them if needed.

If you need to undo everything, simply refresh the page and the subtitle will be removed and Substital custom options will also not appear on the YouTube player.
I have been using Subsitial for quite a while for adding subtitles to online videos, and it does a fine job of adding subtitles to YouTube videos. Its built-in search feature is also incredible and you can find almost any subtitles in any language as long as it is available online. Did you find this Chrome extension useful for adding subtitles to YouTube videos? Do share your experience in the comments below.
The post How To Add Subtitles to Any YouTube Video appeared first on Gtricks.


YouTube is the biggest video streaming website in the world. However, much of the content uploaded on YouTube doesn’t actually need to have a dedicated video. For example, podcasts don’t have a dedicated video, yet YouTube is loaded with cool and informative podcasts. So if you have an audio file that you would like to publish on YouTube, how can you upload it? Well, the blunt answer is, you can’t because YouTube simply doesn’t accept any audio formats.
However, you can convert that audio file into a video file using a dedicated tool to upload the video on YouTube. And today I am going to show you two ways to upload an Mp3 file to YouTube.
The easiest and completely free method to achieve this is to use an online tool to convert your audio file into a video format and then upload the video to YouTube. The tool will just apply a photo to your audio file that will display as the video plays and change the audio format to your preferred video format.
For this purpose, I will recommend you to use the Mp3toolbox website as it is easy to use and completely free. Here’s how to use it:
Click on the red “Pick MP3” button and select the audio file you want to convert.

After upload, select the video format you want, including FLV, MP4, and AVI.
For the picture, you can either select a white or black watermarked background or upload your own custom image using the “Pick a picture” button.
Now just click on the “Convert MP3 to Video” button to convert your audio file to video.

After conversion, you can download the file to your PC and then upload it to your YouTube channel.
The second method is actually very similar to the first method as far as functionality is concerned. However, in this method, we will be using a dedicated tool that will do all the work and also upload your video on YouTube for you.
Tunestotube is the tool we will be using. You can use it for free to convert and publish audio of up to 50 MB in size, but the tool will add a watermark to each video. You can upgrade to a paid version to remove watermark and increase the audio size limit along with a plethora of more features. Here’s how to use the tool:
Go to the Tunestotube website and click on the “Sign in with Google” button to sign in with your Google account from which you manage your YouTube account.
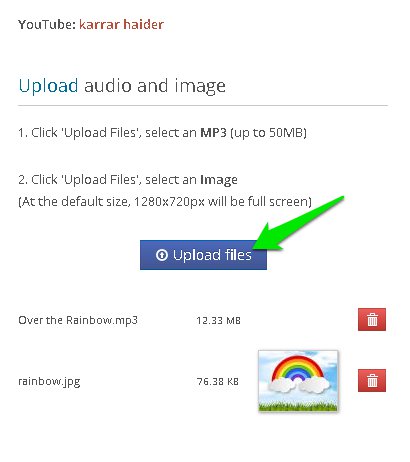
After logging in, click on the “Upload files” button to upload your audio file and you can use the same button to upload the image file.
In the next column, you can provide details about the video, such as the title, descriptions, and tags, etc.

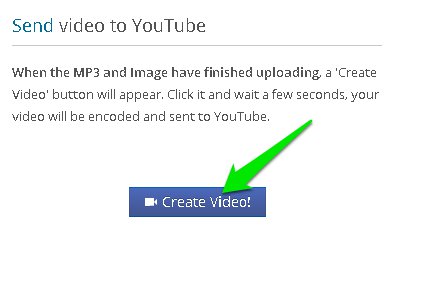
Now just click on the “Create Video” button and the audio file will be converted into a video file and uploaded to your YouTube channel.
The first method is definitely easier and doesn’t require any sign ups or has limitations. However, if you want to frequently upload audio to YouTube than the second method is much faster and the paid upgrade version is worth buying as well. I will also add that if your audio file is not in MP3 format, then you should convert it to MP3 using any audio converter before following the above methods.
The post 2 Easy Ways To Upload Audio Files To YouTube appeared first on Gtricks.
