Read the full article at AskVG.com
via AskVG https://ift.tt/33ffgAO
Chrome is the most used browser on Android devices, and it comes with a built-in adblocker. However, the adblocker of Chrome only blocks ads that are intrusive, such as pop-up ads. If you want to fully block all the ads while browsing the web on your Android phone, then you’ll have to find a different browser.
A quick search on Google Play Store will yield dozens of Android browsers with built-in adblock functionality. But honestly, they all are fairly bad when it comes to other features. Most of them are just chromium-based browsers with an adblocker slapped on them. If you are looking for actually good browsers with a built-in adblocker, then I can help.
Today, I am going to list down 4 Android browsers with a built-in adblocker that also come with great functionality and can easily replace your default browser. All of these browsers have similar adblocking functions, so I am going to focus more on telling you about their other features.
Opera was the first browser to introduce a built-in adblocker on its desktop browser, and it didn’t take them the time to add a comprehensive adblock capability on its Android browser. The main takeaway of Opera is its built-in free unlimited VPN without any ads or intrusions. We all know how difficult it is to get a good VPN, and having one for free is definitely a blessing.

Opera itself has a sleek design with tons of interesting features like the ability to scan barcodes, custom newsfeed, a dedicated download manager, night mode, and much more. It’s also available on both mobile and desktop and you can seamlessly sync data on all devices.
Opera is chromium based, so it shares much of its functionality with Google Chrome. I personally like to call Opera “it’s Chrome with a little bit more”. If Chrome is your default browser, then switching to Opera will be a breeze.
The popular Dolphin browser also has adblock functionality, but you will have to download a separate adblock add-on for it to work. Dolphin browser comes with a built-in flashplayer, which is rare to get as the internet is moving away from flash content. However, if you need to view any flash content like games or videos, then Dolphin will be able to run it.
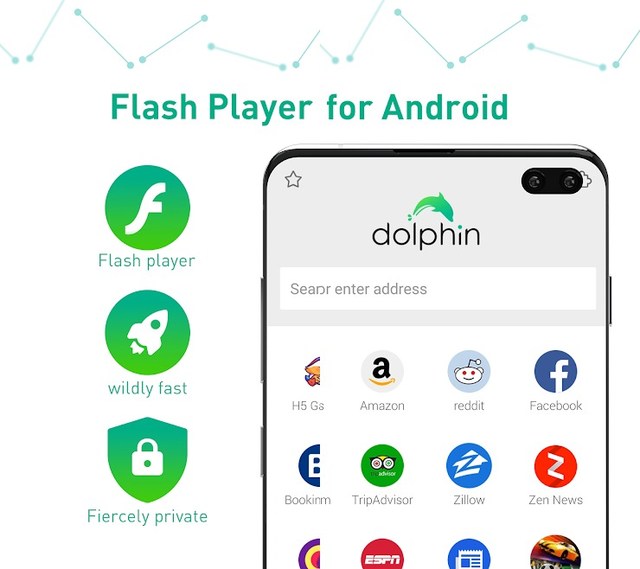
It also has a built-in video downloader to download online videos while browsing, and its quick share functionality makes this just that easier to share on other apps. Best of all, Dolphin has tons of free add-ons to customize the browser as you like.
Pure Browser isn’t very popular, but it’s definitely one of the best browsers on low-end devices. It’s a minimalist browser that focuses on offering only the essential features while making sure it puts the least pressure on your phone. As you must have guessed, the browser comes with an adblocker to keep your browsing experience hassle-free.

The browser itself is very small and works amazingly fast even if you have a low spec phone. Other than the regular browser features, Pure Browser also lets your download videos, use night mode, scan QR codes, save pages for offline viewing, and take screenshots.
The browser founded by the ex-CEO of Opera Browser also has interesting features and a built-in adblocker. Vivaldi is known for its flexible interface that lets you use different themes and change the look of tabs and buttons as you like. Managing tabs is also a breeze using its swipe functionality that lets you quickly skim through dozens of opened tabs.
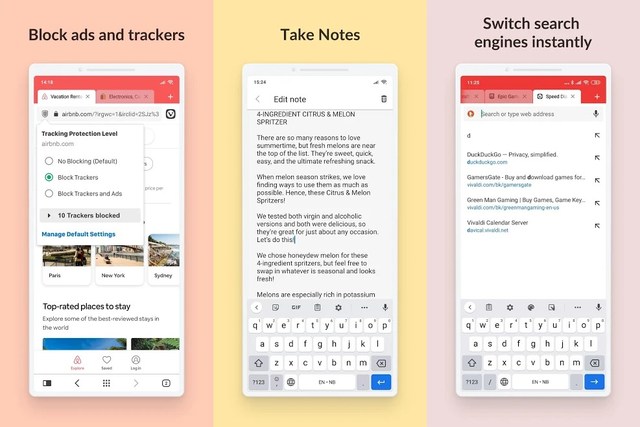
Just like Opera or Chrome, Vivaldi also comes with a secure sync feature that lets you sync data on all your devices and keep it secure with a password. Some of its distinct features include custom speed dials, full-length screenshots, note taker, quick shortcuts to switch search engines, dark mode, and a reader mode.
I personally like Opera as it gives me tons of extra features and works similar to Chrome. However, I might be biased as Opera is my most used browser on the desktop too. I should also mention if you want to stick with Chrome but still want to block all the ads, then you can block ads at the system level. Here’s a post showing how to block ads on all apps in an Android device.
The post 4 Best Android Browsers With Adblocker That Actually Have Good Features appeared first on Gtricks.


Em dash or long dash might be a less popular dash character compared to, say, a hyphen, but when you will have to use it; you won’t find a key on your keyboard. Standard keyboards don’t come with a key to enter an em dash, you will have to use the text program’s built-in tools or use a supported keyboard command.
If you use Google Docs for document creation, then you should know how to make an em dash in Google Docs. In this post, I am going to show you 2 ways to insert an em dash in Google Docs and a bonus method to make it easier to enter em dash when needed.
Google Docs comes with hundreds of special characters, including an em dash. You can use this special characters section to find and insert an em dash. This method is a bit cumbersome, but it works fine if you don’t use em dash often. Here’s how to access it:
Click on the “Insert” menu in the top bar and click on the “Special characters” option in it.

Here in the search bar, type “em dash” and the em dash character will appear in the left panel. Click on the em dash and it will be inserted in the document. You can keep the special characters window open to insert more em dashes if needed.

Another way to enter em dash in Google Docs is to use a keyboard key combination based on your operating system. If you use em dash often while writing, then remembering this combination will be very helpful.
In Windows, you will actually have to use a small code and it will automatically enter an em dash in Google Docs. Simply press and hold the “Alt” key and type “0151” using the numeric pad. Make sure you use the numeric pad as the regular number keys won’t work. As soon as you will type the code and release the “Alt” key, the em dash will be inserted.
In Mac OS X, you can press the keys Option+Shift+ – (hyphen) together and the em dash will be inserted.
Apart from these two methods, you can also create a substitution rule in Google Docs to enter em dash based on a custom shortcut. For example, you can tell Google Docs to enter an em dash wherever you will enter two hyphens (just like Microsoft Word). Here’s how to do it:
Click on the “Tools” menu in the top bar and select “Preferences” from it.

Here move to the “Substitution” section and add the trigger word in the “Replace” section and em dash in the “With” section. Afterward, press the spacebar key to register the substitution rule and click on “OK”.

You can use any trigger word you like, it could be a word or multiple characters. Such as emdash, edsh, — (double hyphen), or em. Most people prefer using double hyphens like this “–” so you might prefer doing that. And to add em dash in the “With” section, just write it down using the keyboard combination or copy it from here ( — ) and paste it there.
Once the trigger word is created, you can just enter it in the document and then press the spacebar key to insert an em dash.
If you don’t use em dash often, then using the special characters tool is the easiest option as you won’t have to memorize anything. Although for regular use, you should memorize the keyboard key combination or create a substitution in Google Docs. I have personally memorized the Alt+0151 combination as it helps me in using em dash in other text processing tools too.
The post 2 Easy Ways To Insert an Em Dash in Google Docs appeared first on Gtricks.

Although Google Docs is one of the best document creation tools, but it doesn’t do much justice when it comes to handling multimedia content. For example, you can’t add and play videos right inside a Google Docs document (there is an alternative though). Similarly, when it comes to images, Google Docs doesn’t let you add captions to add context to the images.
Therefore, yet again we will have to go with a workaround to add captions to images in Google Docs. Keep reading and I will show you two ways to add captions to images in Google Docs.
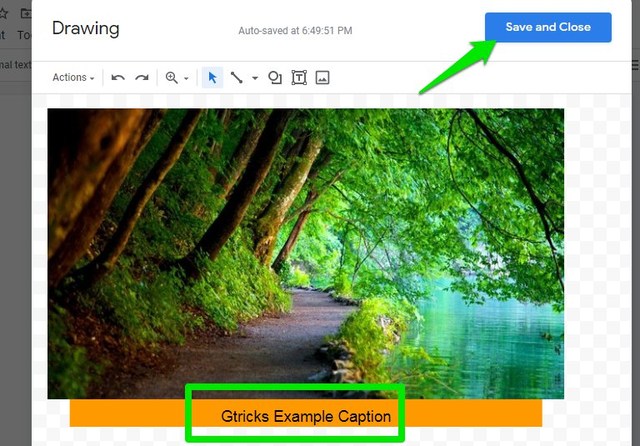
This solution might require a few extra steps, but it’s the best solution for adding captions to images in Google Docs without distorting the text. What you can do is add the image in Google Docs drawing tool and use the text box feature to attach text to the image and make it a single edited image. Follow the below instructions to do it:
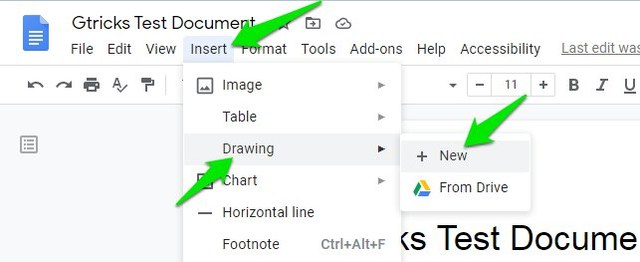
Click on the “Insert” menu at the top and select “New” from the “Drawing” option.
Now either use the “Image” option here to upload the image or copy/paste the image from the document if it’s already uploaded to it.
Afterward, click on the “Text box” button from the top bar and place the box right below the image.
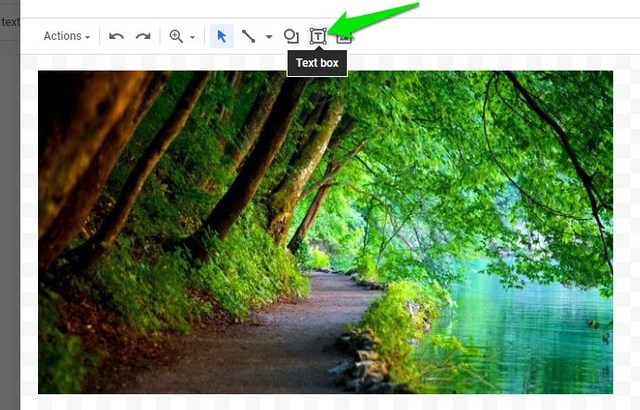
The text box is fully editable, you can adjust size, change box/font color, and even add shapes. Once edited, click on the “Save and Close” button at the top-right corner to insert the image in the document.
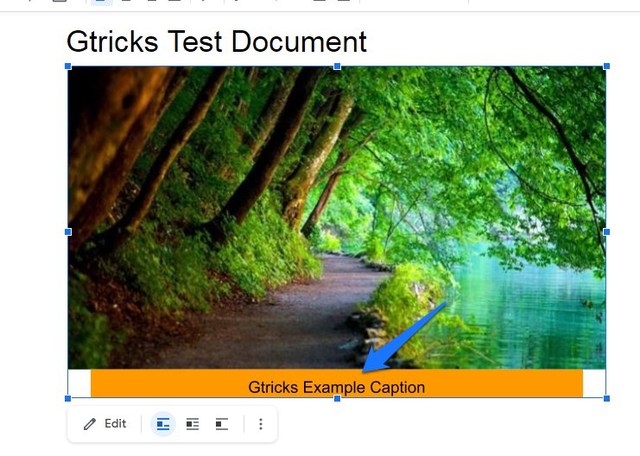
The text will be part of the image and you can edit it any time by double-clicking on the image.
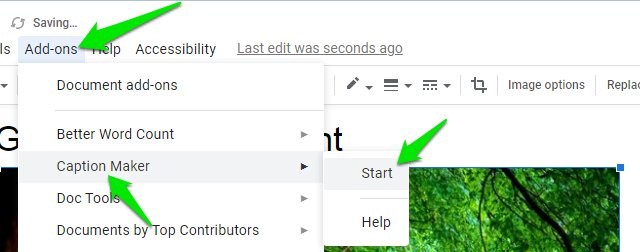
If you want a quicker method, then you can also use a third-party add-on that will add captions in bulk. However, the captions will be separate from the image unlike in the above method. For this purpose, we will be using the Caption Maker add-on for Google Docs. Let’s see how to use it:
Click on the image to select it and then click on “Add-ons” and select “Start” in the “Caption Maker” add-on options.
In the right-side penal, click on “Show options”.
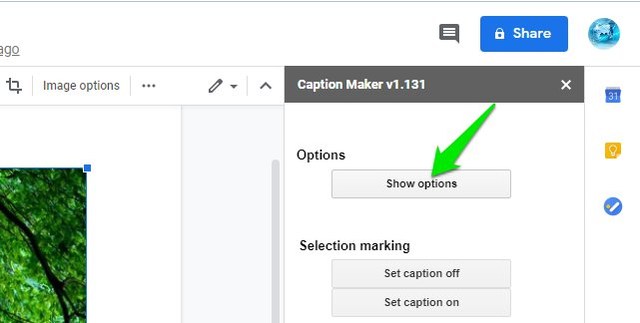
Under the “Images and Drawings” section, type caption text in the “New” field. By default, it is set to add “Figure (image number)”. You can also adjust the caption placement location here.

There are also options to adjust font style, color and size, etc. When you are done, click on “Captionize” to apply the caption.

The caption text will be editable right inside the document and it will be applied to all the images in the document.
I personally find the first method to be most reliable and as it adds clean captions that stick with the image. Of course, it does add a few extra steps, but it’s the only option we have currently. For adding captions in bulk, Caption Maker is definitely worth checking out. Let us know in the comments if you know any other way to add captions in Google Docs images.
The post 2 Ways To Add Captions To Images in Google Docs appeared first on Gtricks.

If you need to work at night often, then that all-white interface of Google Docs is going to strain your eyes for sure. Thankfully, you can get night mode (aka dark mode) in Google Docs that will turn your background dark with light fonts for easier readability. Not only the dark mode is easier on the eyes, but it will also help save your laptop or phone’s battery life.
If you are ready for using night mode while working on Google Docs, then keep reading and I’ll show you how to get it on both Google Docs desktop and Android app.
Google Docs doesn’t offer a built-in way to enable night mode on the desktop. Sure you can make the page color dark and font color light, but it will still be quite bright as all the surrounding interface will stay white. So for Google Docs desktop, you’ll have to use a third-party Chrome extension to get night mode.
Although there are a handful of Chrome extensions that can enable dark mode in Google Docs, but I prefer to use the Google Docs Dark Mode Chrome extension for this purpose. It’s extremely easy to use and gets the job done without any complicating setups.
Just install this Chrome extension and the extension will provide a simple toggle button to enable/disable dark mode, and that’s it. Once enabled, the interface will turn grey/black with white fonts. Although the page will still stay white.

If you need to make things even darker, just turn the page color to a darker one from the page setup option in the File menu.
You can give the Dark Mode Chrome extension a try as well. It’s made to make all the website dark, including Google Docs. It makes the interface dark in a different way, so it’s worth checking out.
Recently, Google introduced dark mode for Google Docs smartphone apps. Therefore, on the Android app you can easily enable night mode right from the Google Docs settings. Here’s how:
Click on the hamburger menu at the top-left corner and select “Settings” from it.
Now tap on “Choose theme” under the “Theme” section and select “Dark” from the list.

That’s it, the whole interface will turn dark with white fonts.
I personally like using Google Docs Dark Mode chrome extension all the time even in the day as it separates the page color from the interface. This helps me focus better on the work in hand, it could be just me though. Although having a dark mode is definitely a great blessing if you need to work in a dark room often, for you and those around you.
The post How To Enable Night Mode In Google Docs For Desktop and Android appeared first on Gtricks.

