Read the full article at AskVG.com
via AskVG https://ift.tt/3ebXfY9
Downloading anything in Chrome is easy, just hit the download button and you’ll find the file in your downloads folder. However, what if you find something to download, but don’t want to download it right away? Maybe the file is too big, and you want to download it at night time. Or maybe you don’t have access to WiFi right now and will prefer to download it when you have access.
If you often get stuck in such a situation, then no need to bookmark download pages or creating reminders. You can now schedule downloads in Chrome and download them later whenever you like. And in this post, I am going to show you how to enable and use this feature.
The schedule downloads is still an experimental feature in the latest Chrome version. It is available as a Chrome flag that you can enable to use the functionality. So first I am going to show you how to enable it.
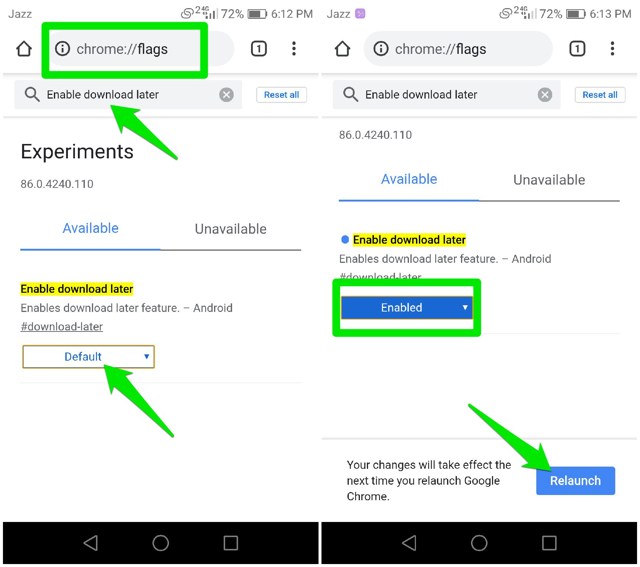
You need to open up the Chrome flags page to access this experimental feature. In the Chrome address bar, type chrome://flags and press Enter.
Here in the search bar, type enable download later to find this experimental feature.
Once found, tap on the “Default” option below and select “Enable” from the list. A “Relaunch” button will show up, tap on it to restart Chrome to let the changes take effect.
Now that you have enabled the feature, go to any downloads page and hit the download button. You will see three options, “Now”, “On Wi-Fi”, and “Select date and time”. Here you can select “On Wi-Fi” to start the download as soon as your phone connects to a WiFi network.
If you want to schedule the download, tap on the “Select date and time” option. A calendar will open up that you can use to select date and time.

Your phone must have access to an internet connection when the scheduled time triggers. Otherwise, the download will begin as soon as you connect to a network even after the scheduled time. You can also freely close the Chrome after scheduling, the download will begin in the background when the time comes.
Scheduling downloads is definitely a needed feature of Chrome and I hope it becomes an official feature of Chrome soon. Many people who depend on third-party download manager apps to schedules download will be able to schedule downloads right inside Chrome.
The post How To Schedule Downloads in Chrome for Android appeared first on Gtricks.


Having trouble installing Chrome extensions isn’t uncommon, every now and then something could interfere in the installation of Chrome extensions. Although I don’t face this issue too often, but last week I had trouble installing Chrome extensions 3 times in a single week. Each time I was slapped with the “Image decode failed” error and no extension was installing.
So today I decided to share all the solutions that have helped me in the past to fix Chrome extensions not installing issue in case other people are facing this issue as well. Let’s get straight to them.
As unrelated as it sounds, this is the solution that actually fixed my problem the last 3 times. For some reason, my ISP (Internet Service Provider) keeps messing with my connection to Google servers; which prevents downloads of extensions. However, a VPN hides my activity from my ISP, so their interference with the connection is also eliminated. So all I had to is start a VPN, refresh the page, and I was able to install the Chrome extension.
You can try the same if your ISP is preventing the installation of Chrome extension or any other network issue is causing this; then a VPN should fix it. Any free VPN should work fine in solving this issue, you don’t need any paid VPN. For me, Hotspot Shield free version did a fine job. You can try any desktop free VPN or even Chrome VPN extension if one is already installed.
If this fixes the issue, then you can try talking to your ISP regarding this blocking. However, I doubt they will be able to fix it if they are purposefully blocking it. I personally haven’t reached out to my ISP yet (bad customer support), so I guess you can give it a try.
There is also a possibility some malware or you accidentally entered the Google server address in the hosts file of your Windows PC to prevent connection. This actually happened to me while I was trying to block ads at host level but ended up adding some important websites, including Google. You can easily view/edit hosts file to make sure Google servers aren’t blocked.
Note: You must have administrator privileges to edit the hosts file, so make sure you are signed in as the administrator on your PC.
Go to the below mention location in Windows. You can paste it in the search bar of explorer too to directly access the folder.
C:\Windows\System32\drivers\etc
Now open up the “hosts” file here using Notepad as the default app. Here look for an entry that starts with “127.0.0.1” and followed by “google.com” in any way. If you find one, simply delete it and save the hosts file. This should fix the problem.

There is also a possibility your Google account might be interfering with the installation. Just log out of your Google account and try installing it again. If this fixes the problem, then it’s probably a temporary bug that should be fixed on re-logging or waiting a bit.
There is a possibility your browser data like cookies or installed extensions might be preventing Chrome extensions from installing. You can disable extensions delete browser data to fix this. Here’s how:
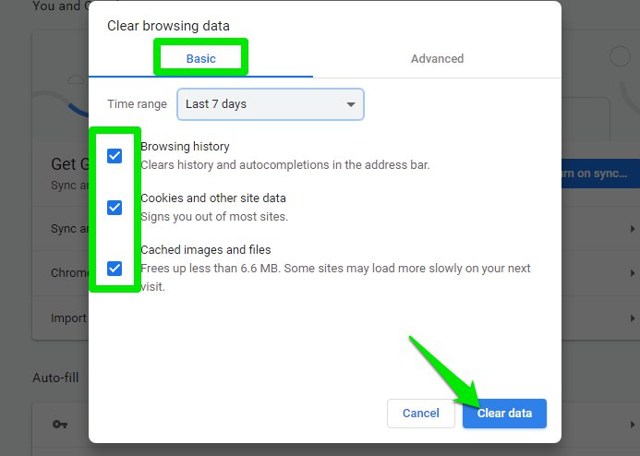
Press the Ctrl+Shift+Delete buttons on the keyboard to open up the “Clear browsing data” window. Here select the time range that is before the extensions were installing fine and make sure all options under the “Basic” tab are select. Afterward, click “Clear data” to delete all the data.
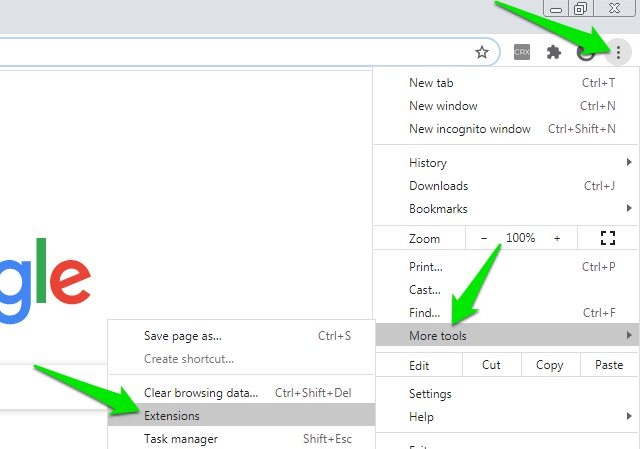
To access Chrome extensions, click on the Chrome main menu and select “Extensions” inside the “More tools” option.
Now click on the toggle button on each extension to disable them.
Once all the extensions are disabled, try installing the Chrome extension again to see if it works.
If this fixes the problem, then you may enable each extension one-by-one to find the culprit and disable it.
If you are still having trouble installing Chrome extensions, then there is also a temporary solution of manually installing Chrome extensions. Instead of letting Chrome install the extension, you can separately download the extension CRX file and install it in Chrome. This might work if something is preventing direct installation. Here’s a complete guide on how to install Chrome extensions manually.
I am sure one of the first 2 solutions should fix your problem of Chrome extensions not installing. Although, if it’s just a browser problem, then the other solutions should fix. If nothing works, you can always reinstall Chrome and start from scratch. Let us know in the comments if you manage to fix the issue using any of these methods.
The post How To Fix Chrome Extensions Not Installing; Image Decode Failed Error appeared first on Gtricks.
