Read the full article at AskVG.com
via AskVG https://ift.tt/37o9xcA
Want to quickly run an Android app on your PC without downloading a heavy PC Android emulator? You can get a tiny Android emulator Chrome extension that should be able to run most of the basic Android apps without trouble. I happen to know the perfect Chrome extension that is easy to use and runs most apps and small games.
Let’s see how you can use this Android emulator to run Android apps in Chrome:
Warning: You should not use an online Android emulator to run apps with confidential information, such as financial accounts. The information inside the emulator can be tracked by a third-party and could lead to accounts being stolen.
The extension I am talking about is Android online emulator, which is completely free but ad-supported. The emulator emulates an Android 8.0 Oreo tablet and comes with all the features a regular Android device comes with. It has internet access and you can navigate the emulator just like an Android device using a mouse and keyboard. You can also login to a Google account and access Google apps, and even download apps and games from the Play Store. Although I will recommend you to not use your personal Google account for security reasons.
If you have APK of an app on your PC, it can also load it to run immediately in the emulator.
Click on the extension button and then click on “Run Android online emulator”.

A new tab will open, here click on “Start” and once the emulator loads, click on “Enter”.

The emulator will load and you should be able to see the home screen in a tablet layout.

You can navigate the emulator using your mouse pointer as a finger. Swipe up to see all the installed apps and access settings to make changes. You can install apps from the Google Play Store after logging in with a Google account.

If you want to run apps using an APK file, then first you need the APK file in your PC. You can download APK files of your favorite apps using Evozi APK downloader. Just copy/paste the app link from Google Play Store in Evozi search bar and it will give you a link to download the APK file.
Afterward, click on the extension button and select “My Apk manager and Apk upload”.

Now click on the “Upload APK” button and select the APK file in your PC.

Once uploaded, you can click on the “RUN APK” button to launch the emulator.

The app will immediately start and you can control it using the mouse. Unfortunately, it doesn’t offer any special keyboard controls to make it easier to use some apps. Although, it should work fine for most apps that don’t require multi-touch functionality.

In my experience, this Android emulator extension is great for basic use to get access to Android apps on your PC and experiment. I would have definitely appreciated some better control options as you find on dedicated PC Android emulators, but I appreciate that it lets you use your physical keyboard to type.
And of course, just like other Android emulators, this emulator can also lag and be slow if your PC doesn’t have enough power.
The post Use This Android Emulator Extension to Run Android Apps in Chrome appeared first on Gtricks.


Java URL Encoder/Decoder Example – In this tutorial we will see how to URL encode/decode attributes in Java.
URL encoding, is a mechanism for encoding information in a Uniform Resource Identifier (URI) under certain circumstances.
When we submit an HTML form using GET or POST request, the data/fields in the form are encoded using application/x-www-form-urlencoded type. There is an optional attribute on <form> element called enctype. Its default value is application/x-www-form-urlencoded. This specification defines how the values are encoded (for e.g. replacing space with +) and decoded on server.
When HTML form data is sent in an HTTP GET request, it is included in the query component of the request URI. When sent in an HTTP POST request, the data is placed in the request body, and application/x-www-form-urlencoded is included in the message’s Content-Type header.
To encode the query parameters or attributes, Java provides a utility class URLEncoder with a couple of encode() methods.
The URLEncoder.encode() method escapes all characters except:
A-Z a-z 0-9 - _ . ! ~ * ' ( )import java.io.UnsupportedEncodingException; import java.net.URLEncoder; import java.nio.charset.StandardCharsets; //.. URLEncoder.encode(plainText, StandardCharsets.UTF_8.toString());In following example, we encode a few plain text strings using URLEncoder.encode.
URLEncoderTest.java
package net.viralpatel; import org.junit.Test; import org.slf4j.Logger; import org.slf4j.LoggerFactory; import java.io.UnsupportedEncodingException; import java.net.URLEncoder; import java.nio.charset.StandardCharsets; public class URLEncoderTest { private static final Logger LOGGER = LoggerFactory.getLogger(URLEncoderTest.class); public static void encode(String plain) throws UnsupportedEncodingException { String encoded = URLEncoder.encode(plain, StandardCharsets.UTF_8.toString()); LOGGER.info("Plain text: {}, Encoded text: {}", plain, encoded); } public void encodeTests() throws UnsupportedEncodingException { encode("john+doe@example.com"); encode("sample text"); encode("+1653-124-23"); } }Run the above test in your favourite IDE and check the output. The plain text is encoded using Java URL Encoder.
Output:
Plain text: john+doe@example.com, Encoded text: john%2Bdoe%40example.com Plain text: sample text, Encoded text: sample+text Plain text: +1653-124-23, Encoded text: %2B1653-124-23Java also provides utility class URLDecoder to decode the value. Usually on server side when we receive the form attributes, using URLDecoder we can decode them to original values.
import java.io.UnsupportedEncodingException; import java.net.URLDecoder; import java.nio.charset.StandardCharsets; //.. URLDecoder.decode(encodedText, StandardCharsets.UTF_8.toString());URLDecoderTest.java
package net.viralpatel; import org.junit.Test; import org.slf4j.Logger; import org.slf4j.LoggerFactory; import java.io.UnsupportedEncodingException; import java.net.URLDecoder; import java.nio.charset.StandardCharsets; public class URLDecoderTest { private static final Logger LOGGER = LoggerFactory.getLogger(URLEncoderTest.class); public static void decode(String encoded) throws UnsupportedEncodingException { String plain = URLDecoder.decode(encoded, StandardCharsets.UTF_8.toString()); LOGGER.info("Encoded text: {}, Plain text: {}", encoded, plain); } public void decodeTests() throws UnsupportedEncodingException { decode("john%2Bdoe%40example.com"); decode("sample+text"); decode("%2B1653-124-23"); } }Run the above test in your favourite IDE and check the output. The encoded text is decoded using Java URL Decoder.
Output:
Encoded text: john%2Bdoe%40example.com, Plain text: john+doe@example.com Encoded text: sample+text, Plain text: sample text Encoded text: %2B1653-124-23, Plain text: +1653-124-23Java provides utility classes URLEncoder and URLDecoder to encode/decode text using URLencoding to transfer data on http. In this tutorial we saw how to use Java URL encoder and decoder.
Download or browse the code on Github.
Github – source code
Further Read: Getting Started with Java 8 Lambda Expression


If you have a sluggish old Android phone or maybe you bought a new budget Android phone that can’t seem to cope with your usage needs, then I might be able to help. I too bought a low-end Android phone two weeks ago and it kept slowing down after mild usage. I tried everything from using battery saver mode to installing booster apps to keep the memory clean, but nothing worked.
So I went a little further and started messing in the developer options, and there I decreased screen resolution a little. Guess what, it solved all the lags and glitches in the phone and it started working smoothly even after long usage. So after some more research, I am here to explain how lowering screen resolution can boost your Android phone’s performance and how to do it.
Screen resolution basically refers to the pixel density on a display. The higher the resolution, the more detailed content you can see. If you will decrease screen resolution, it will decrease pixel density and content will become bigger in size and less content will be visible at a time.
Your phone needs to allocate resources to each pixel on the screen to show content. So if you have lower pixel density, this also means that your phone will have to use fewer resources to show content leading to faster phone speed. Not only you will get a faster phone, the apps that are optimized for the applied lower resolution will also work faster and your phone battery timing will increase as well.
Overall, lower resolution means a phone requiring less power to do its job. And of course, it does have a downside of having less detailed content due to lower resolution. However, in my experience, the difference isn’t very noticeable in regular use if you don’t lower it too much.
Most newer phones have this option available in the display settings of the phone. Just go to the phone “Settings” and tap on the “Display” option. Here tap on “Change screen resolution” and you should be able to see your currently set resolution and available resolutions. Simply choose a lower resolution here and see the magic. For example, if it is set to FHD (1080p) you can set it to HD (720p) to see a performance boost.
If your phone doesn’t have this option available in the display option, then you should be able to do it from the developer options. Developer options must be enabled on your phone first. On most phones, you can do so by tapping 7 times on the “Build number” inside the “About phone” option. Here is a step by step tutorial on how to enable developer options on most Android phones.
Once enabled, go to developer options and scroll down to the “Drawing” section and tap on the “Smallest width” option here. Here the resolution is set as a DP unit, so you will have to experiment a little to find a comfortable resolution. Just scale it down by 20dp and see if you find it better. For example, if it is set to 440dp, then set it to 420dp and see how it goes. You can keep decreasing it to find the right balance.
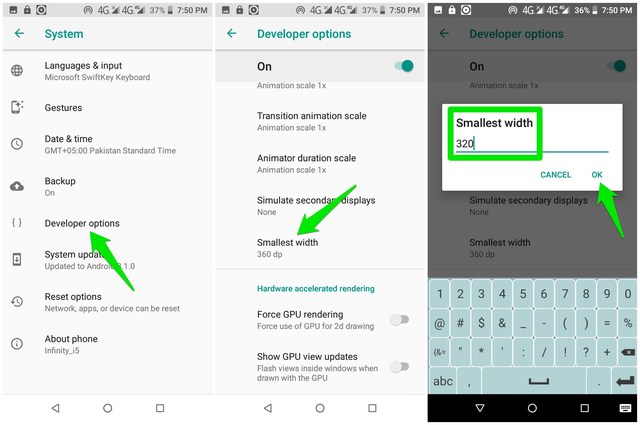
I should also mention that adjusting from developer options also gives you more control over how much you want to decrease the resolution. If you want to lower resolution to as low as 320dp, it can be easily done.
I am personally facing no problems so far while using my phone on a lower resolution than intended. Apart from smooth working, I have noticed a substantial increase in battery timing. Do let us know in the comments if this little trick helps boost your Android phone’s performance.
The post Boost Your Android Phone’s Performance With This Little Trick appeared first on Gtricks.
