How To Add a Reply-To Address in Gmail

By default, any replies to your emails are directly sent to the email that you used to send the email. However, did you know you can change the reply-to address in Gmail to receive replies to a completely different email address from the one you sent the email? This can be very useful if you manage multiple emails but can’t check all of them frequently. You can simply set up a single reply-to address and you will be able to see all the replies in one place.

If you are up for it, then keep reading and I’ll show you how to set up a reply-to address in Gmail.

Add reply-to address in Gmail

You must follow the below instructions on the Gmail desktop version:

Click on the “Gear” icon at the top-right corner of your inbox and select “Settings” from it.
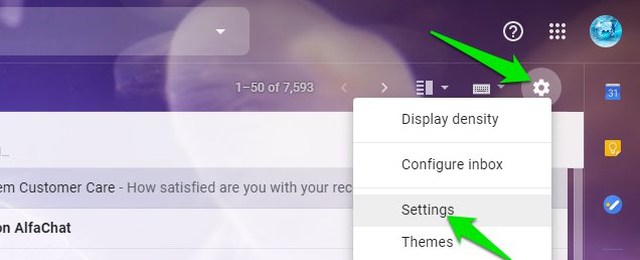
Gmail settings

Now move to the “Accounts and Import” tab.

Accounts and imports

Here, click on the “edit info” link next to your email in the “Send mail as:” section.

edit email info

A new window will open, click on the “Specify a different “reply-to” address” link below your email address and provide the email address where you want the replies. Afterward, click on the “Save Changes” button.
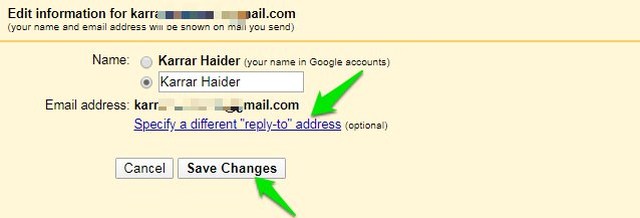
add reply-to address

Now when you will send an email to anyone, their reply will directly go to your reply-to email. Do keep in mind that the recipient will be able to see that the reply is not being sent to the same email as the sender.

If you ever want to undo the changes, simply remove the email address you added in the “edit info” section and click on the “Save Changes” button again.

Ending words

I am sure you will find this feature very helpful for keeping yourself updated with replies from different email addresses. As this doesn’t require any authentication, you can also use this feature to send the reply to a different person if needed. Do let us know in the comments if you found this feature useful.

The post How To Add a Reply-To Address in Gmail appeared first on Gtricks.


via Gtricks https://ift.tt/2T0urbP
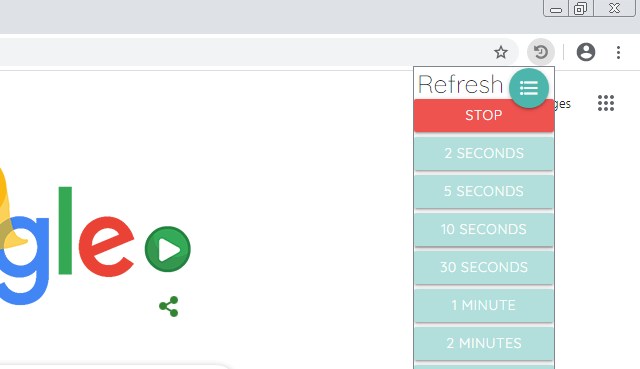
3 Chrome Extensions To Auto Refresh Web Pages

There are many web pages online that are constantly updated so you must refresh the page to see the latest update. For example, forex/news websites are updated every few minutes. Furthermore, refreshing web pages are especially important for nabbing the latest deals on shopping websites before they go away.

If you for some reason need to constantly refresh a web page, then don’t involve yourself in the hassle of manually refreshing web pages yourself. You can install an auto-refresh Chrome extension that will automatically refresh web pages at a fixed interval. Let’s see 3 of the best Chrome extensions to auto-refresh web pages.

1. Super Auto Refresh Plus

Let’s start with something simple that gets the job done flawlessly. Super Auto Refresh Plus has a very minimal interface to quickly set a timer and start refreshing pages. It also shows a countdown timer on the extension button in real-time to know exactly when the web page will refresh. You just need to select from a number of predefined time intervals (up to 60min) and the extension will start the count down immediately.

Super Auto Refresh Plus

A cool option this extension has is the ability to ignore the cache of the web page while reloading (must be enabled from settings). This means the page will reload all the contents without fetching anything from an already saved cache, which can be useful if you notice some page still providing outdated data.

Overall, this is the fastest and the most intuitive web page auto-refresh Chrome extension you can get. However, it comes with its downside of less customizability. Like there is no option to set a custom time interval and there is no predefined time interval above 60min.

2. Auto Refresh Plus

Coming to a bit more customizable auto web page refresh Chrome extension. Auto Refresh Plus offers multiple ways to set the countdown timer. You can select a predefined interval, set your own interval, or simply provide any number of seconds. Just like the above extension, this extension shows a countdown timer right on the extension button.

Auto Refresh Plus

It also has a bunch of more features like auto start refreshing a specific URL whenever opened or refresh a page on a completely different date/day. However, the one feature that I am sure will make you choose this extension over the others is its ability to track keyword changes. Yes, you can provide a keyword on a page, and if it changes after a refresh; the extension will let you know with a sound and a notification.

3. Tab Auto Refresher

Okay, this is a rather bare bone auto refresh extension with little to no extra features (not even an options menu). However, I have chosen to add it to this list for 2 of the features that make it worth it. First, the extension allows you to stop refreshing all the pages with a single button. This is really time-saving when you are refreshing dozens of pages as you won’t have to stop the extension on each one separately.

Tab Auto Refresher

Secondly, the extension ignores any popup windows that can prevent a page from refreshing. Such as popups that ask “Are you sure you want to refresh this page?”. This can be useful if your particular web page brings up a popup when refreshed.

Other than that, the extension lets you provide a custom interval using a text box without any bells and whistles.

Ending words

If you don’t have any special requirements, then I will recommend you to go for Super Auto Refresh Plus. It’s a clean web page auto-refresh extension with a very user-friendly interface and features. However, the other two definitely offer unique features that make them worth getting if you need those specific features. Do let us know in the comments which one of these Chrome extensions to auto-refresh web pages you like.

The post 3 Chrome Extensions To Auto Refresh Web Pages appeared first on Gtricks.


via Gtricks https://ift.tt/2WKhFiz

[Tech Tips] How to Pass Your Time in Covid-19 Pandemic Lockdown

https://ift.tt/eA8V8J We all know that the whole world is suffering from global Covid-19 (Coronavirus) pandemic. Almost all countries are implementing full or...

Read the full article at AskVG.com

via AskVG https://ift.tt/35ImX24

[Tip] Enable HTTPS Only Mode for Websites in Mozilla Firefox

https://ift.tt/eA8V8J This article will help you in enabling HTTPS only mode in Mozilla Firefox web browser to improve security. Now-a-days most of...

Read the full article at AskVG.com

via AskVG https://ift.tt/3fvsopL

Download Windows 10 Insider Preview Build 19619, 19041 and 18363 Offline ISO Files

https://ift.tt/eA8V8J UPDATED on May 06, 2020: Windows 10 Insider Preview build 19619 (Post-20H1 in Fast ring), 19041 (20H1 in Slow ring) and...

Read the full article at AskVG.com

via AskVG https://ift.tt/2p98YOL

[Tip] Enable “Site Specific Browser” (SSB) Mode in Mozilla Firefox

https://ift.tt/eA8V8J In this article, we are going to tell about a hidden secret feature introduced in Mozilla Firefox web browser's newer versions...

Read the full article at AskVG.com

via AskVG https://ift.tt/3b682jy

[Tip] Change Mouse Pointer (Cursor) Color and Size in Windows 10

https://ift.tt/eA8V8J By default, all Windows versions use a Black and White mouse pointer (or cursor). Windows 10 and Windows 8/8.1 use same...

Read the full article at AskVG.com

via AskVG https://ift.tt/2W2nXLp

[Tip] Force Windows 10/11 to Stick With Old Feature Update Version

If you are using Windows 10 or Windows 11 operating system in your computer and you want to force Windows to stay locked on the existing ins...