How To View Photos on a Map in Google Photos

Most of the photos you take are geotagged to know the exact location where the photo was taken. And this information is kept intact when you upload photos to Google Photos, therefore, Google photos know where you have taken those photos. If you have ever wondered you could see all your photos on the world map to see exactly where each photo has been taken, then now it’s possible in Google Photos.

In the recent Google Photos design update, a new Explore Map feature was added where you can view your geotagged photos on a map. In today’s post, I am going to show you how you can access and use this feature to view your photos on a map.

Google Photos map view

This new feature is only available on the Google Photos mobile apps. The desktop version doesn’t support this feature currently, so you will have to use your Android or iOS device to use this feature. And of course, the app must be updated to the latest version that contains this feature. Here’s how to use it:

Open Google Photos app and tap on the “Search” tab at the bottom.

Here you should find the “Explore Map” feature in the second section, tap on it to open it.

This will open a map of your current location with heat patterns on the map where you have taken your photos. Areas where you have taken more photos will be bigger in size and also stronger heat pattern.

Google Photos Explore Map feature

You can tap on a heat patter to open all the photos near that area. Zooming in will help pin point to exact locations where the photos have been taken. You can also scroll through photos and their exact location will update on the map.

View photos on map in Google Photos

Google Photos uses photos metadata, Google location history, and known landmarks in the photos to identify the location. So in most cases, it’s very accurate. However, you may still see some photos with inaccurate location (usually nearby) as GPS may not always work perfectly.

Ending words

Explore Map is definitely a great way to relive your photos using the exact location where the photos were taken. This feature was also one of the most demanded features as iOS already supports this for many years. I am glad Google took the move to add in this feature and honestly, the feature works seamlessly.

What do you think about viewing your photos on a map in Google Photos? Does it really change the way you view your past photos? Let us know your thoughts in the comments below.

The post How To View Photos on a Map in Google Photos appeared first on Gtricks.


via Gtricks https://ift.tt/2OpKcXa

[Tip] How to Defer Feature and Quality Updates in Windows 10

https://ift.tt/eA8V8J This tutorial contains all possible ways to defer feature updates and quality updates in Windows 10 operating system. You can use...

Read the full article at AskVG.com

via AskVG https://ift.tt/32aplyS

[Tip] Enable New Theme or Restore Old Classic UI in Facebook

https://ift.tt/eA8V8J The popular social networking website Facebook has launched a brand new theme or design for its website. The new website design...

Read the full article at AskVG.com

via AskVG https://ift.tt/2OeeMTl

Here’s How To Open Zip Files on Android Using Files By Google App

Unlike Windows, Android doesn’t have a built-in tool to automatically open zip files. Zip files are great for sharing files as it compresses the files and turns them into a single file that can be easily shared. So it isn’t uncommon to stumble upon a zip file on your Android phone that it is unable to open.

No worries though, you can unzip files on Android using the Files by Google app. In this post, I will show you how to use this app to open zip files on Android.

Open zip files on Android

Previously, we had to depend on third-party apps to unzip files on Android. However, since the introduction of Files by Google app which is pre-installed on most Android 8.0+ phones, you can open zip files without installing another app. Even if you have an old phone that doesn’t have Files by Google built-in, you can download Files by Google for free.

Unfortunately, Files by Google doesn’t associate zip files with it by default. So your Android phone will still give an error when trying to open zip files even if Files by Google is pre-installed on your phone. Therefore, you need to unzip files from inside the Files by Google app. Here’s how:

If your phone is running Android 8.0+, then it should have Files by Google installed by default. If not, then download it and launch the app. Now tap on the “Browse” tab at the bottom. If you have downloaded the file on your phone, then it must be in the “Downloads” folder; so tap on it. Otherwise, browse to the location where you have put the file.

Open zip files on Android

Now tap on the file and then tap on the “Extract” option. Once extracted, you’ll get an option to either delete the zip file or keep it. Choose your desired option and tap on “Done”.

Unzip files on Android

That’s it, the files will be unzipped in the same folder where the zipped file is located.

Ending words

Opening zip files isn’t very difficult as long as you have a good app to do so. Previously, I depended on RAR and WinZip apps for this purpose. However, it was quite annoying to deal with ads while unzipping files. Thankfully, Files by Google is a minimal app with no ads and should be preinstalled on your phone anyway.

The post Here’s How To Open Zip Files on Android Using Files By Google App appeared first on Gtricks.


via Gtricks https://ift.tt/2ZQjf49

[Tip] Force Windows 10 to Stay on Existing / Installed Feature Update Version

https://ift.tt/eA8V8J If you are using Windows 10 operating system in your computer and want to force Windows 10 to stay locked on...

Read the full article at AskVG.com

via AskVG https://ift.tt/3gEl9vq

How To Delete All Your Comments On YouTube

If you have a bad history of comments or you just want to delete all your comments and start over, then that’s very possible. Although YouTube doesn’t offer a native way to delete comments in bulk, but there is a little trick that you can use to delete all the comments and replies you have ever made on YouTube.

In this post, I am going to show you how to delete all your comments on YouTube.

Delete all YouTube comments

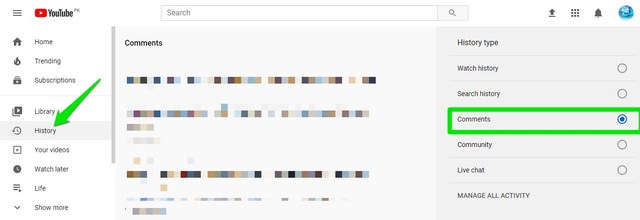
Before we get into deleting all the comments, it’s good to view all your comment history and make sure nothing important is going to get deleted. From the YouTube left-side menu, click on “History” and then select “Comments” from the right panel. This will show you all comments and replies history. You can also individually delete comments here by clicking on the three vertical dots menu next to each comment.

See YouTube comments history

To delete all the comments in one go, you can hide your channel temporarily which will delete all your comments and replies in the process. Once deleted, you can activate your channel again and your deleted comments will not be restored. Here’s how to do it:

From the left-side main menu, click on “Settings”. Afterward, move to the “Advanced settings” section and click on “Delete channel”. You will have to sign-in again.

Delete YouTube channel

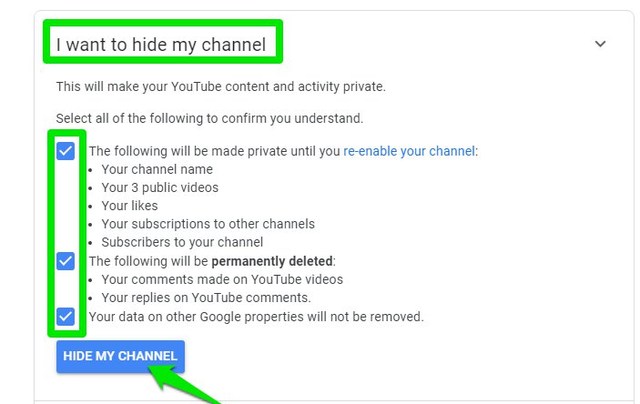
Here click on “I want to hide my channel” and then click on the “Hide My Channel” button after checking all the options.

Hide YouTube channel

This will hide your channel content and delete all the comments. It can take some time to delete all the comments, so to stay on the safe side, you should activate your channel again at least after an hour.

To unhide your channel again, go to Create a channel page, and fill in the details for the hidden channel to activate it again.

Ending words

I really do wish there was an easier way to bulk delete YouTube comments, but for now, we will have to go with this nuke option. If there are important comments in your history, you will have to manually delete them one by one, which isn’t too difficult as YouTube lets you view all the comments in one place.

The post How To Delete All Your Comments On YouTube appeared first on Gtricks.


via Gtricks https://ift.tt/3edWRXo

[Tip] Get Rid of “What’s New” Gift Icon from Mozilla Firefox Toolbar

https://ift.tt/eA8V8J In newer versions of Mozilla Firefox web browser, when you upgrade Firefox to a new version, the browser starts showing a...

Read the full article at AskVG.com

via AskVG https://ift.tt/3gAfaYv

[Tip] Force Windows 10/11 to Stick With Old Feature Update Version

If you are using Windows 10 or Windows 11 operating system in your computer and you want to force Windows to stay locked on the existing ins...