How To Freeze a Row or Column in Google Sheets Desktop and Mobile App

If you need to compare data or need to revisit a set of data often in Google Sheets, then it can be quite cumbersome to scroll back to it every time. Fortunately, Google Sheets lets you lock one or more rows and columns to keep them on-screen even if you scroll to a different section on the sheet.

You can do this on both the desktop and mobile apps of Google Sheets and in this post I will show you how to do it.

Freeze rows and columns in Google Sheets desktop

First, you should know that you can only freeze rows from top to bottom or columns from left to right, you can’t choose rows or columns from the middle. Therefore, all the required data must be in the starting rows/columns of the sheet. Let’s see how you can freeze rows and columns in the Google Sheets desktop version.

Click on the last row (if there is more than one) that you would like to freeze to select it.

Now click on the “View” menu at the top and hover your mouse cursor over the “Freeze” option.

A bunch of options will open to freeze both rows and columns. You can select 1st or 2nd row/column, or all the rows/columns before the row/column you have selected.

Freeze a row or column in Google Sheets desktop

Once the right selection is made, you can scroll and see those rows/columns will stay in view. Furthermore, you can also freeze both rows and columns at the same time and they will all stay in view. A gray line will distinguish between frozen and regular rows/columns.

locked row and column

When you are done, you can unfreeze rows/columns by going to the View > Freeze menu again and selecting “No rows” or “No columns” options.

Freeze rows and columns in Google Sheets Mobile app

On the Google Sheets Android or iOS app, it’s actually even more easy to freeze a row or column. Here’s how:

Open the sheet and tap on the “Sheet” tab at the bottom.

Now scroll down and you will see two options “Freeze rows” and “Freeze columns”. Click on the upward and downward arrow next to them to select the number of rows and columns you want to freeze. A gray line will indicate the selected rows and columns.

Freeze a row or column in Google Sheets mobile

You can decrease or increase the number as needed, and you can unfreeze them by setting the number to 0.

Wrapping up

Locking rows and columns in one place is definitely a great way to keep content in check as you work on the sheet. Although be careful when selecting too many rows or columns to freeze as your screen must have enough space to show both frozen data and regular data. You can always adjust screen size if you really need to select a lot of rows and columns to freeze.

The post How To Freeze a Row or Column in Google Sheets Desktop and Mobile App appeared first on Gtricks.


via Gtricks https://ift.tt/2OJIQql

How To Sign Out of Gmail on Android Without Signing Out of Other Apps

Signing out of Gmail on Android isn’t too difficult, just sign out of the Google account on your phone and you will sign out of Gmail too. However, this also signs you out of other Google apps like Chrome, Play Store, Maps, and Google Assistant, etc. If you only want to sign out of Gmail while staying signed in to other apps, then there is a workaround.

Of course, you can’t actually sign out of Gmail individually, but you can get rid of all the synced emails and prevent new emails from reaching your account. Basically, this will empty your account and keep it like that so it will be similar to signing out.

Sign out of Gmail on Android

Before I tell you how to do it, it’s important to know that your account email will stay logged in and anyone else can interact with it as possible. This also including re-syncing emails to get access to your emails. Therefore, you can only use this workaround to keep your account clean in case you don’t want to see your emails on that phone.

First, you need to disable email syncing for that specific account on your phone. Here’s how:

Go to the phone “Settings” and tap on the “Users & accounts” option here.

Now tap on the Google account for which you want to disable syncing and then tap on “Account sync” on the next page.

Account sync settings

Here from the list, turn off the toggle next to Gmail.

Disable Gmail sync

This will prevent all future emails from automatically syncing to this phone. If you want to get rid of currently stored emails as well, then you will have to delete all the data of the Gmail app. Here’s how:

Go to “Settings” again and tap on “Apps”

Here open up the Gmail app and tap on the “Storage” option.

Now tap on “Clear Data” and confirm the prompt to clear all Gmail data.

Gmail Clear data

This will reset your Gmail app and it will sign in again when you will open the Gmail app. However, there will be no emails in the app. You will get a notification that auto-sync is disabled, but you can dismiss it easily.

Ending thoughts

I know this isn’t a very reliable method to sign out of Gmail, but it should work fine to keep an account clear while you use another one. If you don’t want to use Gmail on your phone at all, then you can also completely disable the Gmail app from the app details section.

If you have any questions, just ask in the comments below.

The post How To Sign Out of Gmail on Android Without Signing Out of Other Apps appeared first on Gtricks.


via Gtricks https://ift.tt/2CRdPOz

[Tip] Having Problems with Your Web Browser? Disable Hardware Acceleration Feature

https://ift.tt/eA8V8J In this article, we are going to share an ultimate solution which should help you in fixing several kind of issues...

Read the full article at AskVG.com

via AskVG https://ift.tt/3jpgJuB

[Tip] Use Minimize to System Tray Feature in Mozilla Thunderbird

https://ift.tt/eA8V8J Minimize to System Tray is an essential feature which should be present in all desktop email client software. Many people prefer...

Read the full article at AskVG.com

via AskVG https://ift.tt/2ZFZg9t

[Tip] Restore Classic and Minimal Full Screen Mode in Microsoft Edge

https://ift.tt/eA8V8J The newer version of Chromium-based Microsoft Edge web browser comes with improved Full Screen mode UI (known as Shy UI). When...

Read the full article at AskVG.com

via AskVG https://ift.tt/2CbYAzP

[Software Update] Mozilla Thunderbird 78.0 Now Available for Download

https://ift.tt/eA8V8J UPDATED on July 17, 2020: Release of Mozilla Thunderbird 78.0 version. Thunderbird is one of the best and most popular Desktop...

Read the full article at AskVG.com

via AskVG https://ift.tt/2nmHuDW

Why You Should Hide Chat and Meet Sections in Gmail And How To Do It

Google recently introduced Google Chat and Google Meet replacing Hangouts as the enterprise video conferencing and chat solution. Just like Hangouts, Chat and Meet also reside in the left sidebar of Gmail taking considerable space. However, not all people will find these services useful. If you are like me and only use Gmail for email, then these features taking up extra space in your sidebar must be annoying you too.

Thankfully, it’s actually really easy to hide both Chat and Meet features right inside Gmail and it’s actually beneficial to do it. Today, I will show you how to hide both Chat and Meet sections in the Gmail sidebar.

Benefits of hiding Chat and Meet sections

Before I tell you how to hide Chat and Meet from Gmail sidebar, I am going to tell you the benefits you will get for hiding them. Personally, I have found two benefits that make it really worth hiding both of these features if you are not using them.

First, it opens up more space to view other labels that are hidden in the “More” button. Usually, the labels under the “More” button open as a scrollable window. However, after hiding Chat and Meet, it fully opens up in its place which makes it very easy to navigate without having to scroll.

Secondly, Gmail uses less system resources to run. From my very rough estimation, Gmail uses approximately 60,000KBs less resources after hiding both of these features. This is almost 25% less load on your system and makes Gmail a bit smooth on older systems. If you are low on system resources, then hiding Chat and Meet is a great solution.

How to hide Chat and Meet in Gmail

With the addition of these features, Google also added a new tab in the settings to control these features. You can hide both of these features from there. Here’s how:

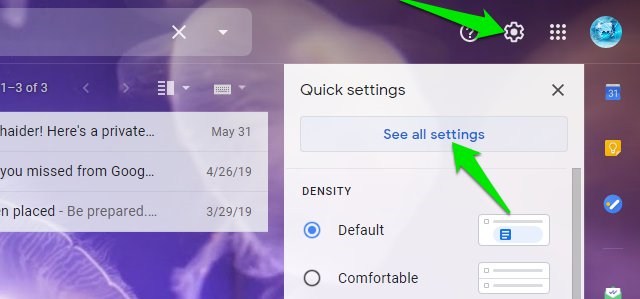
From the main Gmail interface, click on the “Gear” icon at the top-right corner and select “See all settings” option from it.

See all settings in Gmail

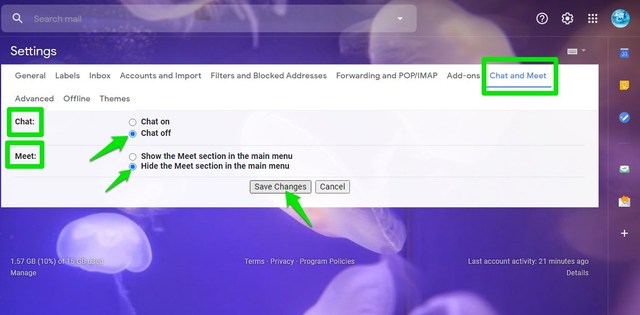
Now move to the “Chat and Meet” tab. Here select “Chat off” in the Chat section and “Hide the Meet section in the main menu” in the Meet section. Afterward, click on “Save changes” to apply the changes.

Hide Chat and Meet in Gmail

Gmail will refresh again and move you to the main interface where both Chat and Meet sections will be removed from the sidebar.

Ending words

Do keep in mind that these changes will only hide Chat and Meet in the Gmail interface. You can still fully use both of these services by going to their respective websites, Chat and Meet. And if you ever like to get back any of these features in the Gmail interface, then follow the same instructions to undo the changes and enable them.

The post Why You Should Hide Chat and Meet Sections in Gmail And How To Do It appeared first on Gtricks.


via Gtricks https://ift.tt/3h4wJQx

[Changelog] What’s New in Microsoft Edge 130 and Later Versions

UPDATE: Addition of Microsoft Edge 132.0 version. In this exclusive changelog article, we are providing information about all versions of Mi...