Read the full article at AskVG.com
via AskVG https://ift.tt/3gVPAxR
I have always used the default Gmail inbox style where your social and promotional emails are separate from your other emails. However, recently I switched to the priority inbox style and it has completely changed the way I interact with emails. Previously, I didn’t even open the social and promotions tab usually and missed many interesting emails, but now everything that matters to me stays in front of me.
If you also want to stay on top of emails that are most important to you, then you should switch to priority inbox style. In this post, I will show you how to enable priority inbox in Gmail and how it can help you organize your emails.
Before I tell you how to enable priority inbox, let’s see how it can help. Priority inbox basically creates a single inbox with multiple sections that you can scroll through. By default, it shows your important and unread emails in the first section, starred emails in the second, and everything else in the third section.
You can check his Google support page to learn how Gmail decides which email is important to you. And with the help of this smart algorithm, Gmail will always show you the most important unread emails on top; this includes all emails from promotions, social, direct, and other emails. And the less important emails are listed at the bottom in case you want to check them out.
The main takeaway is that it shows important emails from all the emails. Therefore, it will show you direct emails, promotional emails, social updates, and forum updates that Gmail thinks are important to you in one place. For example, it will show you a promotional email that interests you, which you might have missed if it stayed in the Promotions section. Furthermore, it also sorts by most important emails first, so if you receive dozens of emails daily, then you will handle the most important ones first.
Overall, the job of priority inbox style is to help you deal with the most important emails first and then the rest.
If you are ready to switch to priority inbox, then below are the instructions to enable it on the Gmail desktop version:
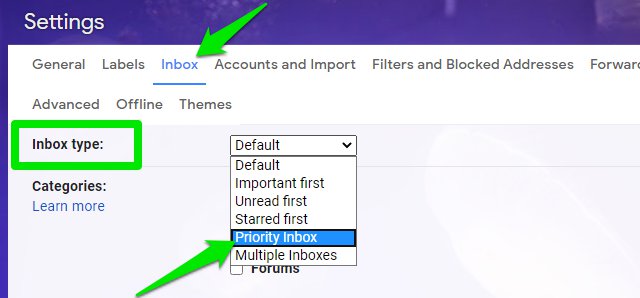
Click on the “Gear” icon at the top-right corner and then click on the “See all settings” button.

Here move to the “Inbox” tab and select “Priority Inbox” from the drop-down menu next to the “Inbox Type” option.
There will be three sections selected by default, Important and unread, Starred, and Everything else. There is an option to add another section as well if you want.
You can click on the “Options” button next to any section to manage things like the total number of emails or type of email.
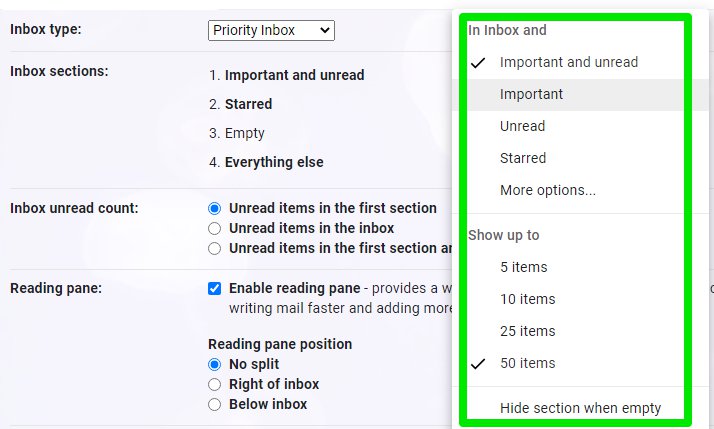
Now click on the “Save Changes” button at the bottom and the priority inbox will be created with all your important emails at the top.
Tip: I have personally replaced the “Starred” section with the “Important” section as I don’t use the starred feature often. The “Important” section shows important emails that you have already read, so it helps me keep even read important emails in front of me. Although, I have decreased the number of emails to 10 only. You can also completely remove the “Important and unread” section to see both read and unread important emails at the top.
Priority inbox on Gmail Android or iOS app is a little different. It doesn’t have any customization options like manually selecting the email type or the number of emails. It also shows both read and un-read important emails, and you can’t change that behavior. Here’s how to enable priority inbox in Gmail mobile app.
Tap on the main menu button at the top-left corner and select “Settings” from it.
Now tap on your email account, and then tap on “Inbox type” and select “Priority Inbox” from it.
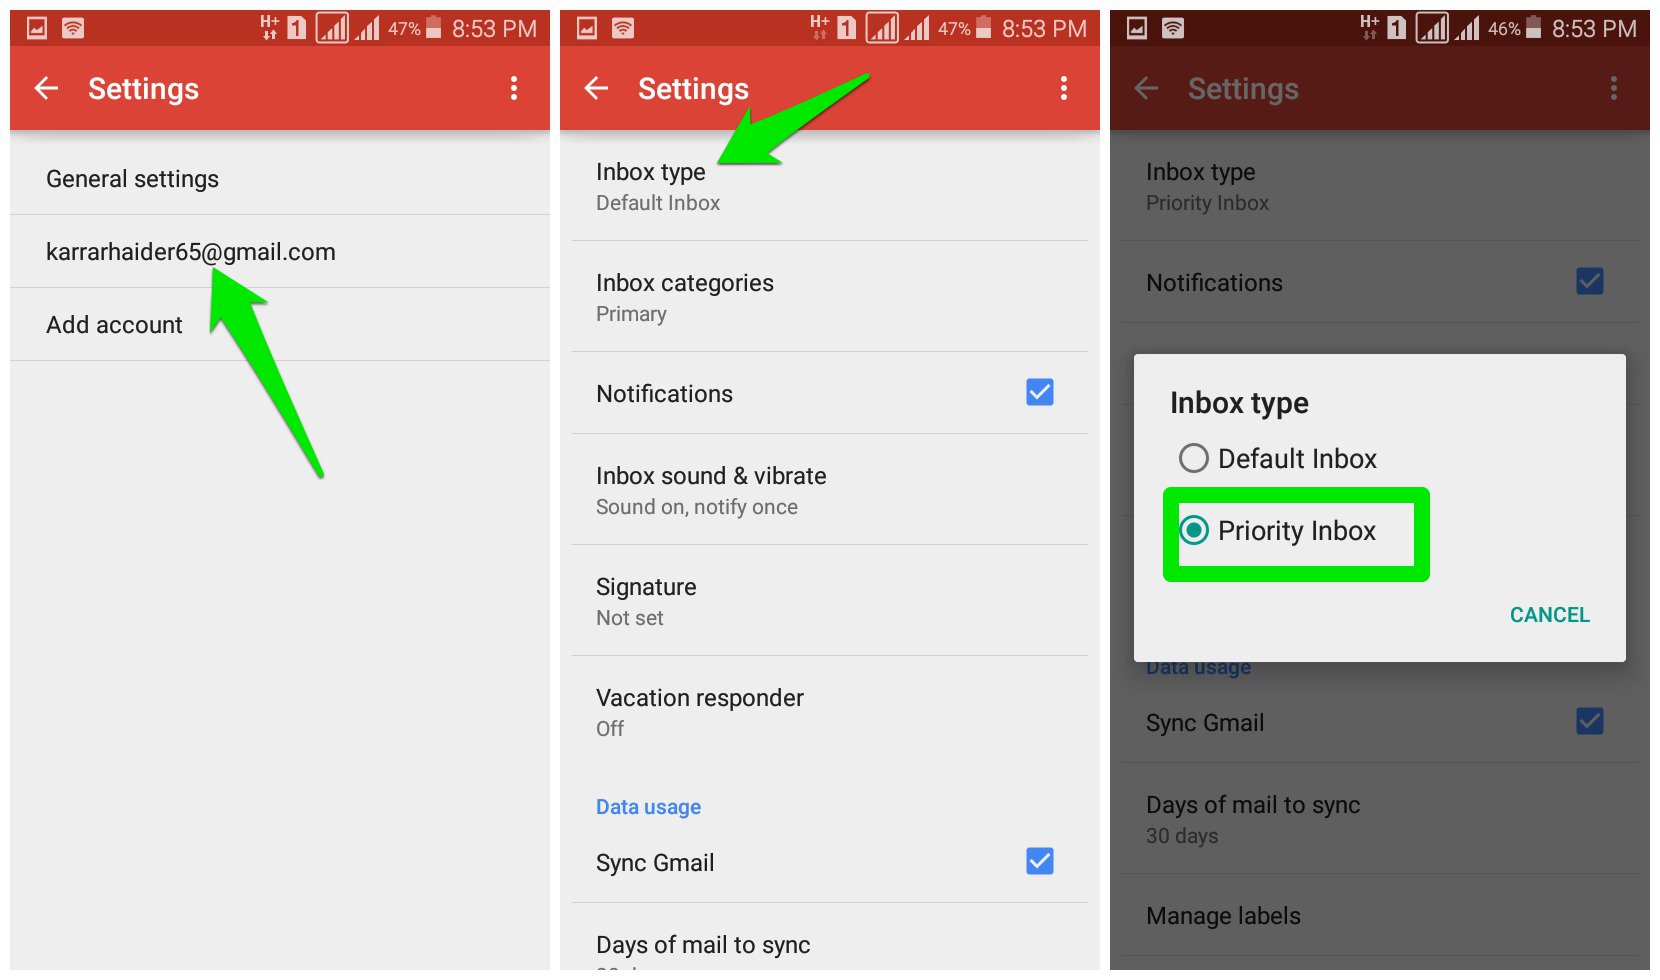
Afterward, both your regular inbox and priority inbox will be accessible from the main menu.
I know that you will wonder “what if Gmail makes a mistake and doesn’t show me an email from a friend because It doesn’t think it’s important”. Don’t worry, the Gmail algorithm is very good at managing priority, so a 50% discount on your favorite product will never take priority over a work document your colleague has shared.
What are your thoughts on using switching to priority inbox? Do let us know in the comments below.
The post Organize Gmail Inbox to Always Show What Matters to You The Most appeared first on Gtricks.


YouTube default behavior is to automatically adjust video quality based on your internet connection speed. For example, if you are playing YouTube videos on the mobile network at peak time, then you’ll be part of the infamous 360p club. Although a stable wired connection should keep you above 720p.
However, what if you always want to play videos on YouTube in a specific quality? Say, you don’t mind waiting a little to let 1080p video buffer and then play, or maybe always play videos at 360p to save internet data. Whatever your reasoning may be, it’s possible to set default video quality on YouTube with the help of a Chrome extension. Let’s see how to do it.
YouTube used to let users set default video quality, but not anymore. Therefore, we will have to use a third-party Chrome extension that will automatically load videos in your specified quality. Although there are many extensions for this purpose, but I found Auto HD for YouTube to be the most reliable. It’s really simple to use and lets you select up to 4320p quality.
Just install the extension and click on the extension button. You will see a big list of all the YouTube supported resolutions from 144p to 4320p. Just click on the one you want to set as default and all your next videos will open at the specified video quality.

Of course, if a video doesn’t support the quality you have selected, then it will play at the next highest quality available instead. Furthermore, I also noticed that the extension sometimes didn’t work immediately. If you notice it not applying the selected video quality, then play 2-3 different videos and it will start using the new changes.
I personally use this extension to always play YouTube videos at 720p as my internet can easily handle it but YouTube still plays videos at 320p or 480p, I don’t know why. If you ever feel like letting YouTube handle the video quality again, you can select the “Auto” option in the extension. Do let us know in the comments if you found this extension useful.
The post Here’s How To Set Default Video Quality On YouTube appeared first on Gtricks.
