Read the full article at AskVG.com
via AskVG https://ift.tt/2YgXryt
Google doesn’t offer a Windows version of the Google authenticator app. However, if you don’t want to rely on your phone for logging in, then there is a workaround to use Google Authenticator on Windows. With the help of a third-party authentication app, you can set up Google Authenticator on your Windows PC.
In today’s post, I will show you how to set up Google authenticator on Windows and validate logins right from your PC.
To use Google Authenticator on Windows, you need to get a secret Google Authenticator code that allows other authentication apps to use Google Authenticator service. You can then enter that code in your preferred authentication app for Windows and use Google Authenticator through it. Follow the below instructions to set it up:
You can get this code right from the security settings of your Google account, here’s how:
Click on this link to the Google account security page and then click on the “2-Step Verification” option in the “Signing in to Google” section.

Provide Google account password and then scroll down and click on “Set Up” under the “Authenticator app” section. This setup is here to verify Google Authenticator on phone, but we will be using it just to get the secret code.

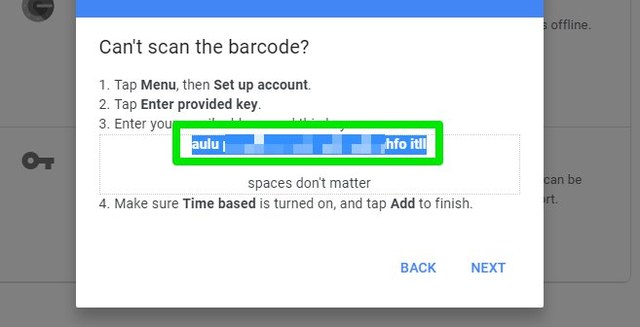
Afterward, click on the “CAN’T SCAN IT” link under the barcode.

Copy the code on the next screen and then you may cancel this setup process.
Keep this code safe, as anyone with this code can access your Google Authenticator.
Now you must use an authentication app compatible with Windows to access your Google Authenticator account through it. There are many apps for this purpose, but I will recommend you to use WinAuth. Apart from being really easy to use, WinAuth is also an open-source app (source). As the app will be managing your extremely sensitive information, you need to make sure it’s trustworthy. And as the app’s code is available to the public, you can trust that no shady business is happening in the background.
After downloading WinAuth, launch it and click on the “Add” button and select “Google” from the list.

Here provide the secret code and click on “Verify Authenticator” and then click on “OK”.

A page will open up with multiple options to tighten up the security of the WinAuth app. You can use a password, restrict device access, or use a Yubikey. I will recommend you to at least use a password to make sure no one can access the app.

That’s it, WinAuth will now show a refreshable Google Authenticator code that you can use to validate your logins.

If you would ever like to remove your Google Authenticator account from the WinAuth app, then right-click on the Google option in the WinAuth app and select “Delete” from the context menu.

Using Google Authenticator on your Windows PC is definitely a convenient way to validate logins without having to access your phone. Although, make sure you add strong protection to the WinAuth app as now a hacker doesn’t need to have access to 2 different devices to access your account. If the hacker gets your account password and access to the unprotected WinAuth app, then he can easily access your account.
The post Guide To Set Up and Use Google Authenticator on Windows appeared first on Gtricks.


I have always used the default Gmail inbox style where your social and promotional emails are separate from your other emails. However, recently I switched to the priority inbox style and it has completely changed the way I interact with emails. Previously, I didn’t even open the social and promotions tab usually and missed many interesting emails, but now everything that matters to me stays in front of me.
If you also want to stay on top of emails that are most important to you, then you should switch to priority inbox style. In this post, I will show you how to enable priority inbox in Gmail and how it can help you organize your emails.
Before I tell you how to enable priority inbox, let’s see how it can help. Priority inbox basically creates a single inbox with multiple sections that you can scroll through. By default, it shows your important and unread emails in the first section, starred emails in the second, and everything else in the third section.
You can check his Google support page to learn how Gmail decides which email is important to you. And with the help of this smart algorithm, Gmail will always show you the most important unread emails on top; this includes all emails from promotions, social, direct, and other emails. And the less important emails are listed at the bottom in case you want to check them out.
The main takeaway is that it shows important emails from all the emails. Therefore, it will show you direct emails, promotional emails, social updates, and forum updates that Gmail thinks are important to you in one place. For example, it will show you a promotional email that interests you, which you might have missed if it stayed in the Promotions section. Furthermore, it also sorts by most important emails first, so if you receive dozens of emails daily, then you will handle the most important ones first.
Overall, the job of priority inbox style is to help you deal with the most important emails first and then the rest.
If you are ready to switch to priority inbox, then below are the instructions to enable it on the Gmail desktop version:
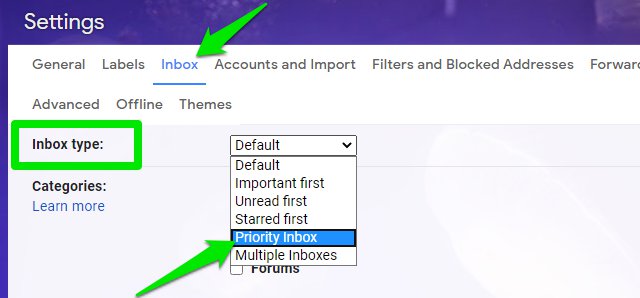
Click on the “Gear” icon at the top-right corner and then click on the “See all settings” button.

Here move to the “Inbox” tab and select “Priority Inbox” from the drop-down menu next to the “Inbox Type” option.
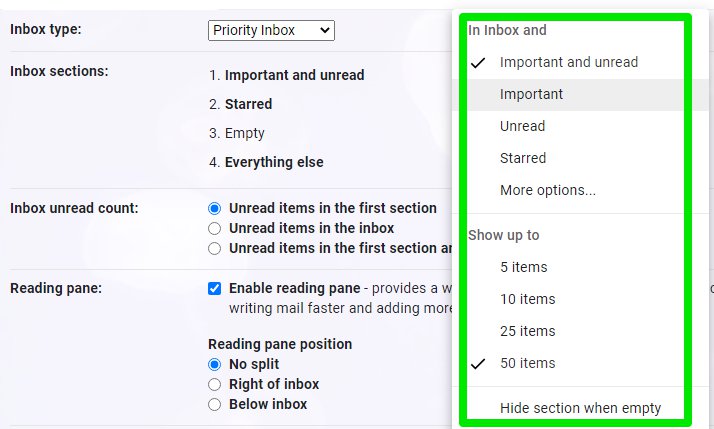
There will be three sections selected by default, Important and unread, Starred, and Everything else. There is an option to add another section as well if you want.
You can click on the “Options” button next to any section to manage things like the total number of emails or type of email.
Now click on the “Save Changes” button at the bottom and the priority inbox will be created with all your important emails at the top.
Tip: I have personally replaced the “Starred” section with the “Important” section as I don’t use the starred feature often. The “Important” section shows important emails that you have already read, so it helps me keep even read important emails in front of me. Although, I have decreased the number of emails to 10 only. You can also completely remove the “Important and unread” section to see both read and unread important emails at the top.
Priority inbox on Gmail Android or iOS app is a little different. It doesn’t have any customization options like manually selecting the email type or the number of emails. It also shows both read and un-read important emails, and you can’t change that behavior. Here’s how to enable priority inbox in Gmail mobile app.
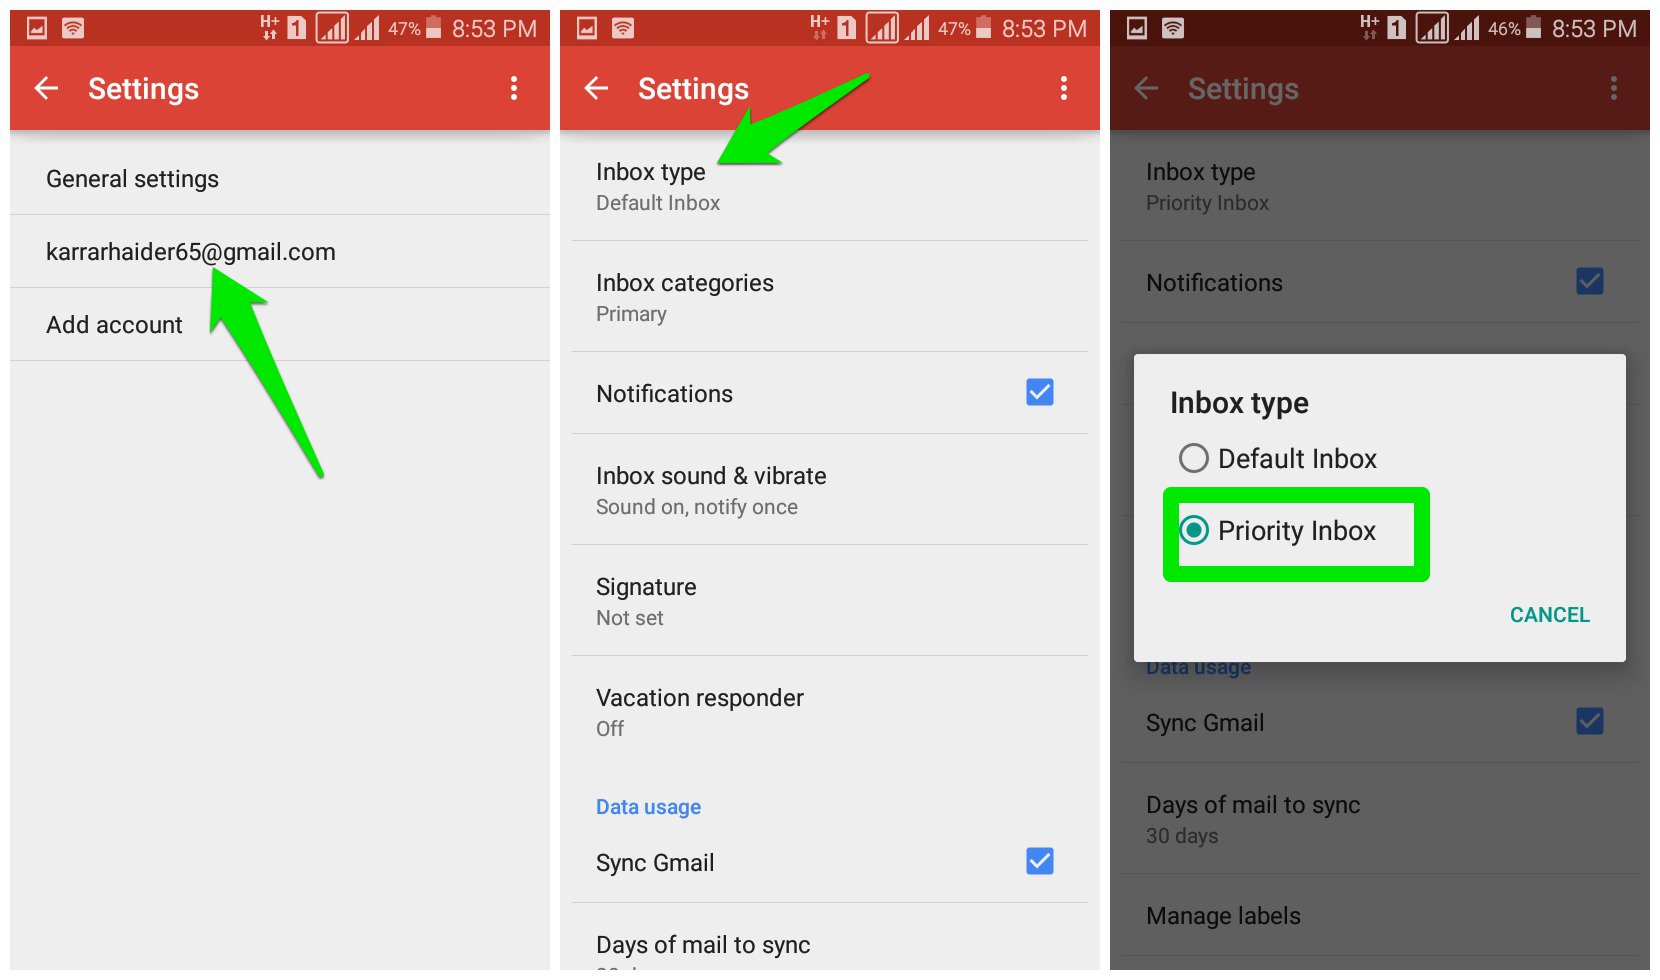
Tap on the main menu button at the top-left corner and select “Settings” from it.
Now tap on your email account, and then tap on “Inbox type” and select “Priority Inbox” from it.
Afterward, both your regular inbox and priority inbox will be accessible from the main menu.
I know that you will wonder “what if Gmail makes a mistake and doesn’t show me an email from a friend because It doesn’t think it’s important”. Don’t worry, the Gmail algorithm is very good at managing priority, so a 50% discount on your favorite product will never take priority over a work document your colleague has shared.
What are your thoughts on using switching to priority inbox? Do let us know in the comments below.
The post Organize Gmail Inbox to Always Show What Matters to You The Most appeared first on Gtricks.

