Use This Video Speed Controller Extension To Control Video Speed in Chrome

If you stream videos often, then you must know how important it is to speed up or slow down videos. For example, if you are watching a tutorial, then speeding it down can make it very easy to follow it. Similarly, when you need to quickly go through familiar instructions without skipping anything, then speeding up videos can be very productive.

Even though popular video streaming websites like YouTube have a built-in controller to control video speed, still many websites don’t support video speed controls. And this is where a Chrome extension can help you get access to video speed controllers on any video online even if the streaming website doesn’t support it. In this post, I am going to show you how you can use this Chrome extension to get speed controls on all videos.

Introducing Video Speed Controller

Video Speed Controller is a Chrome extension that adds small overlay buttons at the top-left corner of the video player to control video speed. It works with all HTML5 video players, which most of the streaming websites support today. You can even use it to control the playback of the video and easily rewind or forward it using custom intervals.

One thing I really like about this extension is that it is very customizable. You can easily customize speed and playback speed intervals according to your need. For example, if you want the speed to increase by 30% with each click, then it can be adjusted in the settings.

How to use Video Speed Controller

As I said before, the extension ads overlay buttons on the video you are viewing. It will be a small button that will show current speed and will expand to reveal more buttons when you click on it. You can click the double arrow buttons to rewind/forward the videos, and click the minus/plus buttons to increase/decrease video speed.

Video Speed Controller overlay buttons

Now if you want to access the customization options of the extension, then click on the extension button and select “Settings” from it. In the first section, you can assign shortcut keys to the functions and increase/decrease the change interval for each function. And there is more than just speed and playback control shortcuts here. Here you can also assign shortcuts to reset speed, default speed, mute, pause, or even move to a set duration in the video.

Video Speed Controller shortcuts

In the second section, you can make basic changes like hide controller, controller opacity, audio controls, and set default playback speed. However, the more interesting feature here is the ability to create a list of websites on which the extension will not work. If there are some websites that offer better video speed controls or don’t work well with the extension, then you may add them to this list to disable the extension on them.

Video Speed Controller whitelist websites

To conclude

Video Speed Controller is definitely a very useful Chrome extension if you need to speed up or slow down videos often. I would say it is better to use it even on websites like YouTube as it offers easier access to video speed controls. The ability to adjust how much speed should decrease/increase is also a great incentive.

If you found this extension to control video speed useful, do share your experience in the comments below.

The post Use This Video Speed Controller Extension To Control Video Speed in Chrome appeared first on Gtricks.


via Gtricks https://ift.tt/2YIwRh1
Understanding New Windows 10 Insiders Channels: Dev, Beta and Release Preview

https://ift.tt/eA8V8J SUMMARY: Previous Windows 10 Insiders channels or rings (i.e. Fast Ring & Skip Ahead, Slow Ring and Release Preview Ring) have...

Read the full article at AskVG.com

via AskVG https://ift.tt/3e7QfKX

2 Of The Best Chrome Extensions To Clear Cache and Other Data

Chrome comes with built-in settings to clear cache and other data like history and cookies. However, if you need to frequently delete browser data, then going through different menus every time can be cumbersome. This is where a Chrome extension to clear data can help. By providing you a single button to quickly clear data using custom rules can make things a whole lot easier.

I am going to share 2 of the best chrome extensions to clear cache and data. Although both of these extensions do a fine job of clearing data, but you might prefer one over the other for its features and UI.

Super History & Cache Cleaner

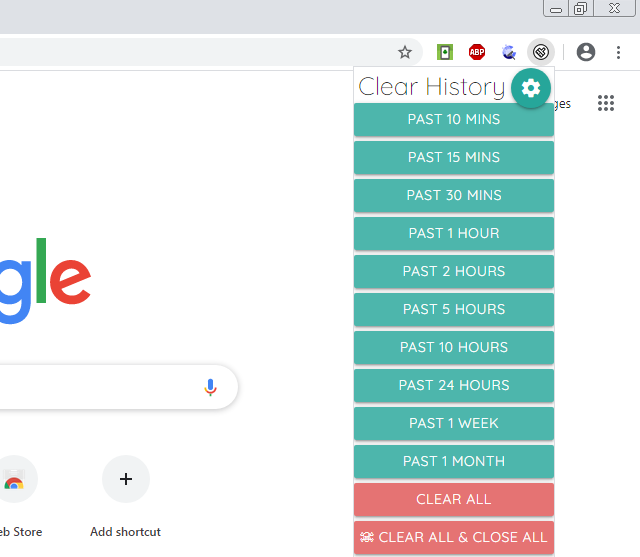
If you want something simple and fast, then this extension is the one you are looking for. It doesn’t come with any extra features, but you can clear cache and other data with a single click based on time period. Clicking on the extension button will show a list of time periods that you can click to clear data from that particular time period.

Super History & Cache Cleaner interface

You can click on the gear icon to access settings where you can decide which data will be deleted when a time-stamped button is clicked. Some of the data you can delete include web cache, history, cookies, passwords, form data, indexed data, plugin data, and webSQL data. Just enable the toggle next to the data type you want to be deleted when you click the time-stamped buttons.

Super History & Cache Cleaner interface options

Furthermore, there is also a “Clear All” button that will clear all the browser data regardless of your choice in the settings. And there is even a panic button to delete all the browser data and close the browser. The browser will close immediately and the data will be deleted afterward.

Clean Guru

Clean Guru takes a little different approach of clearing data and gives you the option to select the type of data right from the extension button. There is a drop-down menu to select the time period from which you want to delete data. Then just click on the “Clear” button and confirm the prompt to delete the data.

CleanGuru interface

You can click on the gear icon to open the settings page and there you can select data type which would be deleted. Clean Guru lets you delete as much data as the above extension, but it goes a step further by letting you whitelist specific cookies to ensure important cookies are not deleted.

CleanGuru Options

It also lets you add a floating button on every tab at the bottom-right corner to quickly delete data without even accessing the extension button. And there is also an option to reload the current tab when the data is deleted to make sure it’s updated with the changes.

Ending words

I should mention that unlike Clean Guru, Super History & Cache Cleaner doesn’t show any prompt before deleting data. This might be good for quickly clearing cache and data, but it can be a problem if you accidentally click the clear button. That said, I believe Super History & Cache Cleaner will be more intuitive for most users as it makes a one-click clear process very easy.

The post 2 Of The Best Chrome Extensions To Clear Cache and Other Data appeared first on Gtricks.


via Gtricks https://ift.tt/2B6XfJE

Hidden Secret Hotkey to Reset Task Manager to Default Settings in Windows 10

https://ift.tt/eA8V8J In this article, we'll tell you how to reset or restore Task Manager tool to default factory settings in Windows 10....

Read the full article at AskVG.com

via AskVG https://ift.tt/37o9xcA

Use This Android Emulator Extension to Run Android Apps in Chrome

Want to quickly run an Android app on your PC without downloading a heavy PC Android emulator? You can get a tiny Android emulator Chrome extension that should be able to run most of the basic Android apps without trouble. I happen to know the perfect Chrome extension that is easy to use and runs most apps and small games.

Let’s see how you can use this Android emulator to run Android apps in Chrome:

Warning: You should not use an online Android emulator to run apps with confidential information, such as financial accounts. The information inside the emulator can be tracked by a third-party and could lead to accounts being stolen.

Introducing Android online emulator

The extension I am talking about is Android online emulator, which is completely free but ad-supported. The emulator emulates an Android 8.0 Oreo tablet and comes with all the features a regular Android device comes with. It has internet access and you can navigate the emulator just like an Android device using a mouse and keyboard. You can also login to a Google account and access Google apps, and even download apps and games from the Play Store. Although I will recommend you to not use your personal Google account for security reasons.

If you have APK of an app on your PC, it can also load it to run immediately in the emulator.

How to use Android online emulator

Click on the extension button and then click on “Run Android online emulator”.

Android emulator Chrome extension

A new tab will open, here click on “Start” and once the emulator loads, click on “Enter”.

Open emulator

The emulator will load and you should be able to see the home screen in a tablet layout.

Emulator home screen

You can navigate the emulator using your mouse pointer as a finger. Swipe up to see all the installed apps and access settings to make changes. You can install apps from the Google Play Store after logging in with a Google account.

emulator apps

If you want to run apps using an APK file, then first you need the APK file in your PC. You can download APK files of your favorite apps using Evozi APK downloader. Just copy/paste the app link from Google Play Store in Evozi search bar and it will give you a link to download the APK file.

Afterward, click on the extension button and select “My Apk manager and Apk upload”.

APK uploader

Now click on the “Upload APK” button and select the APK file in your PC.

Upload APK

Once uploaded, you can click on the “RUN APK” button to launch the emulator.

Run APK

The app will immediately start and you can control it using the mouse. Unfortunately, it doesn’t offer any special keyboard controls to make it easier to use some apps. Although, it should work fine for most apps that don’t require multi-touch functionality.

Opened APK

Ending thoughts 

In my experience, this Android emulator extension is great for basic use to get access to Android apps on your PC and experiment. I would have definitely appreciated some better control options as you find on dedicated PC Android emulators, but I appreciate that it lets you use your physical keyboard to type.

And of course, just like other Android emulators, this emulator can also lag and be slow if your PC doesn’t have enough power.

The post Use This Android Emulator Extension to Run Android Apps in Chrome appeared first on Gtricks.


via Gtricks https://ift.tt/2ztsFJK

Java URL Encoder/Decoder Example

Java URL Encoder Decoder Example

Java URL Encoder/Decoder Example – In this tutorial we will see how to URL encode/decode attributes in Java.

Overview

URL encoding, is a mechanism for encoding information in a Uniform Resource Identifier (URI) under certain circumstances.

When we submit an HTML form using GET or POST request, the data/fields in the form are encoded using application/x-www-form-urlencoded type. There is an optional attribute on <form> element called enctype. Its default value is application/x-www-form-urlencoded. This specification defines how the values are encoded (for e.g. replacing space with +) and decoded on server.

When HTML form data is sent in an HTTP GET request, it is included in the query component of the request URI. When sent in an HTTP POST request, the data is placed in the request body, and application/x-www-form-urlencoded is included in the message’s Content-Type header.

Encode URL in Java

To encode the query parameters or attributes, Java provides a utility class URLEncoder with a couple of encode() methods.

The URLEncoder.encode() method escapes all characters except:


A-Z a-z 0-9 - _ . ! ~ * ' ( )

import java.io.UnsupportedEncodingException; import java.net.URLEncoder; import java.nio.charset.StandardCharsets; //.. URLEncoder.encode(plainText, StandardCharsets.UTF_8.toString());

In following example, we encode a few plain text strings using URLEncoder.encode.

URLEncoderTest.java


package net.viralpatel; import org.junit.Test; import org.slf4j.Logger; import org.slf4j.LoggerFactory; import java.io.UnsupportedEncodingException; import java.net.URLEncoder; import java.nio.charset.StandardCharsets; public class URLEncoderTest { private static final Logger LOGGER = LoggerFactory.getLogger(URLEncoderTest.class); public static void encode(String plain) throws UnsupportedEncodingException { String encoded = URLEncoder.encode(plain, StandardCharsets.UTF_8.toString()); LOGGER.info("Plain text: {}, Encoded text: {}", plain, encoded); } @Test public void encodeTests() throws UnsupportedEncodingException { encode("john+doe@example.com"); encode("sample text"); encode("+1653-124-23"); } }

Run the above test in your favourite IDE and check the output. The plain text is encoded using Java URL Encoder.

Output:


Plain text: john+doe@example.com, Encoded text: john%2Bdoe%40example.com Plain text: sample text, Encoded text: sample+text Plain text: +1653-124-23, Encoded text: %2B1653-124-23

Decode URL in Java

Java also provides utility class URLDecoder to decode the value. Usually on server side when we receive the form attributes, using URLDecoder we can decode them to original values.


import java.io.UnsupportedEncodingException; import java.net.URLDecoder; import java.nio.charset.StandardCharsets; //.. URLDecoder.decode(encodedText, StandardCharsets.UTF_8.toString());

URLDecoderTest.java


package net.viralpatel; import org.junit.Test; import org.slf4j.Logger; import org.slf4j.LoggerFactory; import java.io.UnsupportedEncodingException; import java.net.URLDecoder; import java.nio.charset.StandardCharsets; public class URLDecoderTest { private static final Logger LOGGER = LoggerFactory.getLogger(URLEncoderTest.class); public static void decode(String encoded) throws UnsupportedEncodingException { String plain = URLDecoder.decode(encoded, StandardCharsets.UTF_8.toString()); LOGGER.info("Encoded text: {}, Plain text: {}", encoded, plain); } @Test public void decodeTests() throws UnsupportedEncodingException { decode("john%2Bdoe%40example.com"); decode("sample+text"); decode("%2B1653-124-23"); } }

Run the above test in your favourite IDE and check the output. The encoded text is decoded using Java URL Decoder.

Output:


Encoded text: john%2Bdoe%40example.com, Plain text: john+doe@example.com Encoded text: sample+text, Plain text: sample text Encoded text: %2B1653-124-23, Plain text: +1653-124-23

Conclusion

Java provides utility classes URLEncoder and URLDecoder to encode/decode text using URLencoding to transfer data on http. In this tutorial we saw how to use Java URL encoder and decoder.

Download or browse the code on Github.

Github – source code

Reference

Further Read: Getting Started with Java 8 Lambda Expression


via ViralPatel.net https://ift.tt/30toOaH

[Fix] Start Menu Not Working in Windows 10 May 2020 Update Version 2004

https://ift.tt/eA8V8J If you upgraded or installed the latest Windows 10 feature update which is May 2020 Update version 2004 (build 19041) in...

Read the full article at AskVG.com

via AskVG https://ift.tt/2AlHZZe

Download Windows 11 Insider Preview Build Offline ISO Files

UPDATE: Offline ISO files are available for Windows 11 Insider Preview build 27774 (Canary Channel), 26100.1150 (Dev Channel), 22621 (Beta C...