Boost Your Android Phone’s Performance With This Little Trick

If you have a sluggish old Android phone or maybe you bought a new budget Android phone that can’t seem to cope with your usage needs, then I might be able to help. I too bought a low-end Android phone two weeks ago and it kept slowing down after mild usage. I tried everything from using battery saver mode to installing booster apps to keep the memory clean, but nothing worked.

So I went a little further and started messing in the developer options, and there I decreased screen resolution a little. Guess what, it solved all the lags and glitches in the phone and it started working smoothly even after long usage. So after some more research, I am here to explain how lowering screen resolution can boost your Android phone’s performance and how to do it.

How lowering screen resolution boosts speed

Screen resolution basically refers to the pixel density on a display. The higher the resolution, the more detailed content you can see. If you will decrease screen resolution, it will decrease pixel density and content will become bigger in size and less content will be visible at a time.

Your phone needs to allocate resources to each pixel on the screen to show content. So if you have lower pixel density, this also means that your phone will have to use fewer resources to show content leading to faster phone speed. Not only you will get a faster phone, the apps that are optimized for the applied lower resolution will also work faster and your phone battery timing will increase as well.

Overall, lower resolution means a phone requiring less power to do its job. And of course, it does have a downside of having less detailed content due to lower resolution. However, in my experience, the difference isn’t very noticeable in regular use if you don’t lower it too much.

Lower screen resolution from the settings

Most newer phones have this option available in the display settings of the phone. Just go to the phone “Settings” and tap on the “Display” option. Here tap on “Change screen resolution” and you should be able to see your currently set resolution and available resolutions. Simply choose a lower resolution here and see the magic. For example, if it is set to FHD (1080p) you can set it to HD (720p) to see a performance boost.

Lower screen resolution from developer options

If your phone doesn’t have this option available in the display option, then you should be able to do it from the developer options. Developer options must be enabled on your phone first. On most phones, you can do so by tapping 7 times on the “Build number” inside the “About phone” option. Here is a step by step tutorial on how to enable developer options on most Android phones.

Once enabled, go to developer options and scroll down to the “Drawing” section and tap on the “Smallest width” option here. Here the resolution is set as a DP unit, so you will have to experiment a little to find a comfortable resolution. Just scale it down by 20dp and see if you find it better. For example, if it is set to 440dp, then set it to 420dp and see how it goes. You can keep decreasing it to find the right balance.

change screen resolution on Android

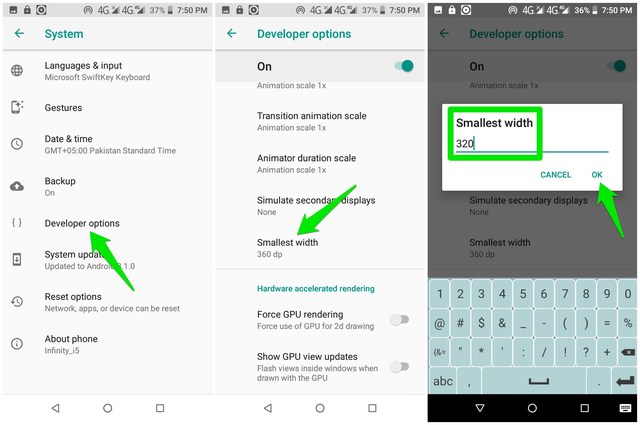
I should also mention that adjusting from developer options also gives you more control over how much you want to decrease the resolution. If you want to lower resolution to as low as 320dp, it can be easily done.

Ending thoughts

I am personally facing no problems so far while using my phone on a lower resolution than intended. Apart from smooth working, I have noticed a substantial increase in battery timing. Do let us know in the comments if this little trick helps boost your Android phone’s performance.

The post Boost Your Android Phone’s Performance With This Little Trick appeared first on Gtricks.


via Gtricks https://ift.tt/2AWEAQI

[Fix] Windows 10 Not Asking for Password on Wake up from Sleep or Hibernate

https://ift.tt/eA8V8J This tutorial will help you in enabling or disabling password requirement on wake up from sleep or hibernate in Windows 10...

Read the full article at AskVG.com

via AskVG https://ift.tt/2UlHYeA

[Firefox Tip] Remove “This Time Search With” One-Click Search Buttons from Address bar

https://ift.tt/eA8V8J In Mozilla Firefox web browser, when you start typing something in address bar (or URL bar) or search box, Firefox starts...

Read the full article at AskVG.com

via AskVG https://ift.tt/378yDfg

[Tip] The Best Working Method to Get Classic Address bar in Mozilla Firefox

https://ift.tt/eA8V8J The method given in this tutorial to get classic address bar back in Mozilla Firefox is permanent and 100% working. You...

Read the full article at AskVG.com

via AskVG https://ift.tt/2z4TljE

How to Show Multiple Examples in OpenAPI Spec

Show Multiple Examples in OpenAPI – OpenAPI (aka Swagger) Specifications has become a defecto standard for documenting and sharing REST API. When using OpenAPI it is always best practice to add as much detail as we can. The API specification should be built from the API consumers perspective. The DX or developer experience is important when developing the API.

To improve the API experience we must define attributes with descriptions and example. It is also possible to define multiple examples to show different way the API can be consumed / requested.

First, let us see how swagger editor (editor.swagger.io) shows multiple examples. The examples are shown in a dropdown where user can choose and see appropriate request payload. sample1 and sample2 are two examples for Pet store API.

openapi multiple examples

Adding Multiple Examples in OpenAPI

To add multiple examples in OpenAPI, we can define examples attribute as shown below. Notice how we defined sample1 and sample2. You can give any meaningful name relevant to your API.

openapi.yaml


paths: /pets: post: description: Creates a new pet in the store. Duplicates are allowed operationId: addPet requestBody: description: Pet to add to the store required: true content: application/json: schema: $ref: '#/components/schemas/NewPet' examples: sample1: value: name: Cupcake tag: Chihuahua sample2: value: name: Prince tag: Poodle

In OpenAPI, we can also provide example at attribute level. While it is good to define an attribute example (e.g. petType) so the consumer of API know what to pass or what to expect from attribute. However it is also a good idea to provide example at broader request/response level.

The request/response level example would provide much broader context to API consumer and also helps documenting API better. Furthermore many mock tools can generate mock responses from the examples provided in Swagger file.

Multiple Examples in API Response

The multiple example works with both API Request and Response. Similar to what we did above, the same can be specified for API Response. In below screenshot we can see how swagger editor shows multiple response example.

multiple examples in api response

openapi.yaml with examples in response


paths: /pets: get: description: Returns all pets operationId: findPets parameters: - name: tags in: query description: tags to filter by required: false style: form schema: type: array items: type: string - name: limit in: query description: maximum number of results to return required: false schema: type: integer format: int32 responses: '200': description: pet response content: application/json: schema: type: array items: $ref: '#/components/schemas/Pet' examples: sample1: value: name: Cupcake tag: Chihuahua sample2: value: name: Prince tag: Poodle default: description: unexpected error content: application/json: schema: $ref: '#/components/schemas/Error'

Hope this little trick will make your API documentation awesome :-)

Reference

https://swagger.io/docs/specification/adding-examples/


via ViralPatel.net https://ift.tt/2BAVggS

[Tip] New Working Method to Disable Enlarging Address bar in Mozilla Firefox

https://ift.tt/eA8V8J Newer versions of Mozilla Firefox web browser come with a new redesigned address bar which is called Megabar (previousally codenamed Quantumbar)....

Read the full article at AskVG.com

via AskVG https://ift.tt/2UbcFTF

[Windows 10 Tip] Prevent / Restrict New Microsoft Edge from Replacing and Disabling Old Legacy Edge

https://ift.tt/eA8V8J UPDATED on June 02, 2020: The new Chromium-based Microsoft Edge browser has started downloading and installing automatically in Windows 10 devices...

Read the full article at AskVG.com

via AskVG https://ift.tt/2NGeTY7

Download Google Chrome Offline Installer (64-bit, 32-bit)

UPDATE: Direct download links added for the latest Google Chrome 125 offline installers. NOTE: The download links given in this article will...