Read the full article at AskVG.com
via AskVG https://ift.tt/2nmHuDW
Google recently introduced Google Chat and Google Meet replacing Hangouts as the enterprise video conferencing and chat solution. Just like Hangouts, Chat and Meet also reside in the left sidebar of Gmail taking considerable space. However, not all people will find these services useful. If you are like me and only use Gmail for email, then these features taking up extra space in your sidebar must be annoying you too.
Thankfully, it’s actually really easy to hide both Chat and Meet features right inside Gmail and it’s actually beneficial to do it. Today, I will show you how to hide both Chat and Meet sections in the Gmail sidebar.
Before I tell you how to hide Chat and Meet from Gmail sidebar, I am going to tell you the benefits you will get for hiding them. Personally, I have found two benefits that make it really worth hiding both of these features if you are not using them.
First, it opens up more space to view other labels that are hidden in the “More” button. Usually, the labels under the “More” button open as a scrollable window. However, after hiding Chat and Meet, it fully opens up in its place which makes it very easy to navigate without having to scroll.
Secondly, Gmail uses less system resources to run. From my very rough estimation, Gmail uses approximately 60,000KBs less resources after hiding both of these features. This is almost 25% less load on your system and makes Gmail a bit smooth on older systems. If you are low on system resources, then hiding Chat and Meet is a great solution.
With the addition of these features, Google also added a new tab in the settings to control these features. You can hide both of these features from there. Here’s how:
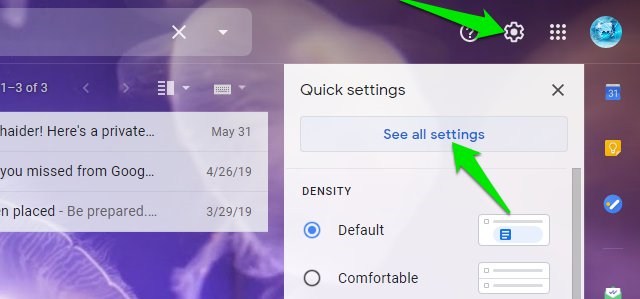
From the main Gmail interface, click on the “Gear” icon at the top-right corner and select “See all settings” option from it.
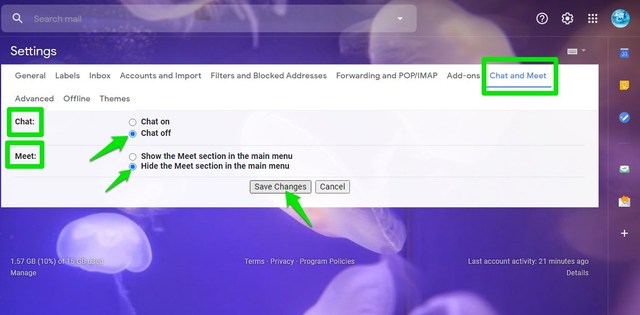
Now move to the “Chat and Meet” tab. Here select “Chat off” in the Chat section and “Hide the Meet section in the main menu” in the Meet section. Afterward, click on “Save changes” to apply the changes.
Gmail will refresh again and move you to the main interface where both Chat and Meet sections will be removed from the sidebar.
Do keep in mind that these changes will only hide Chat and Meet in the Gmail interface. You can still fully use both of these services by going to their respective websites, Chat and Meet. And if you ever like to get back any of these features in the Gmail interface, then follow the same instructions to undo the changes and enable them.
The post Why You Should Hide Chat and Meet Sections in Gmail And How To Do It appeared first on Gtricks.


You can access your Gmail account from multiple devices and stay logged in simultaneously. Although convenient, it also poses a great security risk if you lose access to a device you are logged in. For example, if you access your Gmail account from a public device and forgot to logout. Anyone with access to this device will be able to access your Gmail account and even other Google services.
Thankfully, Google makes it really easy to sign out remotely from all the connected devices using a PC or mobile phone. In this post, I’ll show you how to remotely sign out of Gmail from any device on your desktop and Android phone.
You can sign out of Gmail using Google account settings. Just open Gmail (or any other Google product) on the desktop and follow the below instructions:
Click on your profile picture at the top-right corner and select “Manage your Google Account” from it.

Now select “Security” in the left panel and then scroll down and click on “Manage devices” under the “Your devices” section.

Here you will find all the devices you are currently logged in.

Click on the device you want to sign out from and then click on the “Sign out” button and confirm the prompt.

That’s it, you will be logged out of the particular device and you will have to provide the password to log in again on that device. You can repeat this process to log out of all the other connected devices if needed.
On Android, you can use similar steps to remotely sign out of other devices. Just follow the below instructions:
In the “Settings”, tap on “Google” and then tap on “Manage your Google Account” option.

Here swipe left on the menu at the top and select “Security” from it.
Scroll down and tap on “Manage devices” under the “Your devices” section.
You will find the list of devices where you are logged in currently. Just click on the device and tap on “Sign out” on the next page to sign out from it.

I should mention that you can’t use this method to sign out of the current device you are using. For the current device, you will have to use the regular sign out option available in the main account profile.
If you have any questions, let us know in the comments section below.
The post How To Remotely Sign Out Of Gmail From Other Devices appeared first on Gtricks.

Most of the photos you take are geotagged to know the exact location where the photo was taken. And this information is kept intact when you upload photos to Google Photos, therefore, Google photos know where you have taken those photos. If you have ever wondered you could see all your photos on the world map to see exactly where each photo has been taken, then now it’s possible in Google Photos.
In the recent Google Photos design update, a new Explore Map feature was added where you can view your geotagged photos on a map. In today’s post, I am going to show you how you can access and use this feature to view your photos on a map.
This new feature is only available on the Google Photos mobile apps. The desktop version doesn’t support this feature currently, so you will have to use your Android or iOS device to use this feature. And of course, the app must be updated to the latest version that contains this feature. Here’s how to use it:
Open Google Photos app and tap on the “Search” tab at the bottom.
Here you should find the “Explore Map” feature in the second section, tap on it to open it.
This will open a map of your current location with heat patterns on the map where you have taken your photos. Areas where you have taken more photos will be bigger in size and also stronger heat pattern.

You can tap on a heat patter to open all the photos near that area. Zooming in will help pin point to exact locations where the photos have been taken. You can also scroll through photos and their exact location will update on the map.

Google Photos uses photos metadata, Google location history, and known landmarks in the photos to identify the location. So in most cases, it’s very accurate. However, you may still see some photos with inaccurate location (usually nearby) as GPS may not always work perfectly.
Explore Map is definitely a great way to relive your photos using the exact location where the photos were taken. This feature was also one of the most demanded features as iOS already supports this for many years. I am glad Google took the move to add in this feature and honestly, the feature works seamlessly.
What do you think about viewing your photos on a map in Google Photos? Does it really change the way you view your past photos? Let us know your thoughts in the comments below.
The post How To View Photos on a Map in Google Photos appeared first on Gtricks.

