Read the full article at AskVG.com
via AskVG https://ift.tt/2ZXrq0h

GraphQL Subscription provides a great way of building real-time API. In this tutorial we will build a realtime GraphQL subscription API using Spring Boot.
Spring Boot GraphQL Subscription – GraphQL provides an alternate way of building APIs. Similar to REST, with GraphQL we can query data from server/backend and also update data. This is called Query and Mutation in GraphQL. Checkout the tutorial on Getting Started with GraphQL with Spring Boot in which both Query and Mutation is discussed in detail.
Oftentimes clients want to get pushed updates from the server when data they care about changes. GraphQL Subscription provides this capability of long-lived stream of source events that client can subscribe to.
GraphQL subscriptions are a way to push data from the server to the clients that choose to listen to real time messages from the server. Subscriptions are similar to queries in that they specify a set of fields to be delivered to the client, but instead of immediately returning a single answer, a result is sent every time a particular event happens on the server.
When using Subscription, the client will connect to GraphQL server using Websocket. A persistent websocket connect gets established at the beginning and used across the lifecycle until client wants to consume messages or until server is available. Each time a new message is available, server pushes it on the websocket connection to client.
Designing a realtime API using GraphQL subscription requires careful considerations. Unlike Query and Mutation which are stateless operation types, Subscription is a stateful operation. A stateful connection using WebSocket is established with server. Server should be designed to handle multiple connections and scale along with new connections. Usually to achieve this server can use a messaging service such as RabbitMQ, Redis Pub/Sub or Kafka.
For this tutorial, we will going to mock the messaging server and send mock data to client through Subscription. Let us start with initializing Spring Boot app.
The next step would be to create Spring Boot app with GraphQL support. Let us scaffold the app with start.spring.io using following options:
net.viralpatel Artifact: spring-boot-graphql-subscriptionLet us add GraphQL Java and other dependencies in Gradle. Open build.gradle file and add following code:
build.gradle
plugins {
    id 'org.springframework.boot' version '2.3.0.RELEASE'
    id 'io.spring.dependency-management' version '1.0.9.RELEASE'
    id 'java'
}
group = 'net.viralpatel'
version = '0.0.1-SNAPSHOT'
sourceCompatibility = '11'

repositories {
    mavenCentral()
}

dependencies {
    implementation 'org.springframework.boot:spring-boot-starter'
    implementation 'com.graphql-java-kickstart:graphql-spring-boot-starter:7.0.1'
    implementation 'io.projectreactor:reactor-core'
    runtimeOnly 'com.graphql-java-kickstart:graphiql-spring-boot-starter:7.0.2-SNAPSHOT'
    testImplementation 'org.springframework.boot:spring-boot-starter-test'
}

test {
    useJUnitPlatform()
}
Or if you are using Maven, add following test dependencies.
pom.xml
<dependency>
    <groupId>org.springframework</groupId>
    <artifactId>boot:spring-boot-starter</artifactId>
</dependency>
<dependency>
    <groupId>com.graphql-java-kickstart</groupId>
    <artifactId>graphql-spring-boot-starter</artifactId>
    <version>7.0.1</version>
</dependency>
<dependency>
    <groupId>io.projectreactor</groupId>
    <artifactId>reactor-core</artifactId>
</dependency>
<dependency>
    <groupId>com.graphql-java-kickstart</groupId>
    <artifactId>graphiql-spring-boot-starter</artifactId>
    <version>7.0.2</version>
    <scope>runtime</scope>
</dependency>The GraphQL schema can be written using GraphQL SDL (Schema Definition Language). Following is our app’s GraphQL schema.
Schema definition file is under src/resources directory. GraphQL Spring Boot starter will read this and configure it using graphql-java-tools.
src/resources/schema.graphqls
type Query {
    stockDetail(symbol: String): StockDetail
}

type Subscription {
    stockPrice(symbol: String): StockPrice
}

type StockDetail {
    symbol: String,
    name: String,
    marketCap: String
}

type StockPrice {
    symbol: String
    price: String
    timestamp: String
}
The schema consist of GraphQL Query and Subscription default operation types. It also contains user defined types StockDetail and StockPrice.
The Query stockDetail returns the type StockDetail and is used as GET API to get the stock detail once when called. The Subscription method stockPrice returns the type StockPrice. Since it is Subscription method, instead of returning the result once it subscribe to the method and listen for any changes from server. Server will push changes in realtime whenever there is new data available.
The Spring Boot Graphql starter expects an instance of GraphQLQueryResolver in classpath when the app boots.
QueryResolver.java
package net.viralpatel.springbootgraphqlsubscription;

import graphql.kickstart.tools.GraphQLQueryResolver;
import net.viralpatel.springbootgraphqlsubscription.model.StockDetail;
import org.springframework.stereotype.Component;

@Component
public class QueryResolver implements GraphQLQueryResolver {

    public StockDetail stockDetail(String symbol) {

       return new StockDetail(symbol, "name", 2000l);
    }
}
The custom QueryResolver class defines method stockDetail which matches to the GraphQL SDL we defined above. This method will be invoked whenever the client calls the Query method stockDetail.
The response is just hardcoded value of stock symbol, name and price. Instead of hardcoding, these values can come from database or any backend API.
Similar to QueryResolver, the custom SubscriptionResolver class is required on classpath when using subscription type in GraphQL SDL.
SubscriptionResolver.java
package net.viralpatel.springbootgraphqlsubscription;

import graphql.kickstart.tools.GraphQLSubscriptionResolver;
import net.viralpatel.springbootgraphqlsubscription.model.StockPrice;
import org.reactivestreams.Publisher;
import org.springframework.stereotype.Component;
import reactor.core.publisher.Flux;

import java.time.Duration;
import java.time.LocalDateTime;
import java.util.Random;

@Component
public class SubscriptionResolver implements GraphQLSubscriptionResolver {

    public Publisher<StockPrice> stockPrice(String symbol) {

        Random random = new Random();
        return Flux.interval(Duration.ofSeconds(1))
                .map(num -> new StockPrice(symbol, random.nextDouble(), LocalDateTime.now()));
    }
}
The custom SubscriptionResolver class contains stockPrice method which matches to the GraphQL SDL we defined earlier. This method will be invoked whenever client subscribe for this method. The client would establish a websoket connection with server and the stockPrice() method will return a project reactor’s Publisher instance. The Publisher instace does not return the result immediately rather it will send the result whenever server pushes it. This is the same way Spring Boot Webflux pushes the result non-blocking way.
For simplicity, we have hardcoded the result. The stockPrice() method would return a random value every second using Flux.interval method. Instead of hardcoding these results can also come from a Kafka topic or RabbitMQ queue.
StockDetail.java
package net.viralpatel.springbootgraphqlsubscription.model;

public class StockDetail {
    private String symbol;
    private String name;
    private long marketCap;

    public StockDetail(String symbol, String name, long marketCap) {
        this.name = name;
        this.symbol = symbol;
        this.marketCap = marketCap;
    }

    // getter and setters
}
StockPrice.java
package net.viralpatel.springbootgraphqlsubscription.model;

import java.time.LocalDateTime;

public class StockPrice {
    private String symbol;
    private double price;
    private LocalDateTime timestamp;

    public StockPrice(String symbol, double price, LocalDateTime timestamp) {
        this.price = price;
        this.symbol = symbol;
        this.timestamp = timestamp;
    }

    // getter and setters
}
The above are just some plain old Java objects to carry the data from server to client.
Start the Spring Boot application by running SpringBootGraphqlSubscriptionApplication class or by running gradle:
./gradlew bootRunOnce the Spring Boot app is started on default port 8080, open http://localhost:8080/graphiql
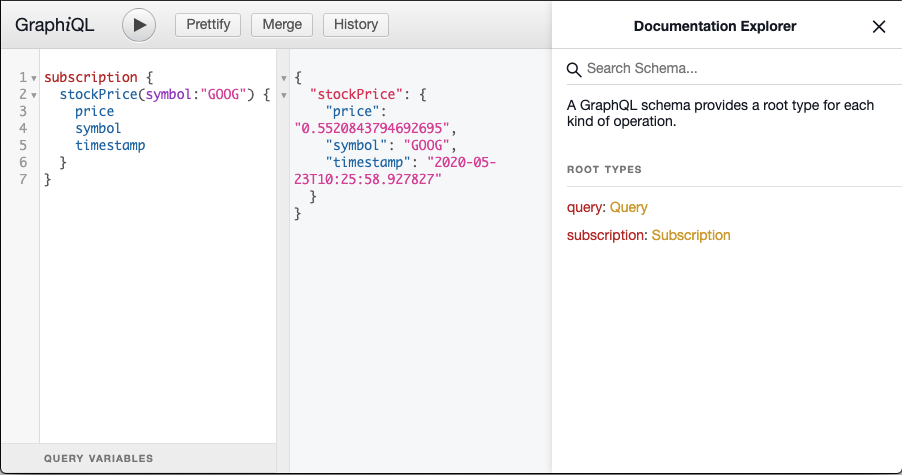
Try running following GraphQL subscription method and see the output.
subscription {
  stockPrice(symbol: "GOOG") {
    symbol
    price
    timestamp
  }
}
At first we will see following output in Graphiql editor.
Your subscription data will appear here after server publication!And after a few seconds we should start getting result back from server.
{
  "stockPrice": {
    "symbol": "GOOG",
    "price": "0.7199789993583869",
    "timestamp": "2020-05-24T19:41:51.780299"
  }
}
Source code for the Spring Boot GraphQL Subscription API.
Github – spring-boot-graphql-subscription


Google Photos does an amazing job of creating a timeline of your photos and videos. However, if you have too many photos over a long period (say 5+ years), then scrolling through all of them to find photos from specific time periods can be a little tedious. You can either go the slow route by swiping up/down, or go fast by jumping from year to year using the scroll bar. There seems to be no in-between the fast and slow scrolling (or is it?).
Well, today I am going to share a quick tip to easily scroll in Google Photos at whatever speed you are comfortable with.
The trick is actually hidden in the scroll bar at the right side of the screen which shows up when you swipe up. Usually, when you grab the scroll bar and move it down, it moves at extreme speed to the point you can’t even see the scrolling photos. Well, you can easily slow down the speed by grabbing the scroll bar and moving your finger to the left of the screen and then scroll.
The trick is that the scroll bar speed is slowed down the more you move your finger to the left of the screen before scrolling. For example, grabbing and moving the finger to the middle of the screen will slow it down enough to easily see photos over a month’s period. Similarly, if you move it to the left end of the screen, then the scroll speed will be slow enough to view photos per day.

Now how is this helpful you are wondering? Well, think about this scenario: You need to find 4 years old photos taken in the middle of March and some in September that you don’t know the exact date of. You can just grab the scroll bar to quickly move 4 years back and then move your finger to the middle of the screen to slowly scroll through September’s photos. And then again you can move your finger back to the right-side to speedup scrolling to move to March and then move the finger to the left-end to see photos taken in the middle of March.
I also believe that this is much faster and convenient than separately searching for the photos using the search bar.
Although quite a necessary feature, the instructions to control scrolling speed isn’t provided by Google Photos (not even a hint). I am sure you will find this little trick very useful for scrolling through thousands of photos.
I should mention though that I had a bit of trouble controlling the scroll bar while needing to do multiple swipes (you don’t have an endless screen). While moving the finger from right to left, the high sensitivity usually messed up my current scroll position. Of course, this could be just me and my shaky hands.
The post Simple Trick To Take Complete Control Over Scrolling in Google Photos appeared first on Gtricks.


Spring Boot Webflux DynamoDB Integration tests – In this tutorial we will see how to setup integration test for a Spring Boot Webflux project with DynamoDB using Testcontainers. This post will use the example from previous Spring Boot Webflux DynamoDB tutorial. Let us add integration tests using Testcontainers and integrate DynamoDB tests with our Spring Boot project.
Testcontainers is a Java library that supports JUnit tests, providing lightweight, throwaway instances of common databases, Selenium web browsers, or anything else that can run in a Docker container.
The key here is Docker containers. It allows us to use any Docker image and run it as container within our integration tests. There are number of standard Testcontainers available to test integration with technologies such as Elastic search, Kafka, RabbitMQ etc. We can also use any Docker container using Testcontainers GenericContainer api.
One key thing to remember while using Testcontainers is that local Docker installation is required to run these test cases. If you are running your integration tests in continues integration (CI) pipelines, remember to use machine instance instead of docker. As Testcontainers need Docker to run, we cannot run it inside a Docker container in CI. Usually all the standard CI platforms such as Circle CI do provides machine instance where you can run your integration tests.
Add following dependencies for Testcontainers and Junit support for Testcontainers.
build.gradle
testCompile "org.testcontainers:testcontainers:1.14.1"
testCompile "org.testcontainers:junit-jupiter:1.14.1"
Or if you are using Maven, add following test dependencies.
pom.xml
<dependency>
    <groupId>org.testcontainers</groupId>
    <artifactId>testcontainers</artifactId>
    <version>1.14.1</version>
    <scope>test</scope>
</dependency>
<dependency>
    <groupId>org.testcontainers</groupId>
    <artifactId>junit-jupiter</artifactId>
    <version>1.14.1</version>
    <scope>test</scope>
</dependency>Once the dependencies are defined, we can start using the Testcontainers in JUnit. First thing is to define a GenericContainer object with official docker image of DynamoDB amazon/dynamodb-local. The withExposedPorts() method defines the port where DynamoDB will be listening to inside the Docker container. The GenericContainer object is annotated with @Container annotation. This annotation works in conjunction with @Testcontainers annotation to mark containers that should be managed by the Testcontainers extension.
private static final int DYNAMODB_PORT = 8000;

@Container
public static GenericContainer dynamodb =
        new GenericContainer<>("amazon/dynamodb-local")
            .withExposedPorts(DYNAMODB_PORT);
Testcontainers will start the Docker container with DynamoDB on the given DYNAMO_PORT 8000, however that will be the internal port which we need to map to actual random port which the AWS DynamoDB client from Spring Boot app can connect to.
Since our Spring Boot app connects to DynamoDB on the host and port defined under application.dynamodb.endpoint config in application.yaml file, for the test case we need to override this config at runtime to point to actual host and port where Docker is running.
To achieve this we are using ApplicationContextInitializer to override the application.dynamodb.endpoint property. We are using GenericContainer‘s getContainerIpAddress and getMappedPort method to get the ip address and actual port number of DynamoDB running inside Docker.
public static class DynamoDBInitializer implements ApplicationContextInitializer<ConfigurableApplicationContext> {
    @Override
    public void initialise(ConfigurableApplicationContext ctx) {

        TestPropertyValues.of(
                String.format("application.dynamodb.endpoint: http://%s:%s",
                    dynamodb.getContainerIpAddress(), dynamodb.getMappedPort(DYNAMODB_PORT)))
                .applyTo(ctx);
    }
}In following RoutesTests, we have one testcase that creates a blank table customers and then uses Spring’s WebTestClient to call POST /customers API. The testcase checks the response from API. Since this is an integration test, the whole service is booted and the customer record is created in DynamoDB database using Testcontainers.
RoutesTests.java
package net.viralpatel.springbootwebfluxdynamodb;

import net.viralpatel.springbootwebfluxdynamodb.customer.Customer;
import org.junit.jupiter.api.Test;
import org.springframework.beans.factory.annotation.Autowired;
import org.springframework.boot.test.context.SpringBootTest;
import org.springframework.boot.test.util.TestPropertyValues;
import org.springframework.context.ApplicationContextInitializer;
import org.springframework.context.ConfigurableApplicationContext;
import org.springframework.test.context.ContextConfiguration;
import org.springframework.test.web.reactive.server.WebTestClient;
import org.testcontainers.containers.GenericContainer;
import org.testcontainers.junit.jupiter.Container;
import org.testcontainers.junit.jupiter.Testcontainers;
import reactor.core.publisher.Mono;
import software.amazon.awssdk.services.dynamodb.DynamoDbAsyncClient;
import software.amazon.awssdk.services.dynamodb.model.*;

import java.util.concurrent.CompletableFuture;

import static org.hamcrest.Matchers.*;

@SpringBootTest(webEnvironment = SpringBootTest.WebEnvironment.RANDOM_PORT)
@Testcontainers
@ContextConfiguration(initializers = RoutesTests.DynamoDBInitializer.class)
public class RoutesTests {

    private static final int DYNAMODB_PORT = 8000;

    @Autowired
    DynamoDbAsyncClient dynamoDbAsyncClient;

    @Container
    public static GenericContainer dynamodb =
            new GenericContainer<>("amazon/dynamodb-local:latest")
                .withExposedPorts(DYNAMODB_PORT);

    public static class DynamoDBInitializer implements ApplicationContextInitializer<ConfigurableApplicationContext> {
        @Override
        public void initialize(ConfigurableApplicationContext ctx) {

            TestPropertyValues.of(
                    String.format("application.dynamodb.endpoint: http://%s:%s",
                        dynamodb.getContainerIpAddress(), dynamodb.getMappedPort(DYNAMODB_PORT)))
                    .applyTo(ctx);
        }
    }

    @Autowired
    public WebTestClient webTestClient;

    @Test
    public void shouldCreateCustomerWhenCustomerAPIInvoked() {

        // Create customers table in DynamoDB
        CompletableFuture<CreateTableResponse> createTable = dynamoDbAsyncClient.createTable(CreateTableRequest.builder()
                .tableName("customers")
                .attributeDefinitions(AttributeDefinition.builder().attributeName("customerId").attributeType("S").build())
                .keySchema(KeySchemaElement.builder().attributeName("customerId").keyType(KeyType.HASH).build())
                .provisionedThroughput(ProvisionedThroughput.builder().readCapacityUnits(5l).writeCapacityUnits(5l).build())
                .build());

        Mono.fromFuture(createTable).block();

        Customer customer = new Customer();
        customer.setName("John");
        customer.setCity("Sydney");
        customer.setEmail("john@example.com");

        webTestClient
                .post()
                .uri("/customers")
                .bodyValue(customer)
                .exchange()
                .expectStatus().is2xxSuccessful()
                .expectHeader().value("Location", is(not(blankOrNullString())));
    }
}
Let us go through the above code step by step and see what is going on.
@SpringBootTest – Specify that the test case is an integration test. Spring should load the full application context and make all beans available to the test case.
@Testcontainers – It is a JUnit Jupiter extension to activate automatic startup and stop of containers used in a test case. The test containers extension finds all fields that are annotated with Container and calls their container lifecycle methods. Containers declared as static fields will be shared between test methods. They will be started only once before any test method is executed and stopped after the last test method has executed. Containers declared as instance fields will be started and stopped for every test method.
@ContextConfiguration – It overrides the Spring properties. We use it to override the host and port of DynamoDB where our DynamoDB client connects. The DynamoDBInitializer static class defined within the test case override this property. We can move this logic into an abstract class and reuse it across multiple tests.
If you haven’t setup your local AWS CLI, you might get following error when running the test case. This is because when the DynamoDB client initialize, it tries to find credentials to connect to dynamodb. In our DynamoDBConfig client we are using DefaultCredentialsProvider which tries to find the credentials at number of places.
Unable to load credentials from service endpoint
software.amazon.awssdk.core.exception.SdkClientException: Unable to load credentials from any of the providers in the chain AwsCredentialsProviderChain(credentialsProviders=[SystemPropertyCredentialsProvider(), EnvironmentVariableCredentialsProvider(), ProfileCredentialsProvider(), WebIdentityTokenCredentialsProvider(), ContainerCredentialsProvider(), InstanceProfileCredentialsProvider()]) : [SystemPropertyCredentialsProvider(): Unable to load credentials from system settings. Access key must be specified either via environment variable (AWS_ACCESS_KEY_ID) or system property (aws.accessKeyId)., EnvironmentVariableCredentialsProvider(): Unable to load credentials from system settings. Access key must be specified either via environment variable (AWS_ACCESS_KEY_ID) or system property (aws.accessKeyId)., ProfileCredentialsProvider(): Profile file contained no credentials for profile 'default': ProfileFile(profiles=[]), WebIdentityTokenCredentialsProvider(): Either the environment variable AWS_WEB_IDENTITY_TOKEN_FILE or the javaproperty aws.webIdentityTokenFile must be set., ContainerCredentialsProvider(): Cannot fetch credentials from container - neither AWS_CONTAINER_CREDENTIALS_FULL_URI or AWS_CONTAINER_CREDENTIALS_RELATIVE_URI environment variables are set., InstanceProfileCredentialsProvider(): Unable to load credentials from service endpoint.]
    at software.amazon.awssdk.core.exception.SdkClientException$BuilderImpl.build(SdkClientException.java:97) ~[sdk-core-2.10.40.jar:na]
    Suppressed: reactor.core.publisher.FluxOnAssembly$OnAssemblyException:
Error has been observed at the following site(s):
    |_ checkpoint ⇢ HTTP POST "/customers" [ExceptionHandlingWebHandler]
Stack trace:
        at software.amazon.awssdk.core.exception.SdkClientException$BuilderImpl.build(SdkClientException.java:97) ~[sdk-core-2.10.40.jar:na]
To resolve this error, either setup your AWS CLI so that client can find the credential or define environment variables:
export AWS_SECRET_ACCESS_KEY=test
export AWS_ACCESS_KEY_ID=test
The env variables value can be any non empty string.
Read more on working with AWS Credentials
Source code for the Testcontainers integration test for DynamoDB and Spring Boot is in Github.
Github – spring-boot-webflux-dynamodb

You can allow many websites to send you notifications of updates right in your Chrome browsers. Although it’s a useful feature to stay updated, but many websites can spam notifications that might annoy you. This is especially annoying when those notifications come from a website you didn’t even intend to allow, which isn’t uncommon as many websites use cheap tactics to trick you to allow notifications.
If you are dealing with annoying notifications from a particular website or even if you just want to disable notifications altogether, then today I will show you how to disable notifications in Google Chrome.
Open up the Chrome browser and follow the below-mentioned instructions:
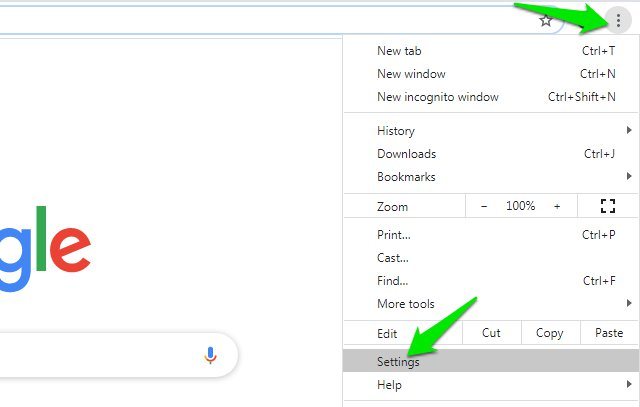
Click on the three vertical dots menu at the top-right corner and select “Settings” from it.
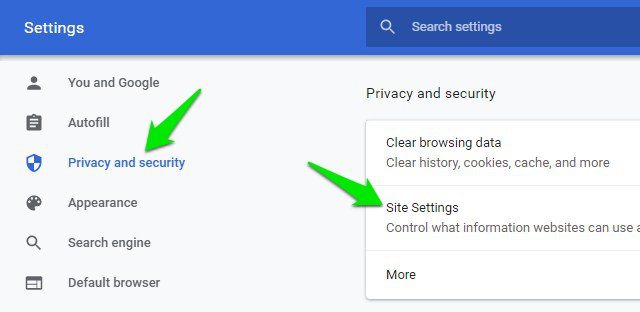
Now click on “Privacy and security” in the left panel and then click on the “Site Settings” option.
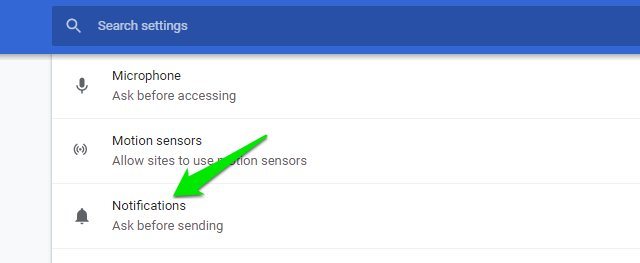
Here, scroll down and click on “Notifications”.
In the “Allow” section, you will see all the websites that are allowed to send you notifications. You can click the three vertical dots menu next to any website and select “Remove” or “Block” from it to turn off its notifications. If you choose “Remove” then the website will be able to again request to allow notifications when you will visit again, and “Block” will stop that website from asking to show notifications in the future.

You can follow the above process to remove all unwanted websites from the “Allow” list. If you don’t want websites to ask for notifications in the future, then you can turn off the toggle button next to “Notifications” at the top.

The process is quite similar on Chrome for Android as well, just follow the below instructions:
Tap on the three vertical dots menu at the top-right corner and select “Settings” from it.
Here click on the “Notifications” option.
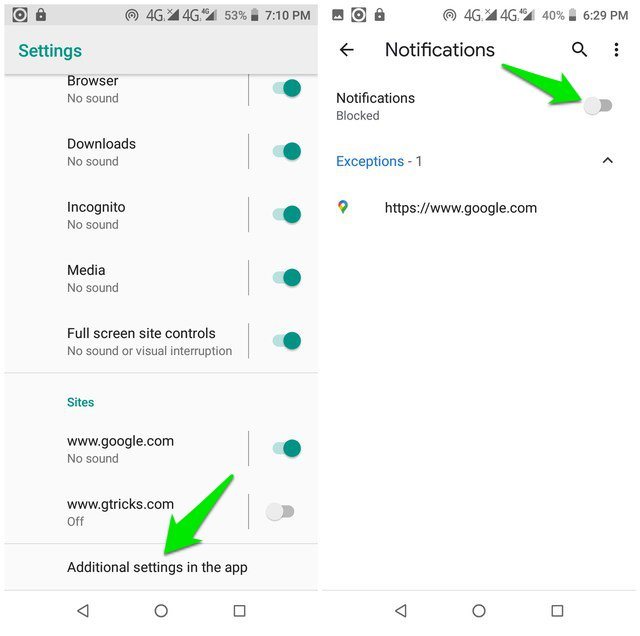
Now scroll down to the “Sites” section and you will see all the websites that are allowed to send notifications here. Simply tap on the toggle button next to each website to disable notifications for it.

If you want to prevent websites from asking for notifications in the future, then tap on “Additional settings in the app” option and turn off the toggle next to “Notifications”.
These instructions should be enough to turn off notifications in Google Chrome on both your PC and smartphone. Although I will recommend you to not disable notification requests for the future as there are many websites on which it’s important to enable notifications, such as your email provider. If you have any further questions, let us know in the comments below.
The post How To Turn Off Notifications in Google Chrome (Desktop and Android) appeared first on Gtricks.

