Unlike most other document creation tools, Google Docs doesn’t come with a built-in option to apply a border to a page. There is also no third-party Google Docs add-on that provides this functionality. If you are looking to add a border in Google Docs, then you are at the mercy of clunky workarounds.
I know 2 ways to add a border in Google Docs, but of course, these workarounds are limited in functionality and a bit unintuitive as well. Although until Google adds this feature officially, these workarounds should get the job done.
Method #1: Use 1×1 table To add a border in Google Docs
To replicate a border you can use a 1×1 table and make it large enough to look like a border. Afterward, fill it with content and it will look like there is a border around the content. Here’s how to make it work:
1. From the top menu, click on “Insert” and go to “Table” and select a 1×1 table.

2. Now click and hold on the lines of the borders to drag and make it as big you need.
3. To customize, right-click inside the table and click on “Table Properties”.
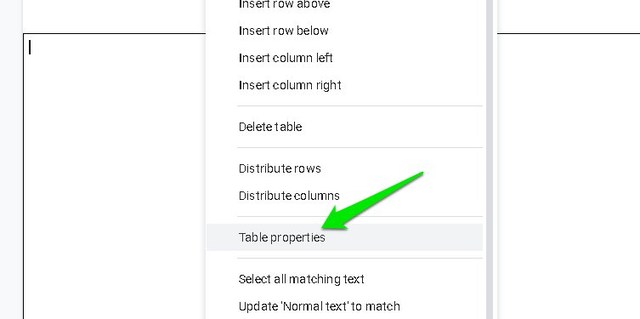
4. Here you can customize border color, line width, and background color, etc.

You can fill the table with content including text and pictures and keep increasing the size of the border as needed.

Method #2: Use Paragraph Styles
Google may not have the option to add a full-page border, but it still lets you add a border to a paragraph. You can use this same option to add a border around all of the content in your document. Here’s how:
1. Highlight the content around which you need the border (press Ctrl+A to select all).
2. Now click on the “Format” menu and then click on “Borders and shading” in the “Paragraph styles” option.

3. Here select the first four border lines next to the “Position” option and customize the rest of the options as you need and then click “Apply”.

This will add the customized border around all the selected content. To customize the border, you will need to go to the same “Borders and shading” option again while the content is highlighted.

Conclusion
The first method is definitely more intuitive and it also closes the border when you move to the next page; which makes it look clean. There are some other ways as well, but they are very limited. Such as the drawing tool table, but it is very hard to edit and adding more content is a headache as well. Let us know in the comments if you know any other easier ways to add a border in Google Docs.
The post 2 Simple Ways To Add a Border in Google Docs appeared first on Gtricks.


via Gtricks https://ift.tt/36VHd0f

No comments:
Post a Comment
If you have any question please let me know