Read the full article at AskVG.com
via AskVG https://ift.tt/3mgqRHn
I mostly rely on my mobile 4G connection for my internet needs. However, during rush hours (9 pm to 1 am) the data speed slows down to a crawl due to heavy network traffic. During rush hour, it’s a luxury to stream a video at 480p without stuttering. Thankfully, I have found a simple solution to at least get a bearable internet speed to make it through the rush hour.
I am not going to promise top LTE speeds during rush hours, but if you can get enough speed to stream 480p videos or even 720p, then I think it’s worth trying. So let’s see how to increase your internet speed during rush hours.
Before we try to get better speed, it’s good to know why you are getting slow speed in the first place. Mobile networks have dedicated towers placed that have a limited capacity of users they can handle without a drop in promised download speed. And during the rush hours, the network limit is reached so all users receive slower mobile data speed.
Once the tower is overloaded there isn’t much you can do to get better speed. Although you can switch your cell phone tower, but there is a good chance all nearby towers are overloaded as well during rush hour. However, there is a good chance that the 3G tower near you might not be overloaded. If you switch to 3G, you might get a better speed than 4G if the tower isn’t overloaded.
4G and 3G towers are separate from each other and come with their own bandwidth capacity. Most of the phones today are 4G enabled, so there is a good chance most users in your area are using 4G; which is why your 4G connection is slow. Although 3G connection offers 2-10 Mbps speed on average, but as it is stable; it might be better than 4G during rush hour.
From my personal experience, during rush hour my download speed on 4G drops to 2-4 Mbps and it’s very unstable. However, when I switch to 3G I get a consistent 6-8 Mbps speed. If you are up for switching to 3G during rush hours, then here’s how to do it:
All 4G enabled phones are backward compatible with 3G and 2G, so you can easily switch to 3G right from the phone settings. Here’s how to do it:
In the phone “Settings”, tap on “More” and then select “Mobile network”.
Now scroll down and tap on “Preferred network mode” and select “WCDMA/GSM auto” from the list. On some phones, it might be “3G/2G” instead. You can also select “WCDMA only” if you don’t want the connection to auto switch to 2G if needed.

That’s it, if the 3G towers in your area aren’t overloaded as well, you should see an increase in mobile data speed.
I should mention that this trick isn’t limited to getting better speed during rush hours. It might also help if 4G reception is weak in your current area and your phone is not automatically switching to 3G connection. Furthermore, if your network provider is throttling the 4G connection for some reason, it might not be throttling 3G, so it’s worth trying.
Let us know in the comments if this trick helps you increase mobile data speed during rush hours.
The post A Simple Trick To Get Faster Mobile Data Speed During Rush Hours appeared first on Gtricks.


I never let Chrome run in the background, ever. Chrome has a habit of running in the background even after explicitly closing it. The main reason is that an app or extension might keep it awake to complete tasks such as sending a notification. It may also be allowed to start up with your PC, so it will keep processes open even if you didn’t open Chrome at all.
I don’t like Chrome eating up resources for no reason, and I personally find it rather shady when Chrome runs resources worth a 3D game when I don’t even have extensions installed. So I make sure Chrome doesn’t run in the background both from Chrome settings and from my Windows PC settings. In this post, I’ll you how to stop Chrome from running in the background whether it’s running after closing or on PC startup.
One of the Chrome advanced settings can stop Chrome from running in the background by disabling apps and extension background processes when Chrome is closed. Here’s how to do it:
Click on the Chrome main menu at the top-right corner and select “Settings” from it.

Now scroll down to the very bottom and click on “Advanced”.

Here disable the option “Continue running background apps when Google Chrome is closed” in the “System” section.

That’s it, Chrome will now close properly when you will hit the cross button without any background processes open.
In Windows, you can use the System Configuration menu to manage startup apps and disable Chrome from starting up with PC. Here’s how:
Press Windows+R keys on the keyboard to open “Run” dialog and type “msconfig” here to open System Configuration.

Now move to the “Startup” section and uncheck the checkbox next to Google Chrome. You can press “OK” to apply the changes.
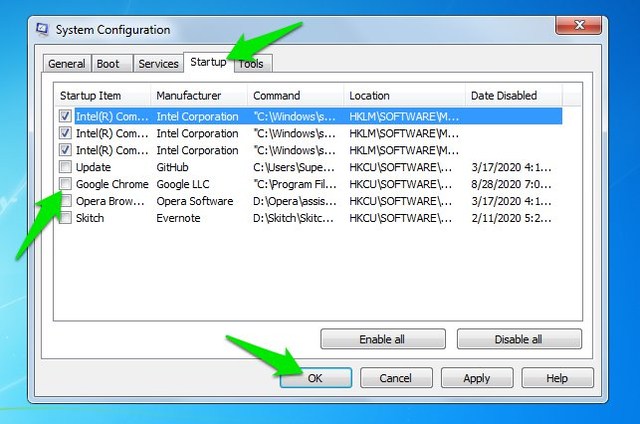
This will stop Chrome from running in the background on future startups of Windows.
The above instructions work on all versions of Windows. Although, in Windows 10 you can also access startup apps from the Task Manager (Ctrl+Shift+Esc).
By using both of the above instructions, you can make sure that Chrome never runs in the background. Although do keep in mind that by stopping Chrome from running in the background, you might miss on important notifications while Chrome is closed. If that’s not a problem for you, then closing the Chrome background process is the best decision for your PC.
The post How To Stop Google Chrome From Running in the Background for Good appeared first on Gtricks.

Gmail comes with hundreds of background themes to beautify your interface. Although there are sufficient wallpapers, but if you want to add a little personal touch, then you can add your own custom backgrounds as well. Whether you want to add a wallpaper that isn’t available in the Gmail collection or you want to add your own picture as a background, all can be done.
In today’s post, I am going to show you how to add a custom background in Gmail.
Gmail uses your albums saved in Google photos as background, and interestingly, it doesn’t give you the option to separately upload pictures. Therefore, you must upload your background pictures to Google photos and also create an album, because Gmail only accepts pictures in albums for some reason. So make sure the background Pictures are saved as an album in your Google photos account. if you don’t know how to do it; here is a support page by Google explaining it.
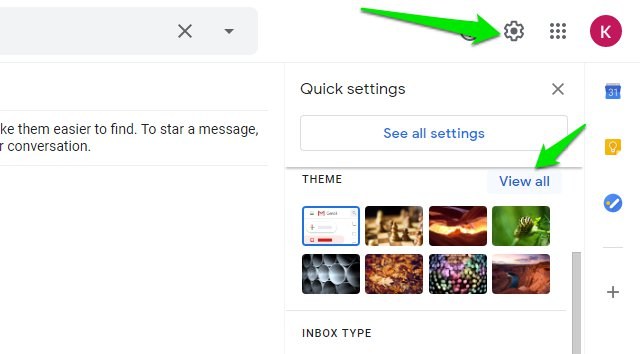
To set the custom background in Gmail, click on the “Gear” icon at the top-right corner and then click on “View all” in the “Theme” section.
Afterward, click on the “My photos” button at the bottom-left corner.

You will see all your albums here, just open the album and choose the background photo and then click on “Select”.
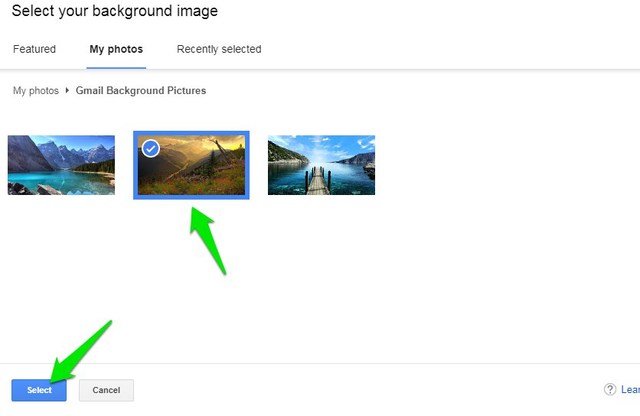
That’s it, the background will be applied and your selected picture will show up in your list of themes.

For the best results, you should use a 2560 x 1920p or higher resolution picture. If the picture will be smaller than this, then Gmail will zoom in and apply the background as it finds fitting.
And just like regular themes, you can also customize your custom background picture from the “Pick your theme” section, such as add vignette or blur the background.
Adding a custom background in Gmail is definitely a great way to personalize your interface. Although, it would have been easier if Gmail would just let us upload a picture and apply it. Creating an album in Google photos is just an extra chore we have to go through.
The post How To Add a Custom Background in Gmail appeared first on Gtricks.
