Read the full article at AskVG.com
via AskVG https://ift.tt/3epZx55
By default, Google Docs has the standard white background with black text to make it easier to read. However, if you need to type with a text color that doesn’t go well on white —such as yellow— or maybe you need to print out the document with a different background color, then you must change the background color in Google Docs.
Although it’s really easy to change text color from the top menu bar, but the option to change background color isn’t available upfront. If you are looking to change background color in Google Docs, then keep reading and I’ll show you how to do it.
Before we learn how to change the background color, I should mention that the background color changes apply to each page of the Google Docs document. You can not apply separate colors to different pages. That said, let’s see how to change background color in Google Docs:
Open up a Google Docs document and click on the “File” menu at the top-left corner.

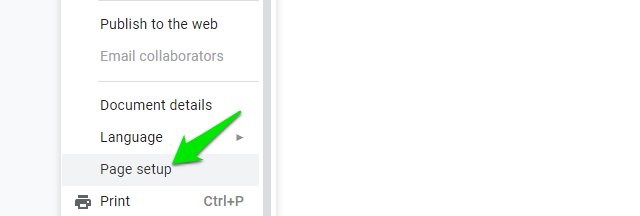
At the bottom of the menu, click on “Page setup”.
Here click on the button under the “Page color” option and you will see a big list of colors from dark to light to choose from.

You can also click on the “Custom” button at the bottom to open the color wheel where you can select a custom color yourself or use the Hex color code to get the needed color.

Once the right color is selected, click on the “OK” button and the color will be immediately applied to the document.

This will only change the background color of the current document. If you want to change the background color of all the future documents, then click on the “Set as default” button before clicking the “OK” button to apply changes.

I am sure you will find this feature of Google Docs very useful if you must submit documents with a different page color. And even if you just want your document to look funky, changing background color can have a huge impact. Do let us know in the comments how this feature benefited you.
The post How To Change Google Docs Background Color appeared first on Gtricks.


If you stream videos often, then you must know how important it is to speed up or slow down videos. For example, if you are watching a tutorial, then speeding it down can make it very easy to follow it. Similarly, when you need to quickly go through familiar instructions without skipping anything, then speeding up videos can be very productive.
Even though popular video streaming websites like YouTube have a built-in controller to control video speed, still many websites don’t support video speed controls. And this is where a Chrome extension can help you get access to video speed controllers on any video online even if the streaming website doesn’t support it. In this post, I am going to show you how you can use this Chrome extension to get speed controls on all videos.
Video Speed Controller is a Chrome extension that adds small overlay buttons at the top-left corner of the video player to control video speed. It works with all HTML5 video players, which most of the streaming websites support today. You can even use it to control the playback of the video and easily rewind or forward it using custom intervals.
One thing I really like about this extension is that it is very customizable. You can easily customize speed and playback speed intervals according to your need. For example, if you want the speed to increase by 30% with each click, then it can be adjusted in the settings.
As I said before, the extension ads overlay buttons on the video you are viewing. It will be a small button that will show current speed and will expand to reveal more buttons when you click on it. You can click the double arrow buttons to rewind/forward the videos, and click the minus/plus buttons to increase/decrease video speed.

Now if you want to access the customization options of the extension, then click on the extension button and select “Settings” from it. In the first section, you can assign shortcut keys to the functions and increase/decrease the change interval for each function. And there is more than just speed and playback control shortcuts here. Here you can also assign shortcuts to reset speed, default speed, mute, pause, or even move to a set duration in the video.

In the second section, you can make basic changes like hide controller, controller opacity, audio controls, and set default playback speed. However, the more interesting feature here is the ability to create a list of websites on which the extension will not work. If there are some websites that offer better video speed controls or don’t work well with the extension, then you may add them to this list to disable the extension on them.

Video Speed Controller is definitely a very useful Chrome extension if you need to speed up or slow down videos often. I would say it is better to use it even on websites like YouTube as it offers easier access to video speed controls. The ability to adjust how much speed should decrease/increase is also a great incentive.
If you found this extension to control video speed useful, do share your experience in the comments below.
The post Use This Video Speed Controller Extension To Control Video Speed in Chrome appeared first on Gtricks.

