How To Add a Custom Background in Gmail

Gmail comes with hundreds of background themes to beautify your interface. Although there are sufficient wallpapers, but if you want to add a little personal touch, then you can add your own custom backgrounds as well. Whether you want to add a wallpaper that isn’t available in the Gmail collection or you want to add your own picture as a background, all can be done.

In today’s post, I am going to show you how to add a custom background in Gmail.

Adding a custom background in Gmail

Gmail uses your albums saved in Google photos as background, and interestingly, it doesn’t give you the option to separately upload pictures. Therefore, you must upload your background pictures to Google photos and also create an album, because Gmail only accepts pictures in albums for some reason. So make sure the background Pictures are saved as an album in your Google photos account. if you don’t know how to do it; here is a support page by Google explaining it.

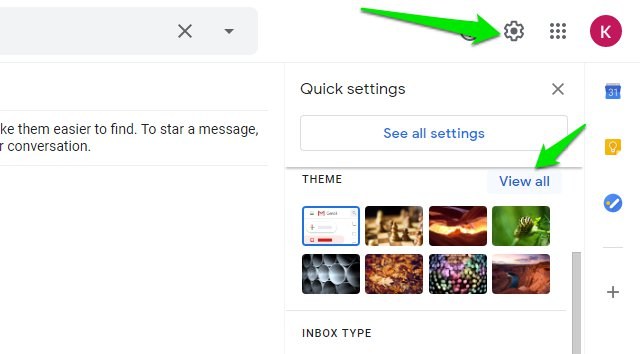
To set the custom background in Gmail, click on the “Gear” icon at the top-right corner and then click on “View all” in the “Theme” section.

Gmail view all themes

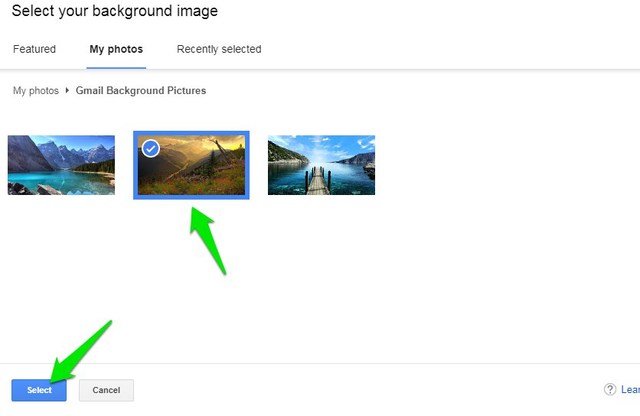
Afterward, click on the “My photos” button at the bottom-left corner.

My photos

You will see all your albums here, just open the album and choose the background photo and then click on “Select”.

Select Background picture

That’s it, the background will be applied and your selected picture will show up in your list of themes.

Custom background applied

For the best results, you should use a 2560 x 1920p or higher resolution picture. If the picture will be smaller than this, then Gmail will zoom in and apply the background as it finds fitting.

And just like regular themes, you can also customize your custom background picture from the “Pick your theme” section, such as add vignette or blur the background.

Ending words

Adding a custom background in Gmail is definitely a great way to personalize your interface. Although, it would have been easier if Gmail would just let us upload a picture and apply it. Creating an album in Google photos is just an extra chore we have to go through.

The post How To Add a Custom Background in Gmail appeared first on Gtricks.


via Gtricks https://ift.tt/3hFLjyY

[Tip] How to Disable Tab Groups Feature in Google Chrome

https://ift.tt/eA8V8J Tab Groups feature is a new feature introduced in Google Chrome web browser which allows users to organize and arrange tabs... The post [Tip] How to Disable Tab Groups Feature in Google Chrome first appeared on AskVG.

Read the full article at AskVG.com

via AskVG https://ift.tt/2QtYbfs

[Tip] Enable “New” Tag or Badge on Menu Items in Google Chrome

https://ift.tt/eA8V8J Just like Windows 10 shows "New" tag or badge on newly installed programs and apps in Start Menu, Google Chrome team... The post [Tip] Enable "New" Tag or Badge on Menu Items in Google Chrome first appeared on AskVG.

Read the full article at AskVG.com

via AskVG https://ift.tt/2YGfmit

[Tip] Enable 2-Line Title UI for URL Suggestions in Google Chrome Address bar

https://ift.tt/eA8V8J The latest stable version of Google Chrome 85 and later versions come with a hidden secret address bar feature which is... The post [Tip] Enable 2-Line Title UI for URL Suggestions in Google Chrome Address bar first appeared on AskVG.

Read the full article at AskVG.com

via AskVG https://ift.tt/2Emm0Uc

How To Forward an Email in Gmail Without Showing Original Sender

If you forward an email in Gmail, it will show all the connected information like sender email, time, and subject, etc. However, what if you don’t want the recipient to know that you are forwarding the email? Or maybe you don’t want the recipient to know where the email came from.

If it’s only a text email, you can just copy it and compose a new email. Although it will be tough to copy it if it contains graphical content like images, themes and buttons, etc. That is when you can just forward it, but remove all the connected information about the sender. Let’s see how you can forward emails without showing original sender information.

Forward email without sender information

There are basically two types of information that you must remove to make the email look like it’s coming directly from you. First you need to remove the “Forwarded message” section that contains information directly connected to the original sender, such as name and time, etc. And then you should remove the “Subject” of the email as it may give away that the email has been forwarded (not necessarily though). Here’s how:

After opening the email, click on the three vertical dots menu on the right side and select “Forward” from it.

Forward email in Gmail

A compose window will open below with a “Forwarded message” section at the top. Use the backspace key to remove all information in this section, including the “Forwarded message” heading. You should also remove any empty space created there to make sure the original email starts from the top.

Remove forwarded message

Afterward, click on the “Type of response” button next to “Recipients” and select “Edit subject”.

Edit email subject

The email will open in a new compose window and here you can change the subject and add the recipient’s email address to send the email.

Remove subject

In the below screenshot, you can see that it looks like that email has been sent directly by me. There is no forwarding information anywhere.

Forward email without sender information

Wrapping up

I will recommend you to stick with copying text if the email only contains plain text. There is no need to go through 2-3 extra steps just to forward an email without sender information. Although for emails with even slight graphical content, it’s better to forward it like I have instructed above.

The post How To Forward an Email in Gmail Without Showing Original Sender appeared first on Gtricks.


via Gtricks https://ift.tt/32umorw

Download Google Chrome Full Standalone Offline Installer

https://ift.tt/eA8V8J UPDATE: Direct download links of offline installers updated for the latest Google Chrome 85.0 version. NOTE: The download links given in...

Read the full article at AskVG.com

via AskVG https://ift.tt/2Yw3gIw

[Windows 10 Tip] Remove “Share with Skype” Option from File Context Menu

https://ift.tt/eA8V8J Recently when I upgraded to latest Windows 10 version, I noticed a new option added to all files context menu (the...

Read the full article at AskVG.com

via AskVG https://ift.tt/3gwNP9b

Microsoft 365 (Office) Insider Preview Build 19727.20000 (Version 2603) Released, Here is What’s New and Fixed

UPDATE: Microsoft 365 Insider (previously known as Office Insider) Preview build 19727.20000 (version 2603) is available for download and in...