Showing posts with label Tricks. Show all posts

Organize Gmail Inbox to Always Show What Matters to You The Most

I have always used the default Gmail inbox style where your social and promotional emails are separate from your other emails. However, recently I switched to the priority inbox style and it has completely changed the way I interact with emails.  Previously, I didn’t even open the social and promotions tab usually and missed many interesting emails, but now everything that matters to me stays in front of me.

If you also want to stay on top of emails that are most important to you, then you should switch to priority inbox style. In this post, I will show you how to enable priority inbox in Gmail and how it can help you organize your emails.

Why choose priority inbox?

Before I tell you how to enable priority inbox, let’s see how it can help. Priority inbox basically creates a single inbox with multiple sections that you can scroll through. By default, it shows your important and unread emails in the first section, starred emails in the second, and everything else in the third section.

You can check his Google support page to learn how Gmail decides which email is important to you. And with the help of this smart algorithm, Gmail will always show you the most important unread emails on top; this includes all emails from promotions, social, direct, and other emails. And the less important emails are listed at the bottom in case you want to check them out.

The main takeaway is that it shows important emails from all the emails. Therefore, it will show you direct emails, promotional emails, social updates, and forum updates that Gmail thinks are important to you in one place. For example, it will show you a promotional email that interests you, which you might have missed if it stayed in the Promotions section. Furthermore, it also sorts by most important emails first, so if you receive dozens of emails daily, then you will handle the most important ones first.

Overall, the job of priority inbox style is to help you deal with the most important emails first and then the rest.

Enable priority inbox in Gmail desktop version

If you are ready to switch to priority inbox, then below are the instructions to enable it on the Gmail desktop version:

Click on the “Gear” icon at the top-right corner and then click on the “See all settings” button.

Gmail Settings

Here move to the “Inbox” tab and select “Priority Inbox” from the drop-down menu next to the “Inbox Type” option.
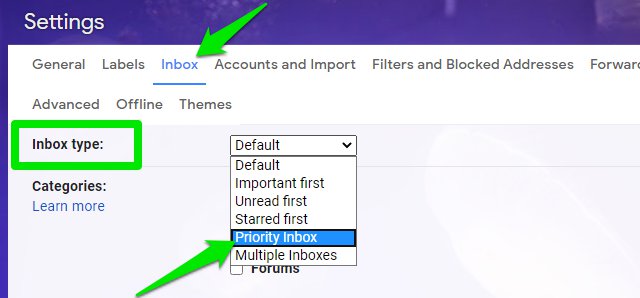
Select Priority inbox

There will be three sections selected by default, Important and unread, Starred, and Everything else. There is an option to add another section as well if you want.

You can click on the “Options” button next to any section to manage things like the total number of emails or type of email.
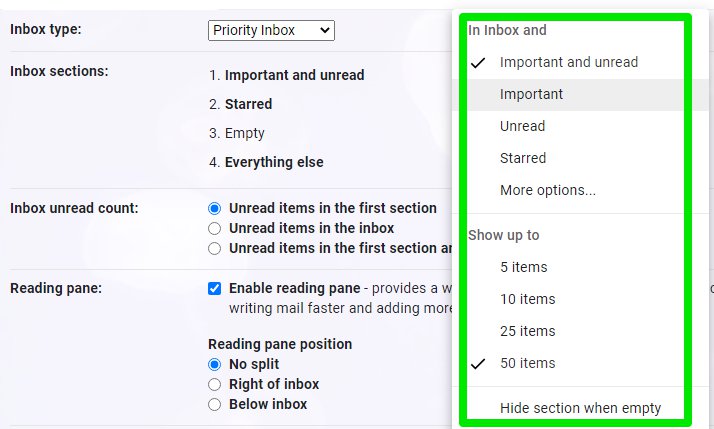
priority inbox options

Now click on the “Save Changes” button at the bottom and the priority inbox will be created with all your important emails at the top.

Tip: I have personally replaced the “Starred” section with the “Important” section as I don’t use the starred feature often. The “Important” section shows important emails that you have already read, so it helps me keep even read important emails in front of me. Although, I have decreased the number of emails to 10 only. You can also completely remove the “Important and unread” section to see both read and unread important emails at the top.

Enable priority inbox on Gmail mobile app

Priority inbox on Gmail Android or iOS app is a little different. It doesn’t have any customization options like manually selecting the email type or the number of emails. It also shows both read and un-read important emails, and you can’t change that behavior. Here’s how to enable priority inbox in Gmail mobile app.

Tap on the main menu button at the top-left corner and select “Settings” from it.

Now tap on your email account, and then tap on “Inbox type” and select “Priority Inbox” from it.
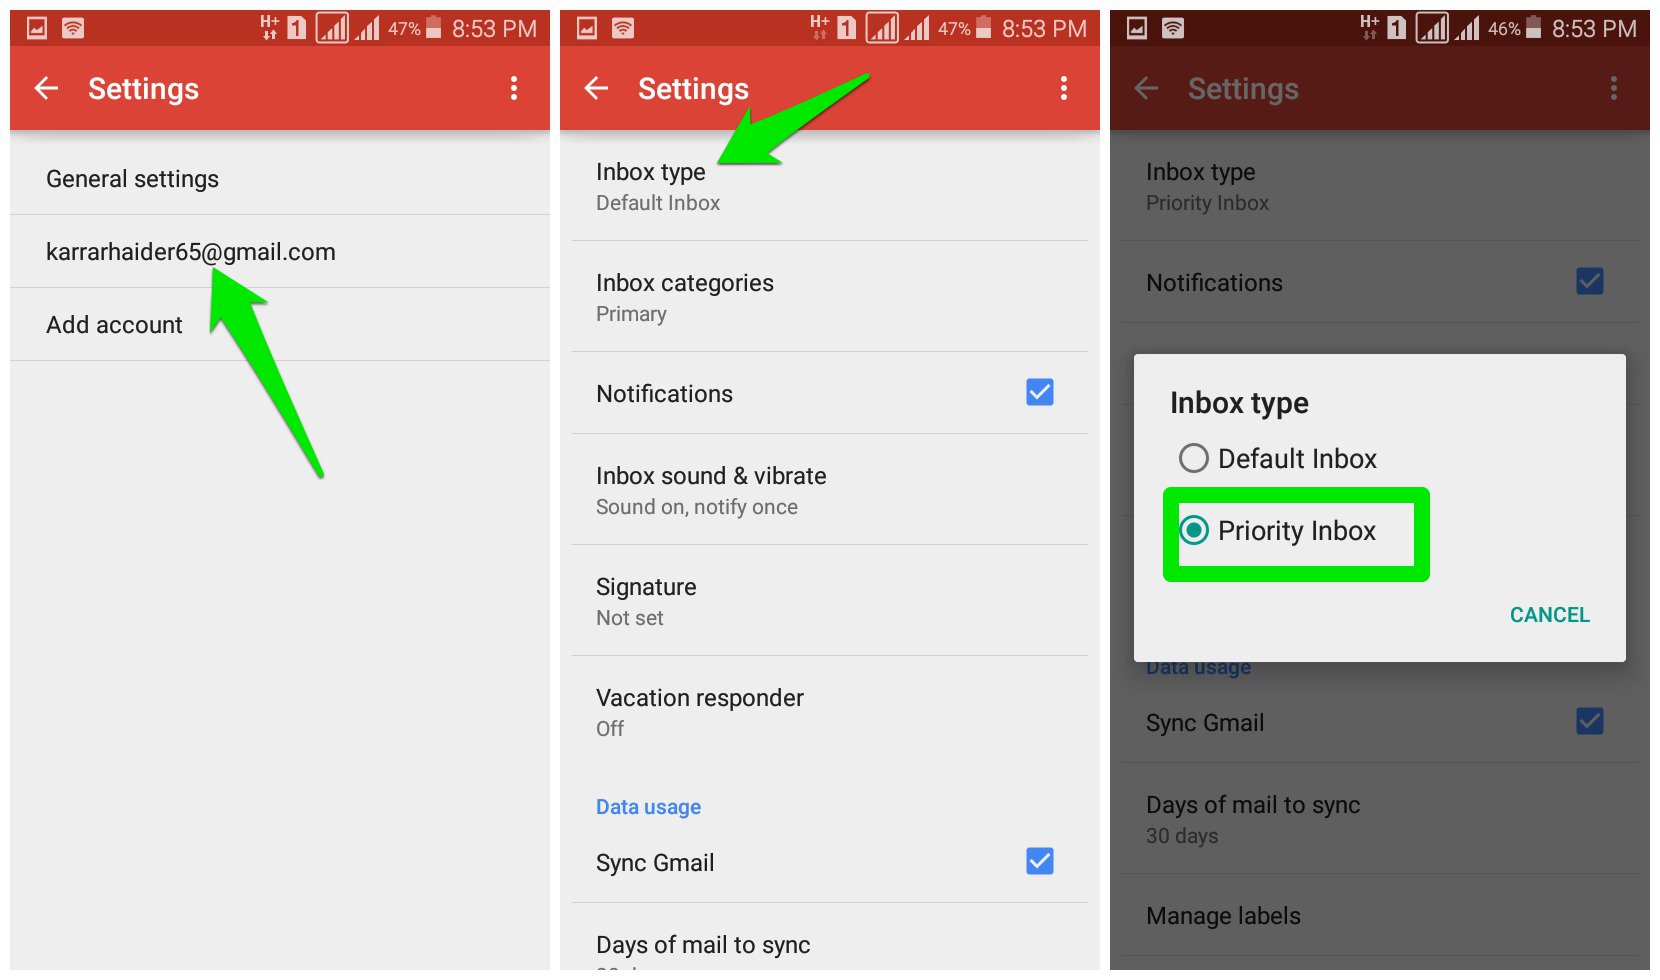
Enable priority inbox in Gmail mobile app

Afterward, both your regular inbox and priority inbox will be accessible from the main menu.

Ending thoughts

I know that you will wonder “what if Gmail makes a mistake and doesn’t show me an email from a friend because It doesn’t think it’s important”. Don’t worry, the Gmail algorithm is very good at managing priority, so a 50% discount on your favorite product will never take priority over a work document your colleague has shared.

What are your thoughts on using switching to priority inbox? Do let us know in the comments below.

The post Organize Gmail Inbox to Always Show What Matters to You The Most appeared first on Gtricks.


via Gtricks https://ift.tt/3aiCBUh

Here’s How To Set Default Video Quality On YouTube

YouTube default behavior is to automatically adjust video quality based on your internet connection speed. For example, if you are playing YouTube videos on the mobile network at peak time, then you’ll be part of the infamous 360p club. Although a stable wired connection should keep you above 720p.

However, what if you always want to play videos on YouTube in a specific quality? Say, you don’t mind waiting a little to let 1080p video buffer and then play, or maybe always play videos at 360p to save internet data. Whatever your reasoning may be, it’s possible to set default video quality on YouTube with the help of a Chrome extension. Let’s see how to do it.

Set default video quality on YouTube

YouTube used to let users set default video quality, but not anymore. Therefore, we will have to use a third-party Chrome extension that will automatically load videos in your specified quality. Although there are many extensions for this purpose, but I found Auto HD for YouTube to be the most reliable. It’s really simple to use and lets you select up to 4320p quality.

Just install the extension and click on the extension button. You will see a big list of all the YouTube supported resolutions from 144p to 4320p. Just click on the one you want to set as default and all your next videos will open at the specified video quality.

Auto HD For YouTube

Of course, if a video doesn’t support the quality you have selected, then it will play at the next highest quality available instead. Furthermore, I also noticed that the extension sometimes didn’t work immediately. If you notice it not applying the selected video quality, then play 2-3 different videos and it will start using the new changes.

Ending words

I personally use this extension to always play YouTube videos at 720p as my internet can easily handle it but YouTube still plays videos at 320p or 480p, I don’t know why. If you ever feel like letting YouTube handle the video quality again, you can select the “Auto” option in the extension. Do let us know in the comments if you found this extension useful.

The post Here’s How To Set Default Video Quality On YouTube appeared first on Gtricks.


via Gtricks https://ift.tt/3kiMdmq

5 Must-Have Android Apps For Farmers For a Better Yield

Keeping up with the latest advancements in agriculture and implementing them is necessary for farmers to get the best yield. If you are a farmer or looking to get into farming, then I know just the right tools to help you keep up with the latest agriculture trends and help you achieve a better yield.

There are many apps on Google Play Store that can help farmers with farming. From farming education to help with creating a virtual crop map, there are enough farming apps to suit your needs. Today, I will introduce 5 Android apps for farmers that you should know if you want the best results.

1. Crop Farmers App

Starting with a farming education focused app. This app provides information about crops, fruits, and vegetables, including climate, soil requirements, and harvesting details. And not only growing them but also protecting them from pests and diseases. You just need to select the item you want to learn about and all details will be listed with pictures.

Crop Farmers App

Not only it provides information about your yield, but it also offers tips on how to improve your yield.

2. Plantix

If you notice your crops infected by a disease or pests, then Plantix can both identify the problem and provide a solution to fix it. Plantix is basically your crops doctor, you just need to take a picture of the infected crop, and Plantix will recognize the damage pattern and provide a solution.

Plantix

It will even recognize deficiencies in crop health and provide tips to grow a healthier crop. If the automatic help isn’t enough, you can also join and share your problems with the Plantix community to get help.

3. BoosterAgro

Another app to help keep the health of your crops in check. BoosterAgro protects your crops by offering accurate climate forecasts using multiple weather forecast sources. It can even tell you important weather information around the exact position of your field, including temperature, wind gusts, humidity, rain, and more.

BoosterAgro

Apart from required weather information, it also provides alerts regarding pests and diseases that are infecting crops near your area (if available).

4. Farmer’s Income & Expense Manager

This is a very simple income and expense manager app specifically made for farmers. You just need to make an entry for any expense and income you make and the app will keep a record and show analytics data according to it. You can add a title to each expense or income and sort accordingly. The app also has a reminder feature to remind you to make an entry if any new expense or income has happened.

Farmer's Income & Expense Manager

5. Soil Sampler

Soil sampling should be done at least once every two years before plant seeding and fertilizing. This app simply makes the process faster by creating a virtual map of your field. You can use this app to create a virtual map of your field by hand or going around your field using GPS. Afterward, create points on the map from where you need to take samples, and then the app will guide you to make sure you take samples optimally.

Wrapping up

The education and real-time help these apps for farmers can provide you will definitely help increase your average yield. Apart from more profits, these apps will also take much of the burden off of your shoulders and make farming easier.

Let us know in the comments if you found these apps useful for farming.

The post 5 Must-Have Android Apps For Farmers For a Better Yield appeared first on Gtricks.


via Gtricks https://ift.tt/2DGE9ek

Two Simple Methods To Take YouTube Videos Screenshot

Although you can share YouTube videos at any frame, but if you just want to share a single frame as a picture, then you’ll have to take a screenshot of the video. A simple way to do this is to make the YouTube player full screen and take the screenshot using your preferred screenshot software.

However, it can be cumbersome to go through multiple hoops just to get a screenshot and possibly affect the quality as well. This is where a dedicated YouTube screenshot taking tool will help you, and in this post, I’ll show you two ways to take YouTube videos screenshot.

Method #1: Use screenshot Chrome extension for YouTube videos

The easiest and my recommended solution is to use a dedicated Chrome extension that will take screenshots of YouTube videos on demand. If you need to take a screenshot often and in high quality, then a Chrome extension will smooth out the process and let you take screenshots with a single click.

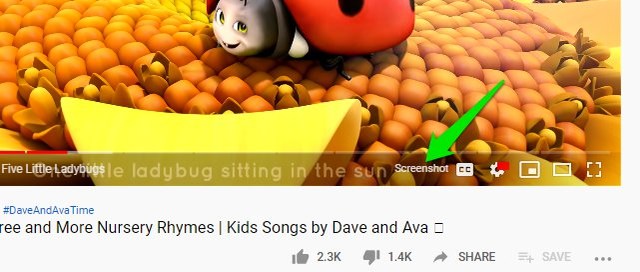
For this purpose, Screenshot YouTube is a great Chrome extension that will add a “Screenshot” button right on the YouTube player to take a screenshot. After installing, just refresh the page and you will see a new “Screenshot” button next to the “Settings” button. Click on it and a screenshot will be taken and saved in the default downloads folder. Although you can take a screenshot of videos while playing, but I’ll recommend you to pause the video first to get the perfect frame.

YouTube screenshot Chrome extension

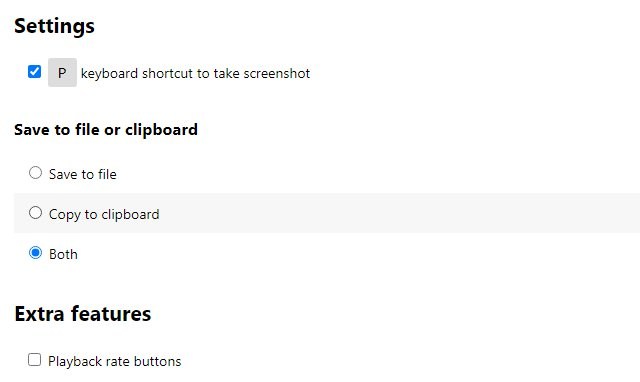
If you look into the options of the extension, you can enable the keyboard shortcut key to quickly take screenshots. Furthermore, you can also decide to download the picture directly or copy it to the clipboard, or both.

Extension settings

The size of the screenshot depends on the quality in which you are playing the video. For example, 1080p FHD will generate 1920×1080 resolution image and 720p SHD will generate 1280×720 resolution image.

Method #2: Use an online screenshot website

If you don’t need to take YouTube videos screenshots often or just don’t want to install a third-party program in your browser, then you can also use an online website to take YouTube screenshots. It might require some extra steps, but it’s a possible solution worth knowing. YouTube Screenshot is a reliable website for this purpose which is easy to use and completely free.

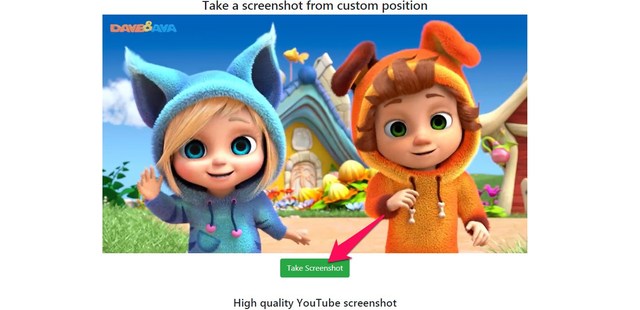
Just copy and paste the URL of the YouTube video in the search bar of the website and click on the “Show screenshots” button. The website will play the video in its own player with a “Take Screenshot” button below it. Just navigate to the part of the video of which you want to take a screenshot and click on “Take Screenshot”.

Take screenshot

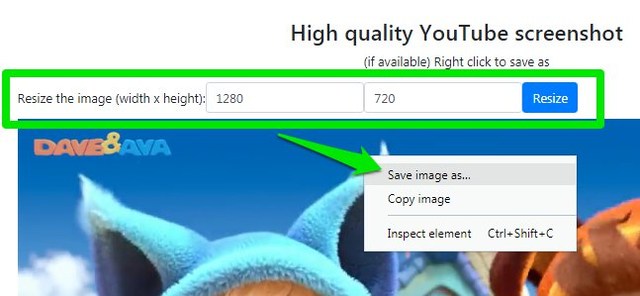
An option to resize the image will show up, here change the image size if needed. Afterward, right-click on the image and click on “Save image as” option to save it.

Resize and save screenshot

That’s it, the screenshot will be saved in your PC and you can upload it anywhere you like.

Ending words

In my opinion, using the Screenshot YouTube extension is a much better solution. It’s really easy and fast to use and makes it easier to both save the screenshot or quickly paste it online. Although YouTube Screenshot website has its uses as well and should be a solution worth considering.

Let us know in the comments if you found these methods to take screenshots of YouTube videos useful.

The post Two Simple Methods To Take YouTube Videos Screenshot appeared first on Gtricks.


via Gtricks https://ift.tt/2Xr905Q

2 Bulk URL Opener Chrome Extensions To Bulk Open URLs

It can be quite cumbersome if you need to open dozens of links one by one. If you deal with multiple links often, then you might be interested in getting a multiple URL opener tool. Thankfully, you can easily do this right inside your Chrome browser using a simple Chrome extension.

In my experience, there are two instances where you need to open URLs in bulk. Either you need to open multiple links on a page quickly, or have a list of URLs that you would like to open at a particular time — like before starting work. Therefore, I have selected 2 multiple URL opener Chrome extensions that will help in both of these instances.

Linkclump — Open multiple URLs on a page quickly

Linkclump lets you open multiple links on a page by simply highlighting them. The extension works using a keyboard shortcut and predefined rules, so you should go to its options first to customize it.  In the options, click on the “Edit” button under the “Actions” section.

edit options

By default, it uses the “Z” key+left mouse button to start the highlighter to highlight URLs. You can change the key binding here if you are already using the Z key for something else.

Activation options

You can also change the default action to open the links in a new tab or a new window. Although unrelated, you can also choose to bookmark or copy links in bulk using this extension.

Actions

There are also a bunch of advanced options like exclude links with specific words, manage delay between opening links, and manage links opening order. There is a “smart select” feature as well that is supposed to exclude less important links. I honestly don’t know what algorithm it uses to differentiate between important and less important links, but for me, it opened up all the links that were selected. If you found this feature useful, do let me know in the comments. I am currently keeping it disabled to have full control.

Advanced options

To open multiple links on a page, simply hold the Z key (default) and click and drag the left mouse click to highlight all the links. The identified links will be highlighted in red and when you will leave the mouse click, all of them will open.

Tip: If you change your mind while highlighting, instead of undoing the highlight, just leave the keyboard shortcut key and the URLs will not open when you will leave the click.

Bulk URL Opener — Create URL lists to open on demand

Bulk URL opener lets you create a list of URLs that you can open with a single click. You can create multiple lists and manage them right from the extension button. When you will click on the extension button, it will automatically create a list of all the open tabs. This is very useful if you need to create the list out of currently opened tabs.

Current tabs list

To create a list, add your URLs per line in the text box and click on the “New List” button at the bottom. On the next page, you can give a name to the list and save it.

Create new list

All your lists can be accessed from the “Your saved lists” section. And you can edit them any time you like, or even permanently delete them.

load saved lists

You can also click on the gear icon to access extension settings. There are a bunch of options to customize your experience, such as adding delay to new tabs, managing non-URLs, import/export lists, and much more.

To bulk open URLs, just load the list and click on the “Open Links” button to immediately open all of them in your browser.

Ending thoughts

Both of these extensions work fine for their intended purpose, just pick the one according to your need. Better yet, you can install both the extensions to use a simple trick to create URL lists easily. The trick is to use the copy feature of Linkclump extension to copy URLs in bulk and then paste them in the Bulk URL Opener to quickly create a list. You can also open links on pages with Linkclump and then let Bulk URL Opener create a list out of them.

Let us know in the comments if you found these extensions to bulk open URLs useful.

The post 2 Bulk URL Opener Chrome Extensions To Bulk Open URLs appeared first on Gtricks.


via Gtricks https://ift.tt/316fxUJ

Tired of Newsletter Spam in Gmail? Here’s How To Bulk Unsubscribe Emails

There is no way to tell before subscribing whether a newsletter will be useful or just annoying spam emails to buy their products. If you subscribe to newsletters often, then there is a good chance your inbox is filled with useless emails. Although you can manually unsubscribe from emails, but it can be quite tiring to do it one by one when you have dozens of subscriptions.

No worries though, with the help of a simple Chrome extension you can get rid of all the unwanted newsletter emails and prevent future emails coming from the specific addresses. In this post, I’ll show you how to do it.

Bulk unsubscribe emails in Gmail

Unroll.me used to be one of the most popular services for this purpose, but their user data selling scandal made many users doubt their service and started looking for alternatives. To serve a similar purpose, HelpNinja has recently introduced a Chrome extension that can help get rid of newsletters without putting your data at risk.

Unsub by HelpNinja works on the browser side to manage your emails, so no data is transferred to the servers. However, it doesn’t actually unsubscribe you from emails, instead, it achieves a similar goal but in a different way. When you unsubscribe using this extension, it simply creates a new label and moves all the emails from the said newsletter to this label; both current and future emails.

You aren’t actually unsubscribed from the newsletter, but it will never come in your way. In my opinion, it’s actually better than unsubscribing. This way, you can access these emails in the future just by visiting the label where they are saved. Furthermore, this also hides all the previously saved emails, so it also cleans up your main inbox.

If you are up for it, let’s see how you can use this Chrome extension to unsubscribe from emails.

How to use Unsub by HelpNinja

HelpNinja offers this Chrome extension completely free, unlike their other services. Just install Unsub in Chrome and follow the below instructions:

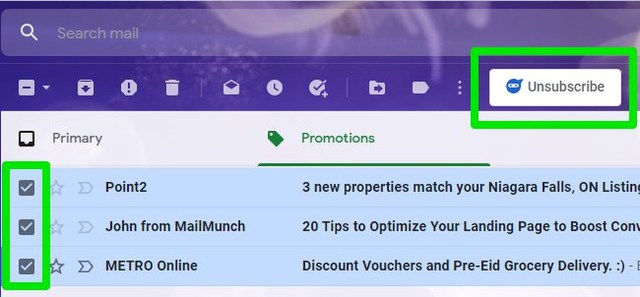
Open Gmail and you will see a new “Unsubscribe” button at the top. Just click on the “Select” checkbox next to the emails from which you want to unsubscribe and then click on this “Unsubscribe” button.

Bulk unsubscribe emails in Gmail

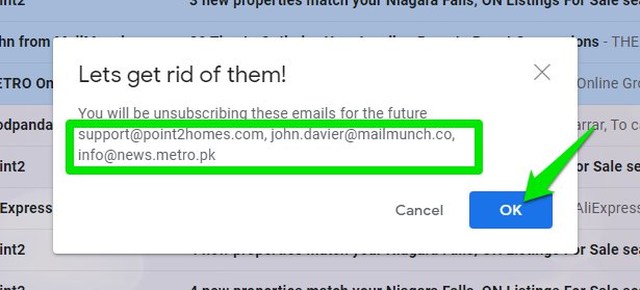
A prompt will show up listing all the email addresses from which you will be unsubscribing.

Email list

When you will confirm this prompt, all the emails will be moved to a new label called “HNGUnsubscribed” that you can find under the “More” option. Future emails will go to this label as well.

Unsubscribed emails label

Ending words

Unsub is a great unsubscribing tool if you are concerned about privacy as it simply redirects the emails to a different label instead of reading email content and unsubscribing directly. As long as you are not looking into the new label, all the annoying newsletters are as good as gone. I should also mention that you can use this extension to redirect emails from regular users as well.

The post Tired of Newsletter Spam in Gmail? Here’s How To Bulk Unsubscribe Emails appeared first on Gtricks.


via Gtricks https://ift.tt/30Xgxua

[FIX] Account Picture Error Code 0x80070520 in Windows 11

If you are getting “Account picture error, this picture couldn’t be saved” message with an error code 0x80070520 while trying to change your...